1. Introducción
Gracias por la compraasing the Makita 14.4V Cordless Driver Drill MDF347DS. This manual provides essential information for the safe and efficient operation, maintenance, and troubleshooting of your tool. Please read this manual thoroughly before use and keep it for future reference.
2. Instrucciones de seguridad
Siga siempre las precauciones básicas de seguridad para reducir el riesgo de incendio, descarga eléctrica y lesiones personales. Mantenga su área de trabajo limpia y bien iluminada. No opere herramientas eléctricas en atmósferas explosivas, como en presencia de líquidos, gases o polvo inflamables. Mantenga a los niños y a otras personas alejados mientras utiliza una herramienta eléctrica.
2.1. Seguridad ELECTRICA
- Evite el contacto del cuerpo con superficies conectadas a tierra, como tuberías, radiadores, estufas y refrigeradores.
- No exponga las herramientas eléctricas a la lluvia ni a condiciones húmedas. Si entra agua en una herramienta eléctrica, aumentará el riesgo de descarga eléctrica.
2.2. Seguridad personal
- Utilice siempre protección para los ojos y los oídos al utilizar la herramienta.
- Vístase adecuadamente. No use ropa suelta ni joyas. Mantenga el cabello, la ropa y los guantes alejados de las piezas móviles.
- Manténgase alerta, preste atención a lo que hace y use el sentido común al operar una herramienta eléctrica.
2.3. Uso y cuidado de las herramientas eléctricas
- No fuerce la herramienta eléctrica. Utilice la herramienta eléctrica correcta para su aplicación.
- Desconecte el paquete de baterías de la herramienta eléctrica antes de realizar cualquier ajuste, cambiar accesorios o almacenar herramientas eléctricas.
- Guarde las herramientas eléctricas que no utilice fuera del alcance de los niños y no permita que personas que no estén familiarizadas con ellas o con estas instrucciones las utilicen.
2.4. Uso y cuidado de la herramienta con batería
- Recargue únicamente con el cargador especificado por el fabricante.
- Utilice herramientas eléctricas únicamente con paquetes de baterías específicamente designados.
- Cuando la batería no esté en uso, manténgala alejada de otros objetos metálicos que puedan hacer una conexión de un terminal a otro.
3. Producto terminadoview
The Makita MDF347DS is a 14.4V cordless driver drill designed for both drilling and screwdriving applications. It features a durable construction, a 2-speed mechanical gear, a 16-stage clutch plus direct drive, and a keyless chuck for easy bit changes.

Figure 3.1: Main Components of the Driver Drill
This diagram illustrates the key components of the Makita MDF347DS driver drill, including the Tightening Force Adjustment Ring (Clutch Ring), Drill Chuck, Trigger Switch, Battery, Speed Change Lever, and Forward/Reverse Rotation Change Lever.
3.1. Componentes
- Tightening Force Adjustment Ring (Clutch Ring): Used to select the desired torque setting for screwdriving or the drill mode for drilling.
- Portabrocas: Holds the drill bits or screwdriver bits securely. Features a keyless design for quick changes.
- Interruptor de gatillo: Activates the tool and controls the rotational speed (variable speed).
- Batería: Provides power to the tool. This model uses a 14.4V slide-type Li-ion battery.
- Speed Change Lever: Allows selection between high-speed and low-speed modes.
- Forward/Reverse Rotation Change Lever: Controls the direction of rotation (forward for tightening, reverse for loosening).
4. Contenido del paquete
Al abrir el paquete, asegúrese de que todos los artículos estén presentes y sin daños:
- Makita 14.4V Cordless Driver Drill MDF347DS Unit
- 1.5Ah Lithium-ion Battery (BL1415G type)
- Cargador de batería
- Estuche de transporte
- +Bit 2-65 (Screwdriver bit)
- Manual de instrucciones (este documento)
5. Configuración
5.1. Instalación y extracción de la batería
To install the battery, align the battery pack with the grooves in the tool's handle and slide it in until it clicks into place. To remove, press the release button on the battery pack and slide it out.
5.2. Carga de la batería
Insert the battery pack into the charger. The charging indicator light on the charger will show the charging status. Refer to the charger's instruction manual for detailed charging procedures and indicator meanings.
5.3. Bit Installation and Removal (Keyless Chuck)
To install a bit, rotate the chuck counter-clockwise to open the jaws. Insert the bit fully into the chuck, then rotate the chuck clockwise to tighten the jaws securely around the bit. Ensure the bit is centered and firmly held. To remove, rotate the chuck counter-clockwise to loosen the jaws and pull the bit out.
6. Instrucciones de funcionamiento
6.1. Power Switch (Trigger Switch)

Figure 6.1: Trigger Switch
The trigger switch controls the power and speed of the drill. Pressing the trigger switch activates the tool. The speed is variable; pressing the trigger further increases the rotational speed.
The tool is equipped with a variable speed trigger switch. The rotational speed increases as you press the trigger further. Release the trigger to stop the tool. For safety, always ensure the forward/reverse rotation switch is in the neutral position when not in use or when changing bits.
6.2. Rotación hacia adelante/atrás
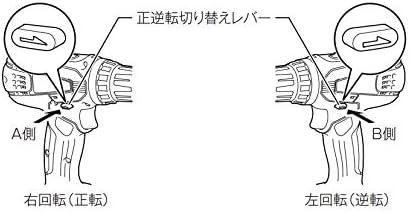
Figure 6.2: Forward/Reverse Rotation Change Lever
This diagram illustrates the positions of the forward/reverse rotation change lever. Pushing the lever to the 'A Side' (left) sets the tool for right rotation (forward), used for tightening screws. Pushing it to the 'B Side' (right) sets it for left rotation (reverse), used for loosening screws.
The forward/reverse rotation change lever is located above the trigger switch. Push the lever from the left side for forward rotation (clockwise, for tightening screws). Push the lever from the right side for reverse rotation (counter-clockwise, for loosening screws). When the lever is in the center position, the trigger switch is locked, preventing accidental startup.
6.3. Selección de velocidad

Figure 6.3: Speed Change Lever
This diagram shows the speed change lever. Position '1' is for low speed, suitable for heavy-duty applications or larger screws. Position '2' is for high speed, ideal for faster drilling or smaller screws.
The speed change lever is located on top of the tool. Slide the lever to position '1' for low speed (0-400 RPM) or to position '2' for high speed (0-1,400 RPM). Always ensure the tool has come to a complete stop before changing the speed setting to prevent gear damage.
6.4. Ajuste del par de apriete (embrague)
The tightening force adjustment ring (clutch ring) allows you to select from 16 torque settings plus a drill mode. Rotate the ring to align the desired number with the arrow on the tool body. Lower numbers indicate lower torque, suitable for smaller screws or softer materials. Higher numbers provide more torque. The drill symbol (drill bit icon) bypasses the clutch for maximum torque, ideal for drilling applications.
6.5. Drilling and Screwdriving
- Para atornillar: Select a low-speed setting and an appropriate clutch setting. Start with a lower torque setting and increase if necessary to avoid overtightening or stripping the screw.
- Para perforar: Select the drill mode on the clutch ring and choose either high or low speed depending on the material and drill bit size. Use high speed for smaller holes and softer materials, and low speed for larger holes and harder materials. Apply steady, even pressure.
7. Mantenimiento
7.1. Limpieza
Limpie periódicamente las aberturas de ventilación de la herramienta para evitar el sobrecalentamiento. Utilice un paño suave y seco.amp cloth to wipe down the tool. Do not use strong detergents or solvents. Ensure the battery terminals are clean and free of debris.
7.2. Almacenamiento
Store the tool and battery in a cool, dry place, away from direct sunlight and moisture. Ensure the battery is partially charged (not fully discharged or fully charged) for long-term storage. Keep out of reach of children.
7.3. Cuidado de la batería
Avoid fully discharging the battery frequently. Recharge the battery before it is completely depleted. Do not store the battery in extreme temperatures. If the battery is not used for an extended period, charge it periodically to maintain its lifespan.
8. Solución de problemas
| Problema | Posible causa | Solución |
|---|---|---|
| La herramienta no arranca | Battery not charged or improperly installed; Forward/reverse lever in neutral position. | Charge battery and ensure proper installation; Move forward/reverse lever to forward or reverse position. |
| Potencia o velocidad reducida | Battery charge low; Overload; Incorrect speed setting. | Recharge battery; Reduce load; Select higher speed setting if appropriate. |
| La broca se tambalea o se cae | Bit not properly tightened in chuck; Damaged chuck. | Retighten bit firmly; If problem persists, chuck may need replacement. |
9. Especificaciones
| Característica | Especificación |
|---|---|
| Número de modelo | MDF347DS |
| Volumentage | 14.4 V CC |
| Tipo de batería | Iones de litio (1.5 Ah) |
| Tipo de mandril | Mandril sin llave |
| Capacidad del mandril | 0.8 - 10 mm |
| Par máximo | 30 N·m |
| Velocidad sin carga (alta) | 0 - 1,400 RPM |
| Velocidad sin carga (baja) | 0 - 400 RPM |
| Capacidad de perforación (acero) | 10 milímetros |
| Capacidad de perforación (madera) | 25 milímetros |
| Screw Tightening Capacity (Wood Screw) | φ5.1 x 63 mm |
| Screw Tightening Capacity (Small Screw) | M6 |
| Dimensiones (L x An x Al) | 198 x 83 x 235 mm |
| Peso neto (con batería) | 1.4 kilogramos |
| Accesorios incluidos | +Bit 2-65, Battery, Charger, Case |
10. Garantía y soporte
Warranty information for the Makita MDF347DS Cordless Driver Drill is not provided in the product details. For specific warranty terms, service, or technical support, please contact your local Makita authorized service center or the retailer where the product was purchased.
You can find contact information for Makita support on their official websitio: Oficial de Makita Websitio


