1. Introducción
This manual provides essential instructions for the safe and efficient setup, operation, and maintenance of your JEGS 20 Gallon Parts Washer. Please read this manual thoroughly before assembly or use to ensure proper function and to prevent injury or damage. Keep this manual for future reference.
The JEGS 20 Gallon Parts Washer is designed for cleaning and degreasing various small to medium-sized parts using appropriate cleaning solvents. It features a 20-gallon tub with a 12-gallon solvent capacity, a pump with a maximum output of 2.64-3.17 gallons per minute, and a heavy-duty steel construction with a powder-coated black finish.

Image: The lid of the JEGS Parts Washer, featuring the distinctive yellow JEGS logo on its black powder-coated surface.
2. Información de seguridad
ADVERTENCIA: El incumplimiento de estas instrucciones de seguridad puede provocar lesiones graves, incendios o daños a la propiedad.
- Always wear appropriate personal protective equipment (PPE) such as safety glasses and chemical-resistant gloves when operating the parts washer.
- Use only non-flammable or high flash-point solvents specifically designed for parts washers. DO NOT USE GASOLINE, KEROSENE, OR OTHER HIGHLY FLAMMABLE LIQUIDS.
- Ensure the parts washer is placed on a stable, level surface in a well-ventilated area.
- Keep the lid closed when the washer is not in use to prevent evaporation and contamination.
- Do not smoke or use open flames near the parts washer. Avoid sources of ignition.
- Desconecte la alimentación antes de realizar cualquier mantenimiento o limpieza.
- Keep children and unauthorized personnel away from the parts washer during operation.
- Dispose of used solvent according to local environmental regulations.
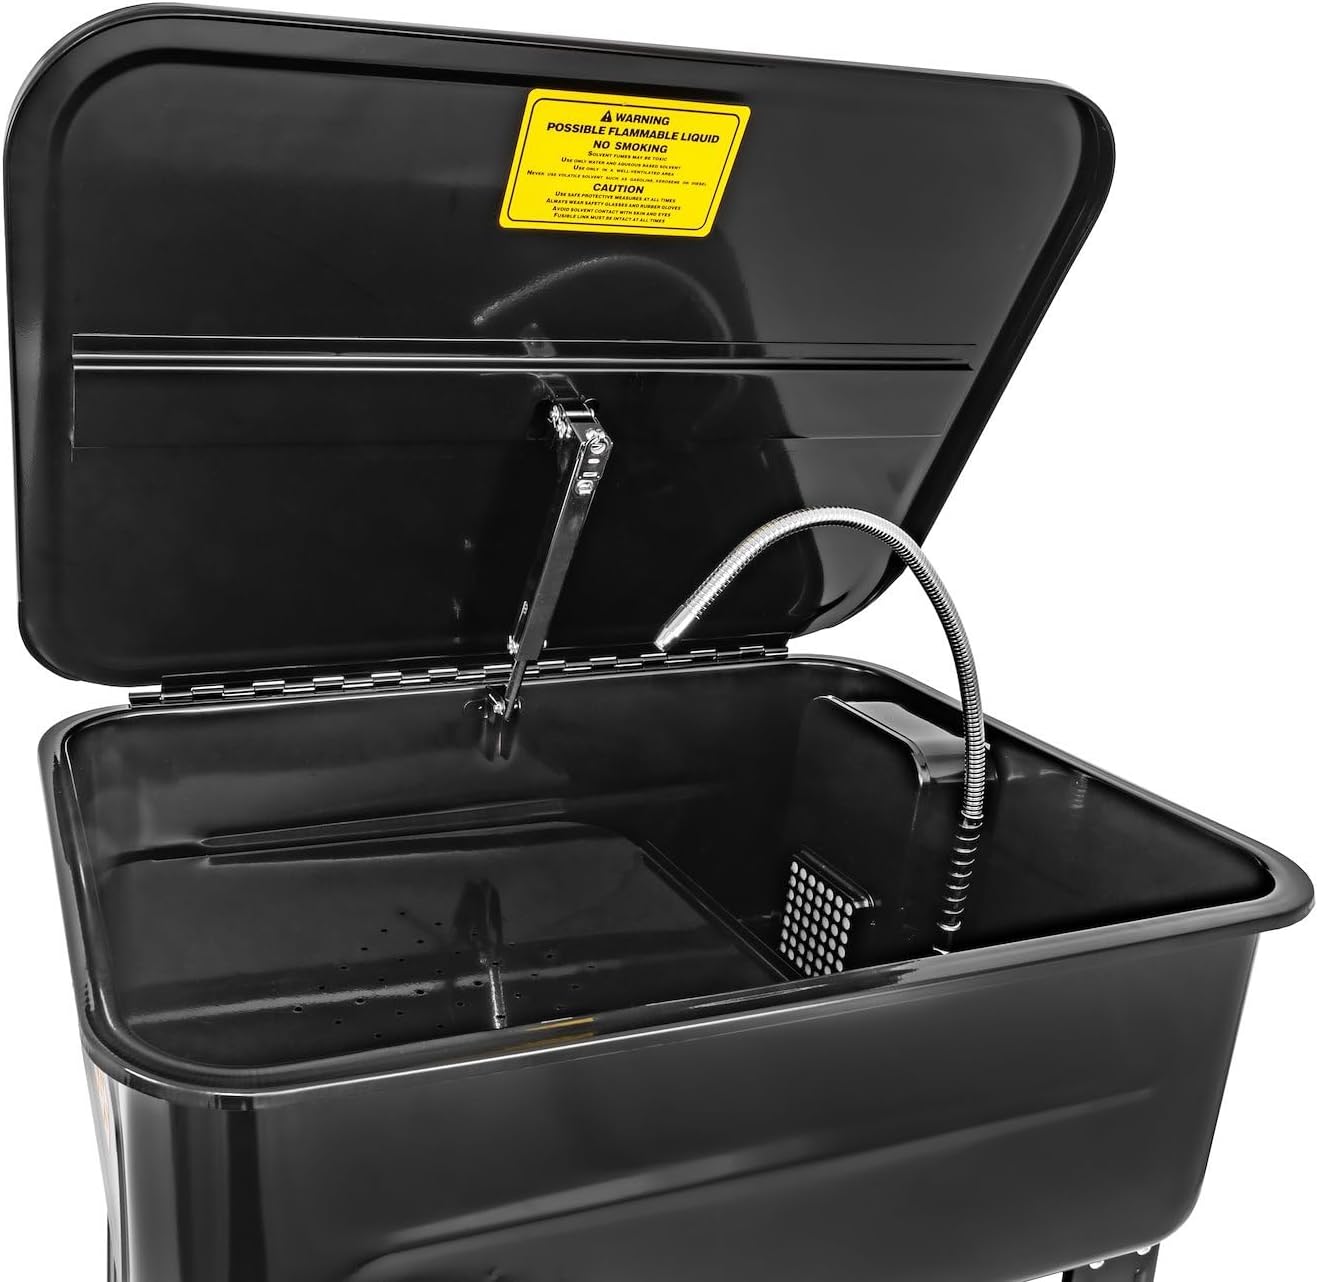
Image: Interior of the parts washer showing the flexible nozzle, removable tray, and a warning label affixed to the inside of the lid. The label warns about possible flammable liquid and no smoking.
3. Lista de piezas
Antes del montaje, verifique que todos los componentes estén presentes y sin daños.
- Parts Washer Tub with Lid
- Stand Assembly (Legs and Shelf)
- Electric Pump with Flexible Nozzle
- Removable Parts Tray
- Tapón de drenaje
- Hardware for Assembly (Bolts, Nuts, Washers)

Image: The fully assembled JEGS 20 Gallon Parts Washer, featuring the black tub, sturdy stand with a lower shelf, and the power cord with an integrated switch.
4. Configuración y montaje
4.1 Desembalaje
- Retire con cuidado todos los componentes del embalaje.
- Inspeccione todas las piezas para detectar cualquier signo de daño. Si alguna pieza está dañada o falta, no continúe con el montaje y contacte con atención al cliente.
- Keep packaging materials until assembly is complete and the unit is confirmed to be working correctly.
4.2 Montaje del soporte
- Attach the four legs to the main tub assembly using the provided bolts, nuts, and washers. Ensure all connections are secure.
- Install the lower shelf between the legs, securing it with the remaining hardware. This shelf provides additional stability and storage.
- Place the assembled stand and tub on a firm, level surface.

Imagen: Lateral view of the JEGS Parts Washer, illustrating the robust stand structure and the lower storage shelf.
4.3 Pump and Nozzle Installation
- Ensure the pump is correctly seated in its designated compartment within the tub.
- Connect the flexible nozzle to the pump outlet. Position the nozzle for optimal solvent flow during cleaning.
- Verify that the power cord and switch are easily accessible.
5. Instrucciones de funcionamiento
5.1 Filling the Washer
- Ensure the drain plug is securely in place.
- Pour the recommended parts washer solvent into the tub. The maximum solvent capacity is 12 gallons. Do not overfill.
- The solvent level should be sufficient to cover the pump intake, typically a few inches above the bottom of the tub, but below the top edge of the removable tray.
5.2 Procedimiento de limpieza
- Place the parts to be cleaned onto the removable parts tray. For smaller items, the tray helps prevent them from falling into the main tub.
- Plug the parts washer into a grounded electrical outlet.
- Turn on the power switch located on the side of the unit. The pump will begin to circulate the solvent through the flexible nozzle.
- Direct the flow of solvent onto the parts to wash away grease, oil, and grime. Use a brush if necessary for stubborn deposits.
- Allow cleaned parts to drip dry over the tub before removal.
- When finished, turn off the power switch and unplug the unit.

Image: Close-up of the parts washer interior, highlighting the removable parts tray and the adjustable flexible nozzle for directing solvent flow.
6. Mantenimiento
6.1 Limpieza de la unidad
- Regularly clean the interior of the tub and the removable tray to prevent buildup of sludge and debris.
- Limpie el exterior con un anuncioamp cloth. Do not use abrasive cleaners that could damage the powder-coated finish.
6.2 Solvent Replacement
- The solvent should be replaced when it becomes heavily contaminated or its cleaning effectiveness diminishes.
- To drain the solvent, place a suitable container under the drain plug, then remove the plug.
- Dispose of used solvent responsibly according to local environmental regulations.
6.3 Pump Care
- Periodically check the pump intake screen for blockages. Clean any debris to ensure proper solvent flow.
- If the pump's output decreases, check for kinks in the hose or blockages in the nozzle.
7. Solución de problemas
| Problema | Posible causa | Solución |
|---|---|---|
| La bomba no funciona. | No power; faulty switch; pump blockage. | Check power connection and outlet. Ensure switch is ON. Disconnect power and check pump intake for debris. |
| Low solvent flow. | Low solvent level; clogged pump intake; kinked hose. | Add more solvent. Disconnect power and clean pump intake screen. Straighten hose. |
| Solvent not cleaning effectively. | Solvent is old or heavily contaminated. | Replace solvent with fresh, clean solvent. |
8. Especificaciones
- Dimensiones del producto: 31 x 22 x 13 pulgadas
- Peso del artículo: 58 libras
- Tub Capacity: 20 galones
- Solvent Capacity: 12 galones
- Max Pump Output: 2.64-3.17 Gallons Per Minute
- Material de construcción: Acero de alta resistencia
- Finalizar: Recubierto de polvo negro
- Número de modelo (ASIN): B078WJB4X2
- Código postal: 889944086260

Imagen: Frente view of the JEGS 20 Gallon Parts Washer, showcasing su diseño compacto y robusto.
9. Garantía y atención al cliente
Specific warranty details for the JEGS 20 Gallon Parts Washer are not provided in this manual. For warranty information, technical assistance, or to order replacement parts, please contact JEGS customer support directly. Refer to the product packaging or the official JEGS webSitio para obtener información de contacto actualizada.
When contacting support, please have your model number (B078WJB4X2) and purchase date available.


