Introducción
Thank you for choosing the Genius GLT-85.4D 4-Channel Class-D Car Amplifier. This compact, high-performance amplifier is designed to deliver exceptional audio quality and power efficiency for your vehicle's sound system. This manual provides essential information for proper installation, operation, and maintenance of your ampLifier. Por favor, léalo detenidamente antes de intentar instalarlo o usarlo.
Información de seguridad
Observe siempre las siguientes precauciones de seguridad durante la instalación y el funcionamiento:
- Disconnect the vehicle's negative battery terminal before any electrical work to prevent short circuits.
- Ensure all wiring is properly insulated to prevent damage and electrical hazards.
- Montar el amplifier securely in a dry, well-ventilated area, away from direct sunlight, heat sources, and moisture.
- Utilice cableado de calibre apropiado para las conexiones de alimentación, tierra y altavoces tal como se especifica en este manual.
- No opere el ampSi el dispositivo está dañado o no funciona correctamente, consulte la sección de solución de problemas o busque asistencia profesional.
- Mantener el ampLificador lejos de los niños.
Contenido del paquete
Verifique que todos los artículos estén presentes en el paquete:
- Genius GLT-85.4D 4-Channel Ampmás vivaz
- Herrajes de montaje (tornillos)
- Manual de usuario (este documento)
Producto terminadoview
The Genius GLT-85.4D is a compact 4-channel Class-D amplifier designed for high efficiency and powerful audio output. Its nanotechnology and SMD components contribute to its small size and robust performance.
Amplificador superior View

Esta imagen muestra la parte superior view of the Genius GLT-85.4D amplifier, highlighting its compact design and the "GENIUS AUDIO" branding along with the model number "GLT-85.4D" and "1000wMax" power rating.
Control Panel Layout (Input Side)
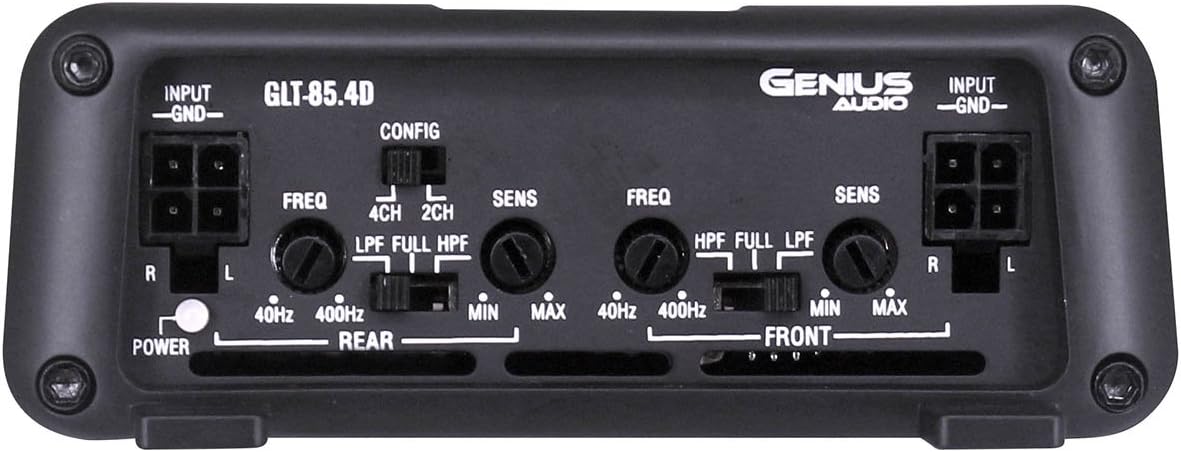
This image displays the input side of the GLT-85.4D amplifier, detailing the various controls and connections. It includes RCA input terminals (R, L) for both Rear and Front channels, gain controls (SENS MIN/MAX), frequency adjustment knobs (FREQ 40Hz-400Hz), and crossover switches (LPF, FULL, HPF) for both Rear and Front channels. A configuration switch (CONFIG 4CH, 2CH) is also visible, along with the Power indicator light.
Power and Speaker Terminal Layout (Output Side)

This image shows the output side of the GLT-85.4D amplifier, featuring the power and speaker terminals. From left to right, it includes the GROUND terminal, REMOTE turn-on terminal, +12V power terminal, and speaker output terminals for REAR BRIDGED (L+, L-, R+, R-) and FRONT BRIDGED (L+, L-, R+, R-) connections. The "4 Channel 'CLASS D' 2 ohm Stable Stereo Bridgeable MOSFET" text indicates key ampcapacidades de lificantes.
Configuración e instalación
Una instalación correcta es crucial para un rendimiento y una seguridad óptimos. Si tiene dudas sobre algún paso, consulte con un instalador profesional.
Ubicación de montaje
- Choose a location that is dry, well-ventilated, and protected from direct sunlight, excessive heat, and moisture.
- Asegúrese de que haya suficiente flujo de aire alrededor del ampLificador para una refrigeración adecuada.
- Montar el amplifier securely to a solid surface using the provided mounting hardware to prevent movement during vehicle operation.
Conexiones de cableado
Antes de realizar cualquier conexión, desconecte el terminal negativo de la batería del vehículo.
- Cable de alimentación (+12 V): Run a heavy-gauge power cable (e.g., 8 AWG or thicker, depending on total system power) directly from the positive terminal of the vehicle's battery to the +12V terminal on the amplificador. Instale un portafusibles en línea con un fusible apropiado (no suministrado) a menos de 45 cm (18 pulgadas) de la batería.
- Cable de tierra (GND): Connect a heavy-gauge ground cable (same gauge as power wire) from the GND terminal on the ampConecte el cable a una superficie metálica limpia y sin pintar del chasis del vehículo. Asegúrese de que la conexión sea sólida y de baja resistencia.
- Remote Turn-On Wire (REMOTE): Connect a remote turn-on wire (typically 18 AWG) from your head unit's remote output to the REMOTE terminal on the amplificador. Este cable señala el ampLificador para encender y apagar con su unidad principal.
- Cables de entrada RCA: Conecte los cables RCA desde el preamplificador de su unidad principal.amp outputs (Front and Rear) to the corresponding RCA input jacks on the ampmás duradero.
- Cables de altavoz: Conecte sus altavoces a la amplifier's speaker output terminals. Ensure correct polarity (+ to + and - to -). The GLT-85.4D supports 2-ohm stereo and 4-ohm bridged configurations. Refer to the "Power and Speaker Terminal Layout" image for terminal identification.
Nota: For bridged operation, connect the speaker to the designated bridged terminals (e.g., L+ and R- for a single channel in bridged mode). Consult a wiring diagram for specific bridged configurations.
Instrucciones de funcionamiento
Encendido inicial
- Después de realizar y verificar todas las conexiones, vuelva a conectar el terminal negativo de la batería del vehículo.
- Encienda la unidad principal. ampLa luz indicadora de encendido del amplificador debería iluminarse.
- Empecemos con el amplifier's gain (SENS) controls set to minimum.
- Play a familiar piece of music at a moderate volume level on your head unit.
Ajuste de controles
- Gain (SENS): Slowly increase the gain control for each channel until you hear distortion, then back off slightly. The gain control matches the ampSensibilidad de entrada del amplificador al volumen de salida de la unidad principaltage. It is not a volume control.
- Crossover (LPF/FULL/HPF):
- LPF (filtro de paso bajo): Allows only frequencies below the set point to pass. Typically used for subwoofers.
- HPF (filtro de paso alto): Allows only frequencies above the set point to pass. Typically used for full-range speakers to prevent low-frequency distortion.
- LLENO: Allows all frequencies to pass.
- Configuration (CONFIG 4CH/2CH): This switch determines how the input signals are routed to the ampcanales ificadores.
- 4 canales: Uses all four RCA inputs (Front L/R, Rear L/R) to drive the four output channels independently.
- 2 canales: Uses only the Front L/R RCA inputs and internally routes them to all four output channels. Useful if your head unit only has two pre-amp outputs but you want to power four speakers.
Recomendación: Fine-tune settings gradually and listen carefully to avoid speaker damage or poor sound quality.
Mantenimiento
- Mantener el ampLimpie el dispositivo con un paño suave y seco. No utilice productos químicos agresivos ni limpiadores abrasivos.
- Asegúrese de que el ampLas aletas de enfriamiento del elevador están libres de polvo y residuos para mantener una disipación de calor adecuada.
- Revise periódicamente todas las conexiones del cableado para verificar que estén bien apretadas y no presenten corrosión.
Solución de problemas
| Problema | Posible causa | Solución |
|---|---|---|
| Sin energía / Amplifier no se enciende |
|
|
| Sin sonido |
|
|
| Sonido distorsionado |
|
|
| AmpEl filtro se sobrecalienta |
|
|
Presupuesto
| Característica | Detalle |
|---|---|
| Modelo | GLT-85.4D |
| Canales | 4 |
| Ampclase más viva | Clase D |
| Max Power @ 12.6V | 1700 W |
| RMS Power Output (4 Ohm Stereo @ 12.6V) | 85W x 4 |
| RMS Power Output (2 Ohm Stereo @ 12.6V) | 120W x 4 |
| RMS Power Output (4 Ohm Bridged @ 12.6V) | 240W x 2 |
| Volumen mínimo de suministrotage | 8.5 V |
| Volumen máximo de suministrotage | 16.8 V |
| Idle Current Consumption @ 12.6VDC | 0.66A |
| Musical Max Current Consumption @ 12.6VDC | 31A |
| Dimensiones (L x An x Al) | 11.02 x 7.99 x 2.76 pulgadas |
| Peso del artículo | 3.5 libras |
Garantía y soporte
For warranty information, technical support, or service inquiries, please refer to the official Genius Audio webSitio web o contacte con el departamento de atención al cliente. Conserve su recibo de compra como comprobante para reclamaciones de garantía.
Oficial Websitio: Genius Audio Store on Amazon