1. Introducción
This manual provides essential instructions for the safe installation, operation, and maintenance of your Luceco LED IP65 Fire Rated GU10 Downlight. Please read this manual thoroughly before installation and retain it for future reference. This downlight is designed for recessed ceiling installation and features an IP65 rating, making it suitable for areas where protection against water jets is required, such as bathrooms (Zone 1 and 2) and outdoor sheltered areas. It also incorporates a fire-rated housing for enhanced safety.

Figura 1: Luceco LED IP65 Fire Rated GU10 Downlight (Polished Chrome)
Esta imagen muestra el frente view of the Luceco LED IP65 Fire Rated GU10 Downlight. It features a polished chrome finish bezel with a central light source, designed for a sleek, modern appearance when installed in a ceiling.
2. Información de seguridad
- Instalación profesional: La instalación debe ser realizada por un electricista calificado de acuerdo con las regulaciones de cableado nacionales y los códigos de construcción locales.
- Desconexión de energía: Always ensure the main power supply is switched off at the consumer unit/fuse box before commencing any installation, maintenance, or bulb replacement.
- Toma de tierra: This downlight has a metal casing and requires proper earthing. Ensure the earth wire is securely connected.
- Tipo de bombilla: Use only GU10 LED or halogen bulbs up to a maximum of 35W. The downlight is supplied without a bulb.
- Dimensiones de la bombilla: Ensure the GU10 bulb length does not exceed 50-60mm to fit correctly within the fire-rated housing.
- Clasificación IP65: The IP65 rating provides protection against dust ingress and low-pressure water jets. Ensure all seals are correctly seated during installation to maintain this rating.
- Resistencia al fuego: This downlight is fire-rated, designed to maintain the integrity of the ceiling's fire resistance. Do not modify the housing.
- Ventilación: Ensure adequate clearance around the downlight in the ceiling void as per manufacturer guidelines and local regulations to prevent overheating.
- Daño: Do not install if the product or any components are damaged.
3. Contenido del paquete
Verifique que todos los componentes estén presentes y sin daños antes de continuar con la instalación.
- 1 x Luceco LED IP65 Fire Rated GU10 Downlight (Polished Chrome finish)
- Manual de instrucciones
- Nota: La bombilla GU10 no está incluida y debe comprarse por separado.
4. Especificaciones
| Marca | Luceco |
| Número de modelo | EFDGUIPPC-01 |
| Dimensiones del producto | 9.63 x 12.48 x 12 cm |
| Peso | 280 gramos |
| Material | Metal |
| Finalizar | Cromo pulido |
| Estilo | Fixed Fire Rated GU10 Downlight / IP65 Rated |
| Lamp Titular | GU10 |
| Wat máximotage | 35W (Bombilla no incluida) |
| Clasificación IP | IP65 (Suitable for bathrooms Zone 1 & 2) |
| Ceiling Cut-out Diameter | 72 mm (aprox.) |
5. Configuración e instalación
Importante: Installation should only be performed by a qualified electrician. Ensure power is disconnected before starting.
- Prepare el techo:
Using an appropriate hole saw, cut a circular opening in the ceiling with a diameter of approximately 72mm. Ensure there is sufficient vertical clearance in the ceiling void for the downlight's housing (approx. 12cm depth).
- Alambrado:
The downlight features tool-free access and loop-in loop-out terminals. Carefully strip the insulation from the live, neutral, and earth wires of your mains supply. Insert the wires into the corresponding push-fit terminals (Live, Neutral, Earth). Ensure a secure connection for all wires, especially the earth wire, due to the metal casing.

Figura 2: Downlight Rear View con terminales de cableado
This image displays the rear of the downlight, highlighting the black cylindrical housing, the spring-loaded clips for ceiling retention, and the push-fit wiring terminals for electrical connection.
- Insertar bombilla GU10:
Before inserting the downlight into the ceiling, insert a GU10 bulb (not supplied) into the lamp holder. Align the two pins of the GU10 bulb with the slots in the lamp holder, push gently, and twist clockwise to secure it. Ensure the bulb length is within the 50-60mm limit.
- Install Downlight into Ceiling:
Fold back the spring clips on the sides of the downlight housing. Carefully push the downlight into the prepared ceiling opening until the spring clips engage and hold the fitting securely in place. Ensure the rubber gasket is properly seated to maintain the IP65 rating.
- Attach Bezel:
The polished chrome bezel is secured by a twist mechanism. Align the bezel with the main housing and twist clockwise until it clicks securely into place. Ensure it is flush with the ceiling surface.
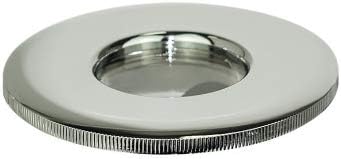
Figura 3: Bisel cromado pulido
This image shows the separate polished chrome bezel, which is the visible trim of the downlight once installed. It features a smooth, reflective surface and a textured edge for grip during installation.
- Restaurar energía:
Once installation is complete and all connections are secure, restore power at the consumer unit/fuse box.
6. Instrucciones de funcionamiento
The Luceco LED IP65 Fire Rated GU10 Downlight operates via your standard wall light switch. Simply toggle the switch to turn the light on or off.
7. Mantenimiento
- Limpieza: Ensure power is off before cleaning. Wipe the polished chrome bezel with a soft, dry, or slightly damp Paño. No utilice limpiadores abrasivos ni disolventes.
- Reemplazo de bombilla:
- Apague la fuente de alimentación principal.
- Carefully twist the polished chrome bezel counter-clockwise to remove it from the main housing.
- Gently push the GU10 bulb upwards and twist counter-clockwise to remove it from the lamp titular.
- Insert a new GU10 bulb (max 35W, max length 50-60mm) by aligning the pins, pushing, and twisting clockwise.
- Reattach the bezel by aligning and twisting clockwise until secure.
- Restaurar la energía.
8. Solución de problemas
| Problema | Posible causa | Solución |
| La luz no se enciende. |
|
|
| Bezel does not sit flush. |
|
|
9. Información sobre reciclaje
This product falls under the Waste Electrical and Electronic Equipment (WEEE) directive. Do not dispose of electrical products with household waste. Please recycle where facilities exist. Check with your local authority for recycling advice.
For information on recycling light bulbs and how to clean up broken lamps, please refer to local guidelines or official recycling resources.
10. Garantía y soporte
Luceco products are manufactured to high standards and are designed for durability. For specific warranty details or technical support, please refer to the warranty card included with your purchase or visit the official Luceco webSitio. Conserve su comprobante de compra para reclamaciones de garantía.


