1. Introducción
This manual provides detailed instructions for the safe and efficient operation of your Energizer 3000W Modified Sine Wave Power Inverter, Model ENK3000. This device converts 12V DC battery power into 120V AC household power, enabling you to operate various appliances and tools from your vehicle or other 12V power sources. Please read this manual thoroughly before use and retain it for future reference.
2. Información de seguridad
Adherence to these safety guidelines is crucial to prevent personal injury and damage to the inverter or connected devices.
- Ventilación: Asegúrese de que haya una ventilación adecuada alrededor del inversor. No bloquee las aberturas de ventilación.
- Ambiente: Utilice el inversor en un área seca, fresca y bien ventilada, lejos de la luz solar directa, fuentes de calor y materiales inflamables.
- Humedad: Do not expose the inverter to rain, water, or excessive moisture.
- Toma de tierra: The inverter must be properly grounded. Refer to the installation section for grounding instructions.
- Conexión de la batería: Connect the inverter directly to a 12V DC battery. Ensure correct polarity (+ to + and - to -). Incorrect connection can cause damage.
- Capacidad de carga: Do not exceed the inverter's rated wattage (3000W continuous, 6000W peak). Overloading can cause the inverter to shut down or be damaged.
- Dispositivos médicos: This inverter is not suitable for use with life-support systems or other critical medical equipment.
- Niños: Mantenga el inversor fuera del alcance de los niños.
- Servicio: No intente abrir ni reparar el inversor usted mismo. Encargue cualquier reparación a personal cualificado.
3. Contenido del paquete
Verifique que todos los artículos estén presentes en el paquete:
- Energizer 3000W Modified Sine Wave Power Inverter (Model ENK3000)
- Installation Hardwire Kit
- 3FT 0 AWG Battery Cables (Red and Black)
- Manual de usuario (este documento)
4. Características y componentes del producto

Figura 4.1: En general view of the Energizer 3000W Power Inverter, showcasing its robust design and primary connections.
4.1 Características del panel frontal

Figura 4.2: Detallado view of the inverter's front and rear panels, highlighting key components.
- Pantalla digital LCD: Shows battery output, output wattage, volumen de entradatage, and warning indicators.
- Main Shutdown Switch: Power button for turning the inverter on and off.
- 2 USB Ports (2.4 Amp Each): Para cargar dispositivos alimentados por USB.
- Display Selector Switch: Used to cycle through display modes on the LCD.
- 2 Standard North American Outlets: 120V AC outlets for connecting appliances.
- Hardwire AC Output Connection: Terminal block for permanent AC wiring.
4.2 Características del panel trasero
- Negative Power Input Terminal (Black): Connects to the negative terminal of the 12V battery.
- Positive Power Input Terminal (Red): Connects to the positive terminal of the 12V battery.
- Terminal de tierra: Para conectar el inversor a una toma de tierra.
- High Speed Cooling Fan: Se activa automáticamente para disipar el calor durante el funcionamiento.
- Remote Control Receptacle: For connecting an optional remote control unit (if applicable).
4.3 Indicadores de la pantalla LCD
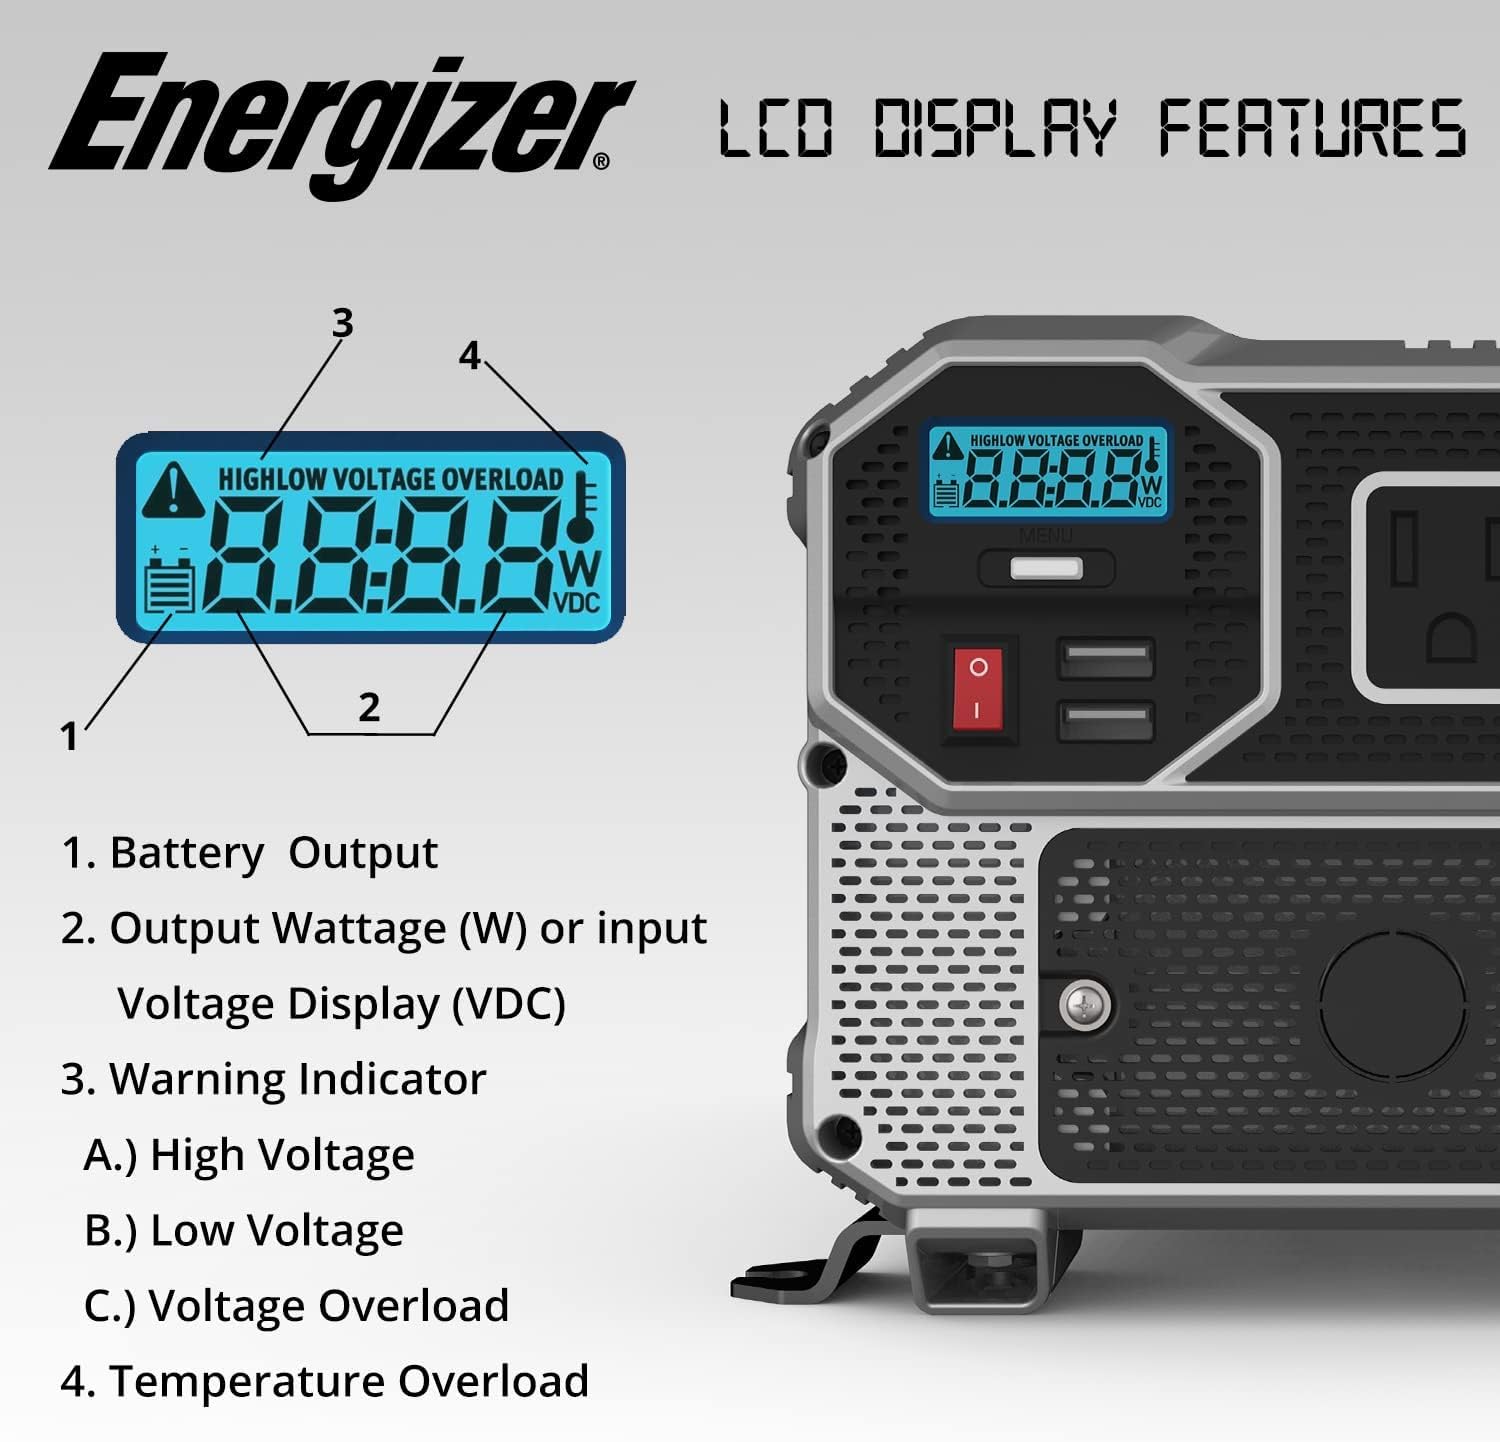
Figura 4.3: Close-up of the LCD display, detailing its various indicators.
- Salida de batería: Muestra el volumen actual de la bateríatage.
- Salida Wattage (W) or Input Voltage Display (VDC): Shows the power consumption of connected devices in watts or the input DC voltage.
- Indicador de advertencia: Illuminates to signal specific conditions:
- Alto voltage: Vol de entradatage excede los límites de seguridad.
- Vol bajotage: Vol de entradatage is below safe operating limits.
- Volumentage Sobrecarga: Connected load exceeds the inverter's capacity.
- Temperature Overload: Indicates the inverter is overheating.
5. Configuración e instalación
Proper installation is critical for safe and efficient operation.
5.1 Elegir una ubicación
- Mount the inverter on a flat, stable surface.
- Ensure the location is dry, cool, and well-ventilated.
- Avoid areas with direct sunlight, heat, or moisture.
- Maintain at least 6 inches of clear space around the inverter for proper airflow.
5.2 Grounding the Inverter
The inverter must be properly grounded. Connect a heavy-gauge wire (not included) from the inverter's ground terminal to a suitable earth ground point, such as the chassis of a vehicle or a dedicated ground rod.
5.3 Conexión a una batería de 12 V
Use the provided 3FT 0 AWG battery cables for connection. Ensure the inverter is turned off before making connections.
- Conectar el rojo cable to the inverter's positivo (+) terminal y luego a la batería positivo (+) Terminal.
- Conectar el negro cable to the inverter's negativo (-) terminal y luego a la batería negativo (-) Terminal.
- Asegúrese de que todas las conexiones estén bien ajustadas y seguras. Las conexiones flojas pueden causar sobrecalentamiento y daños.
5.4 Hardwire AC Output Connection
The included hardwire kit allows for permanent AC wiring. This connection is suitable for fixed installations where direct wiring to a distribution panel or specific appliances is desired.
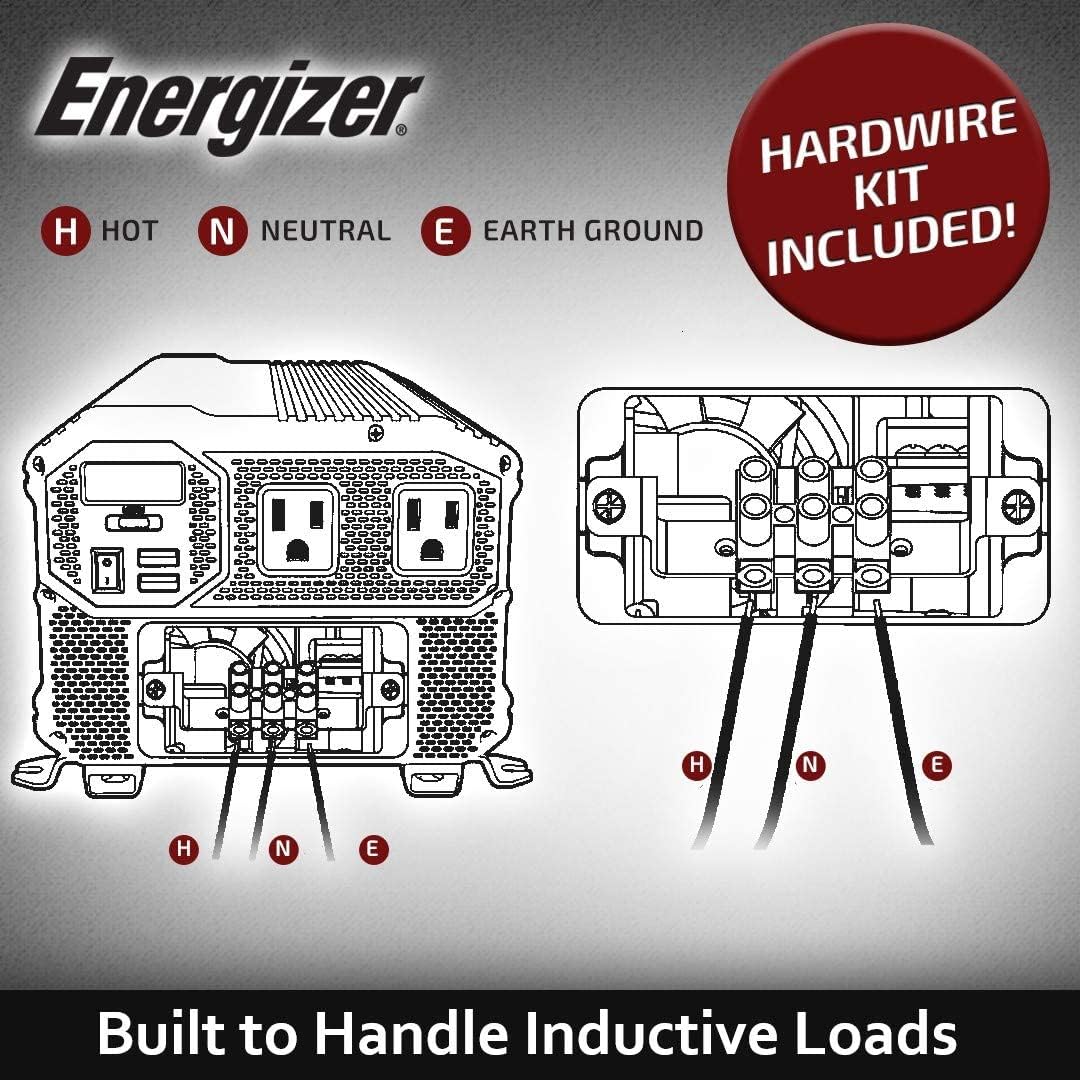
Figura 5.1: Diagram illustrating the hardwire AC output connection points (H: Hot, N: Neutral, E: Earth Ground).
Consult a qualified electrician for hardwire installations to ensure compliance with local electrical codes and safety standards.
6. Instrucciones de funcionamiento
6.1 Encendido del inversor
- Asegúrese de que todas las conexiones de CC y CA estén seguras.
- Press and hold the Main Shutdown Switch (power button) on the front panel for a few seconds until the LCD display illuminates.
- The LCD will show the battery voltage y wat de salidatage (if a load is connected).
6.2 Connecting AC Devices
- Plug your AC appliances into the standard North American outlets on the front panel.
- Asegurar el agua total.tagLa potencia de todos los dispositivos conectados no supera los 3000W.
- For devices with high startup (surge) power requirements, ensure the inverter's peak power rating (6000W) is sufficient.
6.3 Uso de puertos USB
The two 2.4 Amp USB ports can be used to charge compatible USB-powered devices directly.
6.4 Powering Off the Inverter
- Disconnect all AC appliances and USB devices.
- Press and hold the Main Shutdown Switch until the LCD display turns off.
7. Mantenimiento
- Limpieza: Limpie periódicamente el exterior del inversor con un paño seco y suave. No utilice limpiadores líquidos ni disolventes.
- Ventilación: Ensure the cooling fan and ventilation openings are free from dust and debris. Use compressed air to clear blockages if necessary.
- Conexiones: Regularly check battery and AC connections for tightness and corrosion. Clean any corrosion with a wire brush and baking soda solution.
- Cuidado de la batería: Maintain your 12V battery according to its manufacturer's instructions to ensure optimal performance and lifespan for the inverter.
8. Solución de problemas
| Problema | Posible causa | Solución |
|---|---|---|
| No power output / Inverter does not turn on |
|
|
| Overload warning / Inverter shuts down |
|
|
| Vol bajotagy advertencia |
|
|
| Advertencia de exceso de temperatura |
|
|
9. Especificaciones
| Nombre del modelo | ENK3000 |
| Wat continuotage | 3000 vatios |
| Pico Wattage | 6000 vatios |
| Vol de entradatage | 12 V CC |
| Vol de salidatage | 120 V CA |
| Forma de onda de salida | Onda sinusoidal modificada |
| Salida USB | 2 x 2.4 Amp Puertos USB |
| Dimensiones del producto | 13.31 x 7.68 x 5.63 pulgadas |
| Peso del artículo | 11.68 libras |
| Fuente de poder | Funciona con pilas |
| Uso recomendado | Vehículo |
| Fabricante | Pilas Energizer |
10. Garantía y soporte
This Energizer 3000W Power Inverter comes with a Garantía de 2 años a partir de la fecha de compra. Esta garantía cubre defectos de materiales y mano de obra en condiciones normales de uso.
For warranty claims, technical support, or service inquiries, please contact Energizer customer support. Keep your proof of purchase for warranty validation.
Información del contacto: Refer to the Energizer official websitio o embalaje del producto para obtener los detalles de contacto de atención al cliente más actualizados.


