1. Introducción
Gracias por la compraasing the HASTHIP® XROW - 600A Mini Air Dehumidifier. This compact and portable device is designed to efficiently remove excess moisture, dampness, and mold from the air in small areas such as bedrooms, kitchens, offices, wardrobes, and storage rooms. Its silent operation and automatic shut-off feature ensure a comfortable and hassle-free experience. Please read this manual thoroughly before operation to ensure proper use and maintenance.
2. Información de seguridad
Please observe the following safety precautions to prevent injury or damage to the unit:
- Coloque siempre el deshumidificador sobre una superficie estable y nivelada.
- No bloquee la entrada ni la salida de aire. Asegúrese de que haya suficiente espacio alrededor de la unidad para una ventilación adecuada.
- No sumerja la unidad, el cable de alimentación ni el enchufe en agua ni en otros líquidos.
- Desenchufe la unidad del tomacorriente antes de limpiarla o realizar cualquier mantenimiento.
- Mantener fuera del alcance de los niños y las mascotas.
- No opere la unidad si el cable de alimentación o el enchufe están dañados.
- Utilice únicamente el adaptador de corriente proporcionado.
- No intente reparar ni desmontar la unidad usted mismo. Para reparaciones, contacte con personal de servicio técnico cualificado.
3. Producto terminadoview
Características:
- Efficient humidity control for dry air.
- Silent operation, suitable for bedrooms and offices.
- Portable and compact design for easy movement.
- Apagado automático cuando el depósito de agua está lleno.
- LED indicator light for full water tank.
- Simple one On/Off button operation.
- 500ML water tank capacity with removable tray.
- Absorbs approximately 250ML of moisture per day (at 30°C, 80% RH).
Componentes:
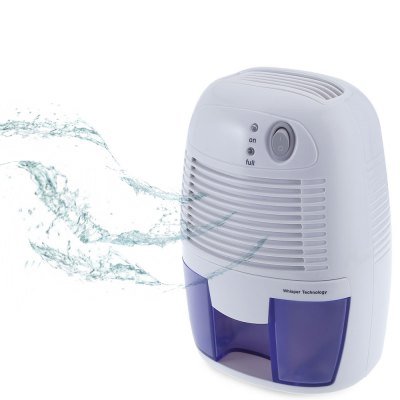
Figura 3.1: Frente view of the HASTHIP XROW-600A Mini Air Dehumidifier, illustrating its compact design and the air purification process.
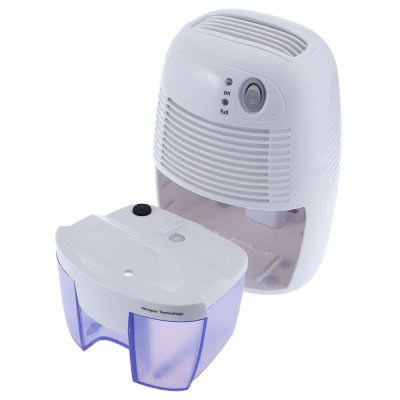
Figure 3.2: The dehumidifier with its 500ML water tank detached, demonstrating the easy removal for emptying.
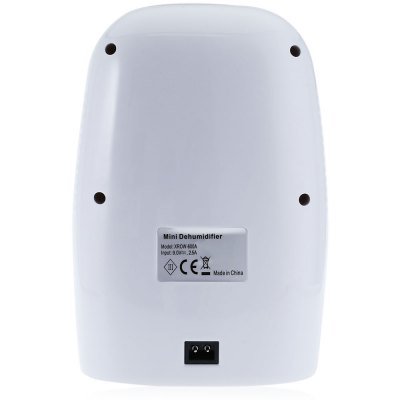
Figura 3.3: Posterior view of the dehumidifier, highlighting the product label with model number XROW-600A and power specifications, along with the power input port.
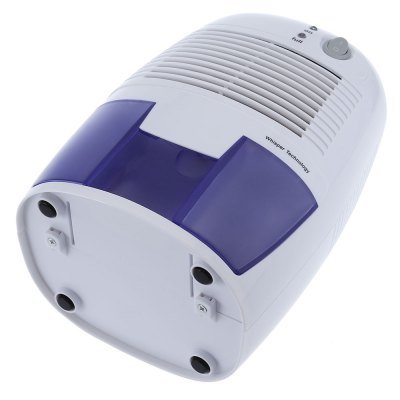
Figure 3.4: Underside of the dehumidifier, illustrating the four anti-slip feet for stable placement.
4. Configuración
- Desembalaje del deshumidificador: Retire con cuidado el deshumidificador y todos los accesorios del embalaje. Conserve el embalaje para su posterior almacenamiento o transporte.
- Elija una ubicación: Place the dehumidifier on a firm, level surface in the desired area. Ensure there is at least 20 cm (8 inches) of space around the air inlet and outlet for optimal performance. Avoid placing it near heat sources or in direct sunlight.
- Conecte la electricidad: Insert the small end of the power adapter into the DC 9V input port on the back of the dehumidifier. Plug the other end of the power adapter into a suitable electrical outlet.
- Comprobación inicial: Asegúrese de que el tanque de agua esté correctamente colocado en la unidad.
5. Instrucciones de funcionamiento
- Encendido: Press the "On/Off" button located on the top of the unit. The "On" indicator light will illuminate, indicating that the dehumidifier is operating.
- Cierre automático: The dehumidifier will automatically turn off when the water tank is full. The "Full" indicator light will illuminate.
- Vaciado del depósito de agua:
- Extraiga con cuidado el tanque de agua de la parte delantera de la unidad.
- Vierta el agua recogida.
- Slide the empty water tank back into the unit until it clicks into place. The "Full" indicator light will turn off, and the unit will resume operation automatically.
- Apagado: Press the "On/Off" button again to turn off the dehumidifier. The "On" indicator light will turn off.
6. Mantenimiento
El mantenimiento regular garantiza un rendimiento óptimo y prolonga la vida útil de su deshumidificador.
Limpieza de la unidad:
- Antes de limpiar, desenchufe siempre el deshumidificador de la toma de corriente.
- Limpie el exterior de la unidad con un paño suave yamp Paño. No utilice limpiadores abrasivos ni disolventes.
- Clean the air inlet and outlet grilles regularly with a soft brush or vacuum cleaner to remove dust and debris.
Limpieza del depósito de agua:
- Retire el tanque de agua de la unidad.
- Rinse the water tank with clean water. If necessary, use a mild detergent and a soft brush to clean any residue.
- Ensure the tank is thoroughly dry before reinserting it into the dehumidifier.
Almacenamiento:
- Si va a almacenar la unidad durante un período prolongado, asegúrese de que el tanque de agua esté vacío y limpio.
- Limpie toda la unidad como se describe arriba.
- Guarde el deshumidificador en un lugar fresco y seco, preferiblemente en su embalaje original.
7. Solución de problemas
| Problema | Posible causa | Solución |
|---|---|---|
| El deshumidificador no se enciende. |
|
|
| El deshumidificador está funcionando pero no recoge agua. |
|
|
| La luz indicadora "Lleno" está encendida, pero el tanque no está lleno. |
|
|
| La unidad es ruidosa. |
|
|
8. Especificaciones
| Especificación | Detalle |
|---|---|
| Modelo | XROW - 600A |
| Capacidad del tanque de agua | 500 ml |
| Admirador | 80mm x 80mm Brushless Motor |
| Material principal | ABS (Acrilonitrilo Butadieno Estireno) |
| Volumentage | 9 V CC |
| Fuerza | 22 W |
| Corriente nominal | 2.5A |
| Moisture Collection | Approx. 250ML per day (at 30°C, 80% RH) |
| Nivel de ruido | Menos de 35dB |
| Área de cobertura | 10 metros cuadrados |
| Longitud del cable de carga | 1.5 millones |
| Dimensiones del producto (L x An x Al) | 22.00 x 14.50 x 12.00 cm / 8.66 x 5.71 x 4.72 pulgadas |
| Peso del artículo | 1.2 kg (1200 gramos) |
9. Garantía y soporte
This HASTHIP® product is designed for reliability and performance. For any questions, technical support, or warranty claims, please refer to the contact information provided with your purchase receipt or visit the official HASTHIP websitio.
Componentes incluidos: 1 x Mini Dehumidifier, 1 x Power Adapter, 1 x English User Manual.


