1. Introducción
Thank you for choosing the Igloo ICEB26WH Automatic Portable Countertop Ice Maker. This manual provides essential information for the safe and efficient operation, maintenance, and troubleshooting of your new appliance. Please read it thoroughly before first use and retain it for future reference.
This portable ice maker is designed for convenience, producing up to 26 pounds of ice in a 24-hour period, with the first batch of 9 ice cubes ready in as little as 7 minutes. It offers two ice cube sizes to suit your preferences.
2. Información de seguridad
Para garantizar un funcionamiento seguro y evitar daños, respete las siguientes pautas de seguridad:
- Seguridad eléctrica: Ensure the appliance is plugged into a grounded outlet. Do not operate with wet hands or if the power cord is damaged.
- Colocación: Place the ice maker on a stable, level surface, away from direct sunlight, heat sources, and corrosive gases. Ensure adequate ventilation around the unit.
- Calidad del agua: Use only potable (drinkable) water in the reservoir.
- Niños: Keep the appliance out of reach of children and supervise them when the unit is in use.
- Mantenimiento: Always unplug the unit before cleaning or performing any maintenance. Do not immerse the appliance in water.
- Advertencia sobre la Proposición 65: Este producto puede contener sustancias químicas conocidas en el estado de California como causantes de cáncer y defectos de nacimiento u otros daños reproductivos.
3. Producto terminadoview
Familiarize yourself with the components of your Igloo ICEB26WH Ice Maker:

Imagen 3.1: Frontal derecha view of the Igloo ICEB26WH Ice Maker, showcasing su diseño compacto y panel de control.

Image 3.2: Diagram illustrating the dimensions of the ice maker, highlighting the removable ice basket, LED control panel, and included ice scoop.
Componentes:
- Unidad de fabricación de hielo: The main appliance housing the compressor, water reservoir, and ice-making mechanism.
- Cesta de hielo: A removable basket to collect the freshly made ice cubes.
- Cuchara de hielo: A plastic scoop for convenient ice retrieval.
Panel de control:
The intuitive LED control panel features indicators and buttons for easy operation:
- AGREGAR AGUA Indicador: Se ilumina cuando es necesario rellenar el depósito de agua.
- Indicador HIELO LLENO: Illuminates when the ice basket is full, and the unit will pause ice production.
- SMALL/LARGE Ice Size Selection: Button to toggle between small and large cylindrical ice cube sizes.
- Botón de encendido: Para encender o apagar la unidad.

Image 3.3: Visual representation of key features including instant ice, dual ice sizes, low noise, self-cleaning, and the LED control panel.
4. Configuración
- Deshacer: Retire con cuidado la máquina de hielo de su embalaje. Retire todos los materiales de embalaje, incluidas las cintas adhesivas y las películas protectoras.
- Posición: Coloque la máquina de hielo sobre una superficie plana, estable y resistente al calor. Asegúrese de que haya al menos 4 cm de espacio libre alrededor de la unidad para una ventilación adecuada. Evite colocarla cerca de fuentes de calor o expuesta a la luz solar directa.
- Estabilizar: Deje la unidad en posición vertical durante al menos 2 horas antes de enchufarla. Esto permite que el refrigerante se asiente.
- Limpieza inicial: Antes del primer uso, limpie el interior de la máquina de hielo. Consulte la sección "Limpieza y mantenimiento" para obtener instrucciones detalladas.
- Llenar el depósito de agua: Open the top lid and fill the water reservoir with potable water up to the MAX fill line. Do not overfill.
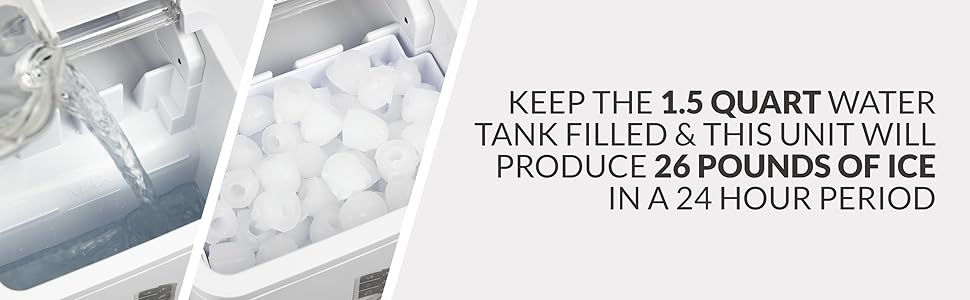
Image 4.1: Illustrates filling the water reservoir and the ice production capacity.
5. Instrucciones de funcionamiento
- Encendido: Conecte la máquina de hielo a una toma de corriente con conexión a tierra. Presione el botón FUERZA Botón en el panel de control para encender la unidad.
- Seleccione el tamaño del hielo: Presione el SELECCIONAR button to choose between small or large ice cube sizes. The corresponding indicator light will illuminate.
- Producción de hielo: The ice maker will begin its cycle. Water will be pumped to the freezing fingers, and ice cubes will form. The first batch of 9 ice cubes will be ready in approximately 7 minutes.
- Colección de hielo: Once formed, the ice cubes will be released into the ice basket. The unit will continue to make ice until the basket is full or the water reservoir is empty.
- Indicadores:
- Si el AGREGAR AGUA indicator illuminates, refill the water reservoir. The unit will resume operation automatically once water is added.
- Si el HIELO LLENO indicator illuminates, remove ice from the basket. The unit will resume ice production automatically.
- Almacenamiento de hielo: The ice basket is not refrigerated. For long-term storage, transfer ice cubes to a freezer.

Image 5.1: Details on the ice maker's quick production and automatic features.

Image 5.2: Depicts the two available ice cube sizes: small and large bullet ice.
6. Limpieza y mantenimiento
La limpieza y el mantenimiento regulares prolongarán la vida útil de su máquina de hielo y garantizarán un rendimiento óptimo.
6.1. Limpieza diaria
- Desconecte la unidad.
- Retire la cesta de hielo y lávela con agua tibia y jabón. Enjuáguela y séquela bien.
- Limpie el exterior de la unidad con un paño suave yamp paño.
6.2. Función de autolimpieza
The Igloo ICEB26WH features an automatic self-cleaning function:
- Asegúrese de que la unidad esté vacía de hielo y agua.
- Fill the water reservoir with a mixture of water and white vinegar (or a recommended ice maker cleaning solution) according to the product instructions.
- Activate the self-cleaning cycle (refer to your specific model's control panel instructions, typically a long press of a button or a specific sequence).
- Después del ciclo, drene completamente la solución de limpieza.
- Rinse the reservoir thoroughly with clean water and drain again to remove any residue.

Image 6.1: Highlights the low noise operation and the automatic self-cleaning feature.
6.3. Drenaje y almacenamiento
- When not in use for an extended period, unplug the unit and drain all water from the reservoir.
- Clean and dry the interior thoroughly to prevent mold or mildew growth.
- Store the ice maker in a cool, dry place.
7. Solución de problemas
If you encounter issues with your ice maker, consult the following table before contacting customer support:
| Problema | Posible causa | Solución |
|---|---|---|
| La unidad no se enciende. | No enchufado; sin energíatage; toma de corriente defectuosa. | Ensure unit is securely plugged into a working, grounded outlet. Check circuit breaker. |
| "ADD WATER" indicator is on, but reservoir is full. | Water sensor malfunction; air bubble. | Unplug and replug the unit. Gently shake the unit to dislodge any air bubbles near the sensor. |
| El hielo no se forma o es muy pequeño. | Insufficient water; high ambient temperature; poor ventilation; unit recently moved. | Ensure water reservoir is full. Operate in a cooler environment. Ensure proper ventilation. Allow unit to sit upright for 2 hours if recently moved. |
| El indicador "ICE FULL" está encendido, pero la cesta no está llena. | Sensor de hielo obstruido o sucio. | Clean the ice sensor (located near the ice basket). Ensure no ice cubes are blocking the sensor. |
| El hielo se derrite rápidamente en la cesta. | Ice basket is not refrigerated. | This is normal. Transfer ice to a freezer for storage. |
8. Especificaciones
| Característica | Especificación |
|---|---|
| Número de modelo | ICEB26WH |
| Marca | Iglú |
| Dimensiones del producto (Pr. x An. x Al.) | 12.2" x 9" x 12.8" |
| Producción diaria de hielo | Hasta 26 libras |
| Capacidad del tanque de agua | 1.5 cuartos |
| Ciclo de producción de hielo | 9 cubes in as little as 7 minutes |
| Wat operativotage | 120 vatios |
| Fuente de alimentación | 120V, 60Hz (Standard US) |
| Accesorios incluidos | Ice Maker, Ice Basket, Ice Scoop |
9. Garantía y soporte
This Igloo ICEB26WH Ice Maker comes with a manufacturer's warranty. Please refer to the warranty card included with your purchase for specific terms and conditions, including coverage duration and limitations.
For technical support, troubleshooting assistance beyond this manual, or warranty claims, please contact the retailer where the product was purchased or the manufacturer directly. Contact information can typically be found on the product packaging or the manufacturer's official websitio.


