1. Instrucciones de seguridad importantes
Please read all instructions carefully before using the GASTROBACK Mini Oven Design Bake & Grill. Retain this manual for future reference.
- Asegúrese siempre de que el aparato esté colocado sobre una superficie estable y resistente al calor.
- No toque superficies calientes. Use guantes o manoplas de horno al manipular alimentos calientes.
- Asegúrese de que haya una ventilación adecuada alrededor del horno durante su funcionamiento.
- No sumerja el aparato, el cable o el enchufe en agua u otros líquidos.
- Es necesaria una estrecha supervisión cuando cualquier aparato sea utilizado por niños o cerca de ellos.
- Desenchufe el aparato del tomacorriente cuando no lo utilice y antes de limpiarlo. Deje que se enfríe antes de colocar o quitar piezas.
- No opere ningún aparato con un cable o enchufe dañado, o después de que el aparato funcione mal o haya sufrido algún daño de cualquier tipo.
- No utilice accesorios no recomendados por el fabricante del aparato.
- No lo coloque sobre o cerca de un quemador de gas o eléctrico caliente, ni dentro de un horno caliente.
- Se debe tener mucho cuidado al mover un aparato que contenga aceite caliente u otros líquidos calientes.
- Para desconectar, gire cualquier control a la posición "apagado" y luego retire el enchufe del tomacorriente de pared.
- No utilice el aparato para otro uso que no sea el doméstico previsto.
- The exterior of the oven features a Cool Touch housing, but internal components and accessories will become very hot.
- This appliance is equipped with electronic child safety features.
2. Componentes del producto
Familiarize yourself with the parts of your GASTROBACK Mini Oven.

Figura 2.1: Frente view of the GASTROBACK Mini Oven, showcasing the digital control panel and oven door.

Figure 2.2: Included accessories: rotisserie spit, grill rack, pizza stone, and baking tray.
- Unidad principal: The oven housing with integrated heating elements and control panel.
- Puerta del horno: Puerta de cristal para viewcocinar los alimentos durante la cocción.
- Panel de control: Backlit touch display for program selection, temperature, and time settings.
- Bandeja de hornear: Para hornear y asar.
- Rejilla para parrilla: Para asar y colocar platos.
- Piedra para pizza: 30 cm diameter, for crispy pizzas.
- Asador de asador: For roasting whole chickens or kebabs.
- Mango de asador: Para insertar y retirar de forma segura el asador.
- Bandeja para migas: Ubicado en la parte inferior, extraíble para fácil limpieza.
3. Configuración y primer uso
- Desembalaje: Retire con cuidado todos los materiales de embalaje y accesorios. Compruebe si presentan daños.
- Colocación: Place the oven on a flat, stable, and heat-resistant surface. Ensure there is sufficient space (at least 10 cm) around the oven for proper ventilation. Do not place it near flammable materials.
- Limpieza: Antes del primer uso, limpie el interior y los accesorios con un paño húmedo.amp cloth. Wash the baking tray, grill rack, pizza stone, and rotisserie spit in warm soapy water, then rinse and dry thoroughly.
- Quemado inicial:
- Enchufe el horno a una toma eléctrica con conexión a tierra.
- Set the oven to 230°C (450°F) using the "Custom" function.
- Operate the empty oven for approximately 10-15 minutes to burn off any manufacturing residues. A slight odor or smoke is normal during this process. Ensure the area is well-ventilated.
- After 10-15 minutes, turn off the oven and unplug it. Allow it to cool completely.
- Your GASTROBACK Mini Oven is now ready for use.
4. Instrucciones de funcionamiento
4.1 Panel de control terminadoview
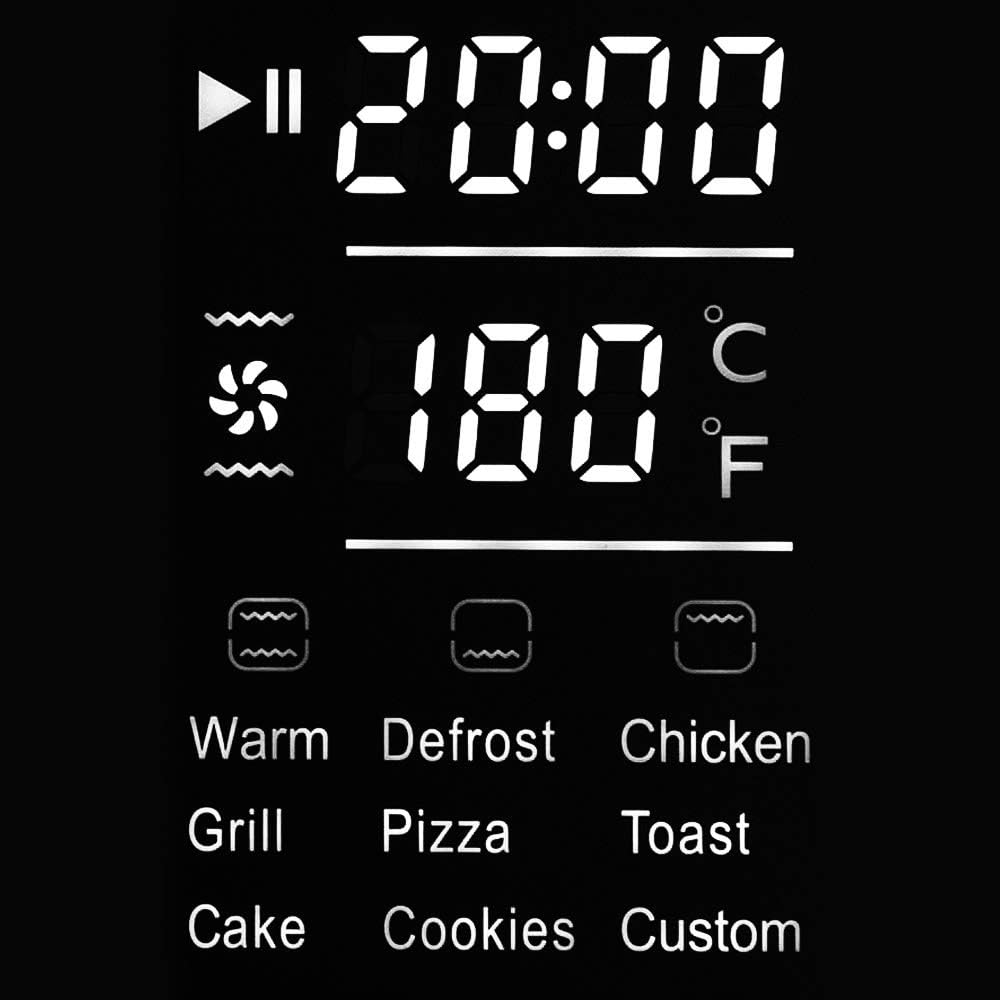
Figura 4.1: detallada view of the backlit touch display, showing program icons, temperature, and time settings.
The control panel features a backlit touch display for easy operation. It displays the selected program, function, cooking time, and temperature.
- Botón de encendido: Enciende/apaga el horno.
- Selección de programas: Icons for various pre-set programs (Warm, Defrost, Chicken, Grill, Pizza, Toast, Cake, Cookies, Custom).
- Iconos de función: Indicate heating elements (top, bottom, convection) and rotisserie.
- Ajuste de temperatura: Up/Down arrows to set temperature (30°C to 230°C).
- Ajuste de hora: Up/Down arrows to set cooking time.
- Botón de inicio / pausa: Inicia o pausa la cocción.
4.2 programas preestablecidos
The oven offers 9 pre-set programs for common cooking tasks:
- Cálido: For keeping food warm.
- Descongelar: Para descongelar alimentos congelados.
- Pollo: Optimized for rotisserie chicken.
- Parrilla: Para asar carnes y verduras.
- Pizza: Ideal for baking pizzas, especially with the pizza stone.
- Tostada: Para tostar pan.
- Pastel: Para hornear pasteles y tartas.
- Galletas: Para hornear galletas.
- Costumbre: Allows manual setting of temperature, time, and heating functions.
4.3 Manual Operation (Custom Program)
- Presione el botón de Encendido para encender el horno.
- Select the "Custom" program icon.
- Use the temperature adjustment arrows to set the desired temperature between 30°C and 230°C.
- Use the time adjustment arrows to set the desired cooking duration.
- Select the desired heating function(s):
- Calor superior: For browning and crisping the top.
- Calor inferior: For baking bases and gentle cooking.
- Calor superior e inferior: Horneado y asado estándar.
- Convection (Hot Air): For even cooking and faster results, ideal for multiple racks.
- Asador: Activates the rotisserie motor for even roasting.
- Presione el botón Inicio para comenzar a cocinar.
- The display will show the remaining cooking time and current temperature.
- To pause cooking, press the Start/Pause button again. Press it once more to resume.
- When cooking is complete, the oven will beep and turn off the heating elements.
- Retire con cuidado los alimentos utilizando guantes de horno.
4.4 Uso de la función de asador

Figure 4.2: A whole chicken being roasted on the rotisserie spit inside the oven.
- Prepare the food (e.g., a whole chicken) and secure it onto the rotisserie spit using the forks. Ensure it is balanced.
- Inserte el extremo puntiagudo del asador en el zócalo de accionamiento ubicado en el lado derecho del interior del horno.
- Rest the square end of the spit onto the support bracket on the left side.
- Cierre la puerta del horno.
- Select the "Chicken" pre-set program or the "Custom" program and activate the rotisserie function along with desired heating elements (e.g., Top & Bottom Heat with Convection).
- Ajuste la temperatura y el tiempo según sea necesario.
- Press Start. The rotisserie spit will begin to rotate.
- Once cooking is complete, use the rotisserie handle (Figure 2.3) to safely remove the hot spit from the oven.

Figure 4.3: The rotisserie handle and a separate rack lifter tool for safe handling of hot accessories.
4.5 Using the Pizza Stone

Figure 4.4: A pizza cooking on the included pizza stone, positioned on the grill rack.
- Place the pizza stone on the grill rack.
- Insert the grill rack with the pizza stone into the desired rack position in the oven.
- Preheat the oven with the pizza stone inside for at least 10-15 minutes at the desired pizza baking temperature (e.g., 200-220°C).
- Carefully slide the pizza onto the hot pizza stone.
- Select the "Pizza" pre-set program or "Custom" with Top & Bottom Heat.
- Bake until the crust is golden brown and cheese is melted.
- Use oven mitts and a pizza peel or spatula to remove the pizza.
5. Mantenimiento y limpieza
La limpieza regular garantiza un rendimiento óptimo y prolonga la vida útil de su horno.
- Desenchufe siempre el horno de la toma de corriente y deje que se enfríe completamente antes de limpiarlo.
- Exterior: Limpie las superficies exteriores con un paño suave, damp tela. No utilice limpiadores abrasivos ni estropajos.
- Interior: The oven interior has a non-stick coating. Wipe with a damp Paño y detergente suave. Para manchas difíciles, se puede usar un limpiador de hornos no abrasivo diseñado para superficies antiadherentes, siguiendo las instrucciones del producto. Asegúrese de eliminar todos los residuos del limpiador.
- Accesorios: The baking tray, grill rack, rotisserie spit, and pizza stone can be washed in warm soapy water. Rinse thoroughly and dry completely before storing or reusing. The pizza stone should not be washed with soap if possible, as it can absorb odors; simply scrape off residue and wipe with a damp paño.
- Bandeja para migas: Pull out the crumb tray from the bottom of the oven. Empty crumbs and wash with warm soapy water. Rinse and dry thoroughly before reinserting.
- No sumerja la unidad principal en agua ni en ningún otro líquido.
6. Solución de problemas
Consulte esta sección para conocer problemas comunes y sus soluciones.
| Problema | Posible causa | Solución |
|---|---|---|
| El horno no enciende. | No enchufado; sin energíatage; toma de corriente defectuosa. | Asegúrese de que el horno esté bien enchufado a una toma de corriente que funcione. Revise el disyuntor. |
| Los alimentos no se cocinan de manera uniforme. | Temperatura y tiempo incorrectos; hacinamiento; posición incorrecta del estante. | Adjust temperature and time. Avoid overcrowding the oven. Use the convection function for more even heat distribution. Try different rack positions. |
| Exceso de humo durante la cocción. | Residuos de alimentos o acumulación de grasa; alimentos grasosos. | Clean the oven interior and accessories thoroughly. Use the baking tray to catch drips from fatty foods. Ensure proper ventilation. |
| El asador no gira. | Asador no insertado correctamente; función de asador no seleccionada; comida demasiado pesada o desequilibrada. | Ensure the spit is correctly seated in both the drive socket and support bracket. Verify the rotisserie function is activated. Ensure food is balanced and not exceeding weight limits. |
| La pantalla no responde al tacto. | Fallo temporal del software; pantalla sucia. | Unplug the oven for a few minutes, then plug it back in. Clean the touch screen with a soft, dry cloth. |
If the problem persists after attempting these solutions, please contact GASTROBACK customer support.
7. Especificaciones del producto
- Modelo: GASTROBACK Mini Oven Design Bake & Grill, Model 42814
- Capacidad: 26 litros
- Fuerza: 1500 vatios
- Volumentage: 220-240V~, 50/60Hz (Standard European voltage, adjust if needed for other regions)
- Rango de temperatura: 30°C - 230°C
- Funciones: Top Heat, Bottom Heat, Top & Bottom Heat, Convection (Hot Air), Rotisserie
- Tipo de control: Electronic Touch Display
- Material: Stainless Steel housing, non-stick interior
- Peso: 8.2 kilogramos
- Accesorios incluidos: Baking tray, grill rack, 30cm pizza stone, rotisserie spit, rotisserie handle.
- Características de seguridad: Cool Touch housing, Electronic Child Safety.
8. Garantía y atención al cliente
GASTROBACK products are manufactured with high-quality materials and undergo strict quality control. This product is covered by a manufacturer's warranty against defects in materials and workmanship from the date of purchase.
- Periodo de garantía: Please refer to your purchase documentation or the official GASTROBACK webSitio para conocer los términos y la duración de la garantía específicos en su región.
- Reclamaciones de garantía: In the event of a defect, please contact the retailer where you purchased the product or GASTROBACK customer service directly. Proof of purchase is required for all warranty claims.
- Exclusiones: The warranty does not cover damage resulting from improper use, normal wear and tear, unauthorized repairs, or failure to follow the instructions in this manual.
Atención al cliente:
For further assistance, technical support, or spare parts, please visit the official GASTROBACK websitio o comuníquese con su departamento de atención al cliente:
Websitio: www.gastroback.de (o regional pertinente websitio)
Información del contacto: Refer to the "Contact" section on the GASTROBACK website for phone numbers and email addresses specific to your country.


