1. Introducción y másview
This manual provides comprehensive instructions for the installation, operation, and maintenance of your Jensen CDX3119 CD Receiver. Please read this manual thoroughly before using your new receiver to ensure proper functionality and safety. The Jensen CDX3119 is a single-DIN CD receiver designed for vehicle audio systems, featuring Bluetooth connectivity, CD playback, USB input, and auxiliary input.
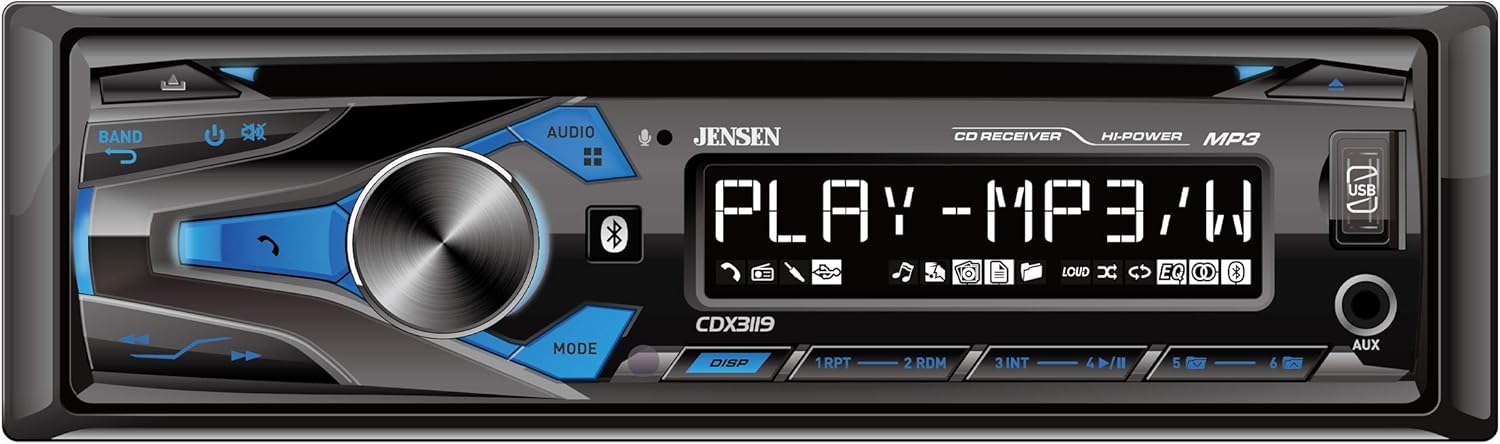
Figure 1: Front panel of the Jensen CDX3119 CD Receiver.
2. Características del producto
- Llamadas manos libres Bluetooth y transmisión de audio
- Plays MP3 music files
- Front panel USB input for media playback and device charging
- Front panel 3.5mm Auxiliary (AUX) input
- CD Player for audio CDs
- AM/FM Tuner with presets
- pre de 2 canalesamp salidas para externo ampConexión del elevador
- Multiple preset EQ curves for sound customization
3. Configuración
3.1 Instalación
Professional installation is highly recommended for car audio systems. Incorrect wiring can cause damage to the vehicle's electrical system or the receiver. Refer to the detailed wiring diagram included in the separate installation guide for specific connections.
- Conexión de energía: Connect the yellow wire to a constant 12V power source, the red wire to an accessory 12V power source (switched with ignition), and the black wire to a good chassis ground.
- Conexiones de altavoz: Connect speaker wires according to the color codes provided in the installation diagram. Ensure correct polarity for optimal sound.
- Conexión de antena: Conecte el cable de antena del vehículo a la entrada de antena del receptor.
- Montaje: Secure the receiver in the vehicle's dashboard using the provided mounting hardware.
3.2 Encendido inicial
After installation, turn on your vehicle's ignition. The receiver should power on. If not, check all power connections and the vehicle's fuse box.
4. Instrucciones de funcionamiento
4.1 Controles básicos
- Perilla de encendido/volumen: Press to turn the unit ON/OFF. Rotate to adjust the volume level.
- Botón de fuente (SRC): Press to cycle through available audio sources (Tuner, CD, USB, Bluetooth, AUX).
- Botón de banda: In Tuner mode, press to switch between FM1, FM2, FM3, AM1, and AM2 bands.
- Botones de sintonización/búsqueda: Use to manually tune radio frequencies or seek for the next/previous station. In media playback, use to skip tracks.
4.2 Funcionamiento de la radio
Press the SRC button until 'TUNER' is displayed. Use the BAND button to select FM or AM. Use the seek buttons to find stations. To store a preset, tune to the desired station, then press and hold one of the numeric preset buttons (1-6) until the station number flashes on the display.
4.3 Reproducción de CD
Insert an audio CD into the disc slot. The unit will automatically switch to CD mode and begin playback. Use the track skip buttons to navigate between songs.
4.4 Conectividad Bluetooth
Para emparejar su dispositivo:
- Asegúrese de que Bluetooth esté habilitado en su dispositivo móvil.
- On the CDX3119, press the SRC button to select 'BT AUDIO' or 'BT PHONE'.
- On your mobile device, search for available Bluetooth devices and select 'JENSEN CDX3119'.
- Confirm pairing if prompted. Once connected, 'CONNECTED' will appear on the receiver's display.
For hands-free calling, use the dedicated call buttons on the receiver's front panel. For audio streaming, play music from your paired device, and it will stream through the receiver.
4.5 Entrada USB y auxiliar
- USB: Inserte una unidad flash USB que contenga MP3 files into the front USB port. The unit will automatically switch to USB mode and begin playback. The USB port also provides charging for compatible devices.
- Auxiliar: Connect an external audio device (e.g., MP3 player, smartphone) to the front 3.5mm AUX input using an audio cable. Press the SRC button to select 'AUX'.
Video 1: Demonstration of a Single DIN Car Stereo with CD Player, Bluetooth, and USB functionality. This video illustrates general features and operation similar to the Jensen CDX3119.
5. Mantenimiento
- Limpieza de la unidad: Use a soft, dry cloth to clean the front panel. Avoid abrasive cleaners or solvents.
- Cuidado del CD: Sujete los CD por los bordes. Manténgalos limpios y sin rayones. Use un paño suave y sin pelusa para limpiarlos desde el centro hacia afuera.
- Cuidado general: Evite exponer la unidad a temperaturas extremas, luz solar directa durante períodos prolongados o humedad excesiva.
6. Solución de problemas
| Problema | Posible causa | Solución |
|---|---|---|
| Sin poder | Cableado incorrecto; Fusible quemado; Encendido del vehículo apagado. | Check power connections; Replace fuse; Turn vehicle ignition on. |
| Sin sonido | Volumen demasiado bajo; Silencio activado; Cableado incorrecto del altavoz. | Aumentar el volumen; Desactivar silencio; Verificar las conexiones de los altavoces. |
| Bluetooth no se conecta | Bluetooth not enabled on device; Device not in pairing mode; Incorrect pairing procedure. | Ensure Bluetooth is on; Put device in pairing mode; Re-attempt pairing as per instructions. |
| CD Error | CD sucio o rayado; Formato de disco incorrecto. | Clean or replace CD; Ensure disc is an audio CD. |
| USB no lee | Incompatible USB format; Corrupt files; USB device not supported. | Asegúrese de que el USB tenga formato FAT32; Verificar file integrity; Try a different USB device. |
7. Especificaciones
- Modelo: CDX3119
- Peso del artículo: 3.36 libras
- Dimensiones del producto: 9 x 9 x 3 pulgadas
- Tecnología de conectividad: Auxiliar, Bluetooth, RCA, USB
- Tipo de controlador: Botón pulsador
- Característica especial: USB Port, Built-In Amplifier, High-Definition LCD Display
- Dispositivos compatibles: teléfono inteligente, altavoz
- Tipo de conector: Conector de 3.5 mm, USB
- Modo de salida de audio: Estéreo
- Configuración del canal de sonido envolvente: Canal 2
- Potencia de salida: 50 vatios
8. Garantía y soporte
Your Jensen CDX3119 CD Receiver comes with a 3-year warranty. For warranty claims or technical support, please refer to the contact information provided in your product packaging or visit the official Jensen webSitio. Conserve su comprobante de compra para validar la garantía.


