1. Producto terminadoview
The WilTec 20-Ton Hydraulic Shop Press (Model 61978) is designed for various pressing, bending, and crushing operations in professional and home workshop environments. Constructed from high-quality alloy steel, this robust frame press features an integrated manometer for precise pressure control and adjustable working height to accommodate different materials and project requirements. Its versatile design makes it suitable for industrial, agricultural, and craft applications.

Figure 1: The WilTec 20-Ton Hydraulic Shop Press, showcasing its robust red frame and integrated components in a workshop environment.

Figura 2: Examples of typical applications for the hydraulic press, including automotive repair, general garage use, workshops, and industrial factory settings.
2. Instrucciones de seguridad
Read and understand all safety warnings and instructions before operating this hydraulic press. Failure to follow these instructions may result in serious injury or property damage.
Precauciones generales de seguridad:
- Always wear appropriate Personal Protective Equipment (PPE), including safety glasses, gloves, and sturdy footwear.
- Ensure the press is placed on a firm, level, and stable surface capable of supporting its weight and the maximum pressing force.
- Nunca exceda la capacidad de carga nominal de 20 toneladas.
- Do not work under the lifted load without additional support devices.
- Keep hands and other body parts clear of the pressing area during operation.
- Inspect the press for any signs of damage or structural weakness before each use. Do not operate a damaged press.
- Asegúrese de que todos los pernos y sujetadores estén bien apretados.
- Do not use the press to compress springs or any other items that could suddenly release energy or be ejected from the press, causing a hazard.
- Mantenga a los niños y al personal no autorizado alejados del área de trabajo.
- Release pressure slowly and carefully after each operation.
3. Montaje
The WilTec 20-Ton Hydraulic Shop Press requires assembly. It is recommended to have at least two people for safe assembly due to the weight and size of the components. Refer to the included assembly diagram for detailed component identification and placement.
Pasos de montaje:
- Desempaquetar componentes: Retire con cuidado todas las piezas del embalaje y verifíquelas con la lista de piezas.
- Montar el marco: Attach the base supports to the vertical frame pillars using the provided bolts and nuts. Ensure all connections are secure.
- Install the Crossbeams: Mount the adjustable crossbeams onto the vertical pillars. These beams allow for height adjustment of the work surface.
- Mount the Hydraulic Jack: Secure the 20-ton hydraulic jack to the top crossbeam. Ensure the jack is properly seated and fastened.
- Attach the Manometer: Connect the manometer to the hydraulic jack as per the instructions to monitor pressure.
- Install Support Jaws: Place the support jaws onto the adjustable crossbeams. These are used to hold the workpiece.
- Inspección final: Double-check all connections for tightness and ensure the press is stable before first use.

Figura 3: Primer plano view of the press base assembly, showing the sturdy feet and connecting frame components.
4. Configuración para la operación
Proper setup is essential for safe and effective operation.
- Área de trabajo: Asegúrese de que su área de trabajo esté limpia, bien iluminada y libre de obstrucciones.
- Estabilidad: Confirm the press is on a stable, level surface. For added stability, consider bolting the press to the floor if it will be used frequently for heavy tasks.
- Adjust Working Height: Adjust the height of the lower crossbeams to suit your workpiece. This is done by removing the pins, repositioning the beams, and reinserting the pins securely.
- Posición de la pieza de trabajo: Place the workpiece centrally on the support jaws. Ensure it is stable and will not shift during pressing.
- Check Hydraulic Fluid: Verify the hydraulic jack has sufficient fluid. Refer to the jack's specific instructions for checking and refilling.

Figure 4: Top section of the press showing the hydraulic jack and the integrated manometer for pressure monitoring.
5. Instrucciones de funcionamiento
Follow these steps for safe and effective operation of your hydraulic press.
Pressing Procedure:
- Prepare la pieza de trabajo: Ensure the item to be pressed is clean and properly positioned on the support jaws.
- Cerrar válvula de liberación: Close the release valve on the hydraulic jack by turning it clockwise until it is tight.
- Aplicar presión: Insert the pump handle into the jack's socket and pump slowly to raise the ram. Observe the manometer to monitor the applied pressure.
- Pieza de trabajo del monitor: Continuously observe the workpiece during pressing. If any unusual sounds or movements occur, immediately stop and assess the situation.
- Liberar presión: Once the operation is complete, slowly open the release valve by turning it counter-clockwise. The ram will retract.
- Retirar la pieza de trabajo: Carefully remove the pressed item from the support jaws.
Demostración en vídeo:
Video 1: Demonstration of a 20-ton hydraulic shop press in operation, showing the pressing mechanism and use of the hydraulic jack. This video illustrates the general functionality of a similar press model.
Video 2: Operational overview of a 12-ton hydraulic shop press, demonstrating the process of applying and releasing pressure. This video provides a visual guide to the press's functionality.
6. Mantenimiento
Regular maintenance ensures the longevity and safe operation of your hydraulic press.
- Limpieza: Keep the press clean and free from dirt, grease, and debris. Wipe down surfaces after each use.
- Lubricación: Periodically lubricate moving parts, such as the ram and pivot points, with appropriate grease or oil.
- Fluido hidráulico: Check the hydraulic fluid level regularly and top up if necessary. Use only recommended hydraulic fluid. Replace fluid according to manufacturer guidelines or if it appears contaminated.
- Inspección: Regularly inspect all components for wear, damage, or loose fasteners. Pay close attention to welds, frame integrity, and the hydraulic jack.
- Almacenamiento: Store the press in a dry, clean environment when not in use. Lower the ram completely to prevent corrosion of the piston.
7. Solución de problemas
This section addresses common issues you might encounter with your hydraulic press.
| Problema | Posible causa | Solución |
|---|---|---|
| Ram does not lift or lifts slowly. | Low hydraulic fluid level; air in the hydraulic system; release valve open; faulty pump. | Check and refill hydraulic fluid; bleed air from the system; ensure release valve is fully closed; inspect or replace pump. |
| Ram drifts down under load. | Leaking seals in the hydraulic jack; release valve not fully closed. | Inspect and replace seals; ensure release valve is tightly closed. |
| Manometer shows no pressure or incorrect reading. | Manometer faulty or improperly connected; air in the manometer line. | Check connection; bleed air; replace manometer if faulty. |
| Ruidos inusuales durante el funcionamiento. | Loose components; lack of lubrication; internal jack issue. | Tighten all fasteners; lubricate moving parts; consult a qualified technician for jack repair. |
8. Especificaciones técnicas
Key technical details for the WilTec 20-Ton Hydraulic Shop Press (Model 61978).
- Modelo: 61978
- Marca: WilTec
- Tipo: Prensa de taller hidráulica
- Fuerza de presión: 20 toneladas
- Material: Acero aleado
- Color: Rojo
- Dimensiones (L x An x Al): 680 x 600 x 1500 mm (aprox. 68 x 60 x 150 cm)
- Peso: 66.04 kilogramos
- Características: Integrated Manometer, Adjustable Working Height

Figure 5: Detailed dimensional drawing of the hydraulic press, showing key measurements for length, width, and height.
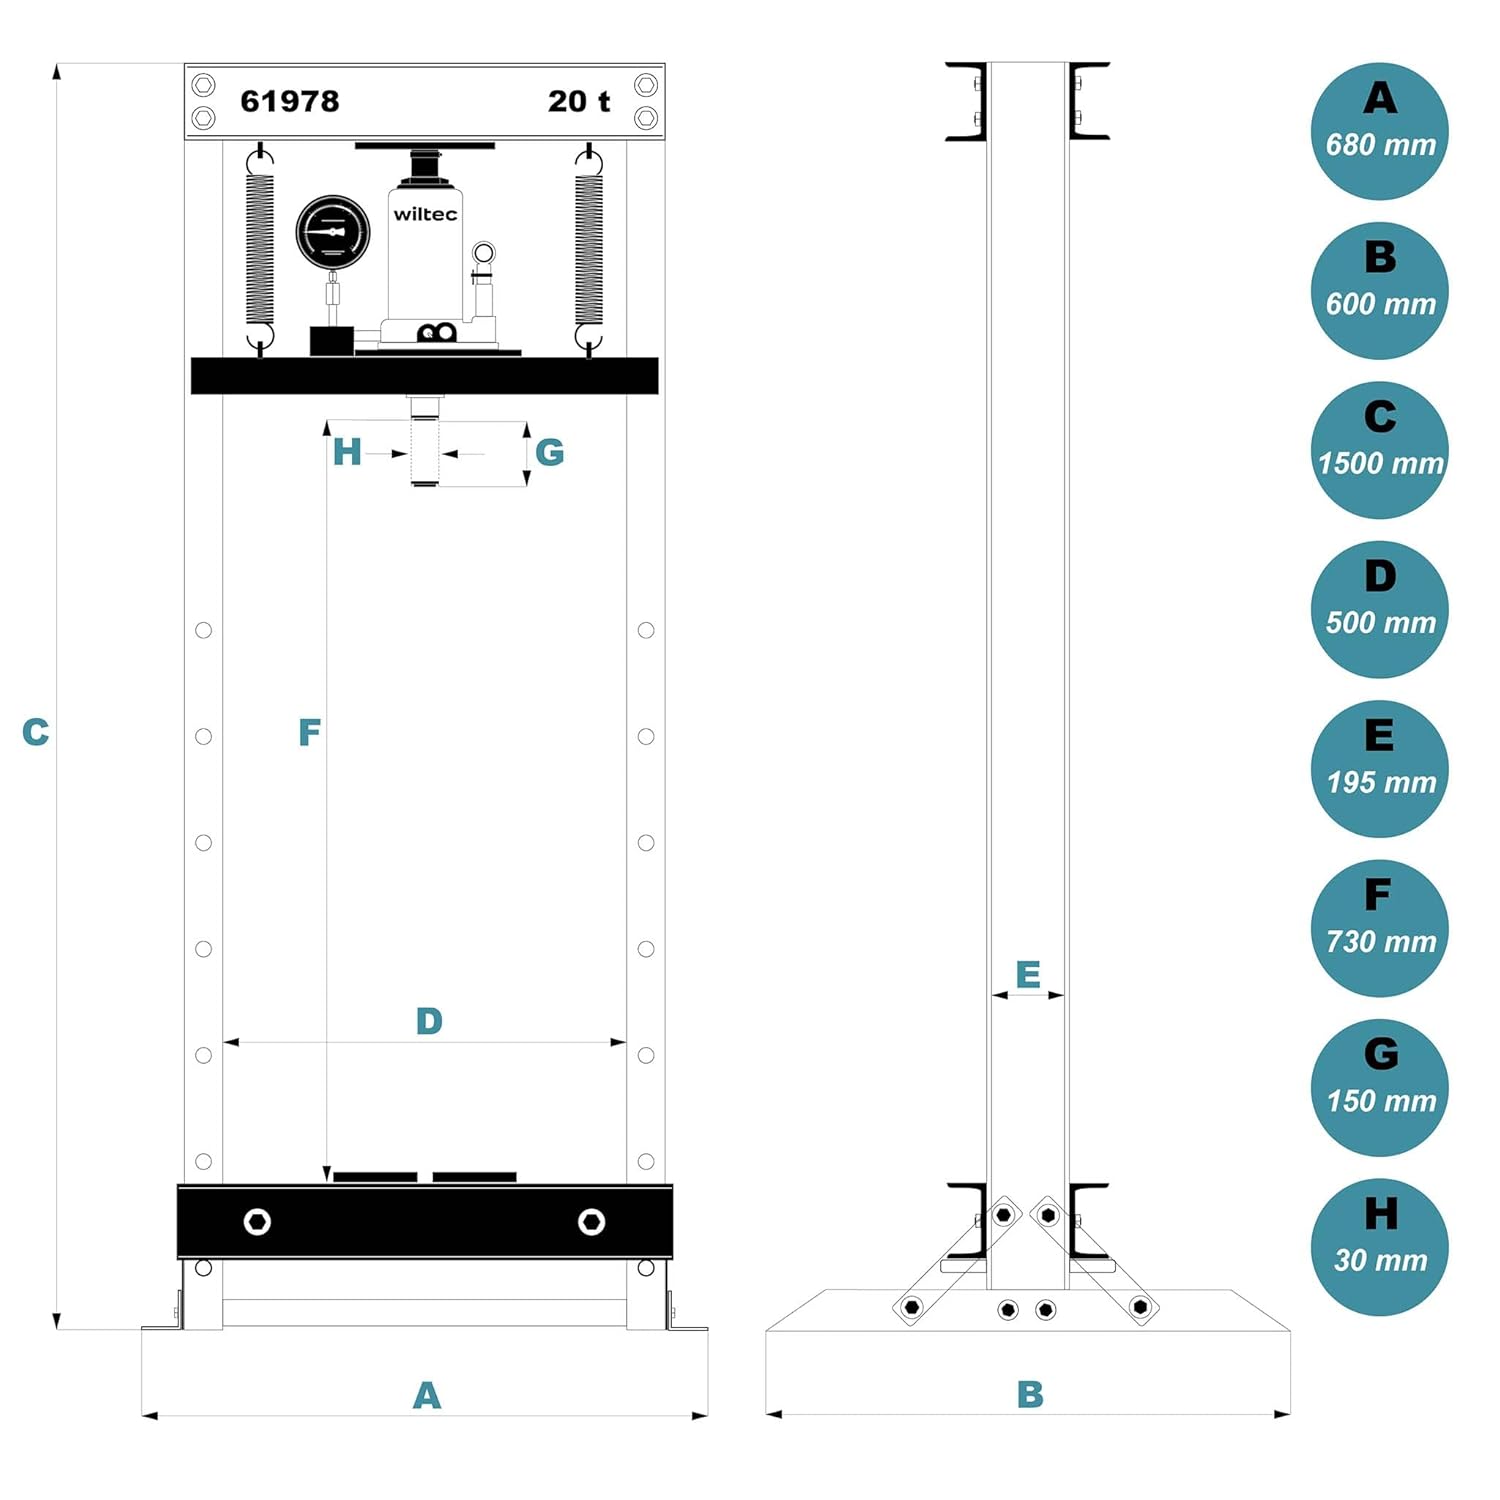
Figure 6: Technical drawing illustrating various dimensions and components of the hydraulic press, including working area and overall size.
9. Garantía y soporte
WilTec products are designed for durability and performance. For specific warranty information, please refer to the warranty card included with your product or visit the official WilTec website. In case of technical issues, missing parts, or warranty claims, please contact WilTec customer support directly. Keep your proof of purchase for all warranty-related inquiries.
Información del contacto:
- Fabricante: WilTec Wildanger Technik GmbH
- Websitio: www.wiltec.de (or refer to local distributor websitio)
- Servicio al cliente: Refer to the contact details provided in your product packaging or on the official websitio.


