1. Introducción
The OOYCYOO 100 Amp MPPT Solar Charge Controller is designed to efficiently manage power flow from your solar panels to your battery bank. This manual provides essential information for safe installation, operation, and maintenance of your solar charge controller. Please read this manual thoroughly before installation and use.
2. Producto terminadoview
2.1 Características principales
- 100 Amp MPPT Solar Charge Controller with 12V/24V/36V/48V automatic system voltage identificación.
- Equipped with a blacklight LCD display for clear visibility of operational data.
- Directly displays accumulated charge in KWH, eliminating the need for external measuring instruments.
- Features two newly designed vents for enhanced convection cooling.
- Incorporates multiple safety protection functions.
- Achieves a maximum DC/DC transfer efficiency of up to 98.7%.
- Compatible with various battery types: USER (programmable for Lithium, LiFePO4, Li(NiCoMn)O2), Flooded, Sealed, and Gel batteries.
- Ajustes programables por el usuario para el volumen de absorcióntage, vol flotantetage, bajo volumentagDesconectar y cargar el temporizador.
- Built-in cooling fan activates when temperature exceeds 45℃ and deactivates below 40℃, designed for extended life.
- Maximum Power Point Tracking (MPPT) rate ≥99% and conversion rate >98%.
2.2 Componentes del producto
The following image illustrates the main components and connection points of the OOYCYOO 100 Amp Controlador de carga solar MPPT.

Figura 1: Delante y abajo view of the OOYCYOO MPPT Solar Charge Controller with labeled ports. Key components include the LCD display, 5S Reset button, Solar Panel terminals, Battery terminals, Load terminals, USB 5V 2A ports, Remote Temp Sensor port, RS485 Communication port, and mounting holes.
- Pantalla LCD: Shows real-time system status and parameters.
- Botón de reinicio 5S: Used for system reset or accessing certain settings.
- Terminales del panel solar: Connect to your solar panel array.
- Terminales de la batería: Connect to your battery bank.
- Terminales de carga: Connect to your DC loads.
- USB 5V 2A Ports: Para cargar dispositivos USB compatibles.
- Puerto del sensor de temperatura remoto: Connects to the included temperature sensor for accurate battery temperature compensation.
- Puerto de comunicación RS485: For external communication and monitoring.
- Orificios de montaje: For secure installation of the controller.
3. Configuración e instalación
3.1 Precauciones de seguridad
- Asegúrese de que todas las conexiones estén firmes y seguras para evitar conexiones sueltas que puedan causar calor excesivo.
- Instale el controlador en un área bien ventilada, lejos de materiales inflamables y de la luz solar directa.
- Utilice siempre el equipo de protección personal (EPP) adecuado durante la instalación.
- Desconecte todas las fuentes de energía (paneles solares y batería) antes de realizar cualquier cableado o mantenimiento.
3.2 Montaje
Mount the controller vertically on a solid surface to allow for proper heat dissipation. Ensure there is adequate clearance around the unit for airflow. The controller dimensions are approximately 12 inches (L) x 7.8 inches (W) x 3.2 inches (H).

Figura 2: Illustration of the OOYCYOO MPPT Solar Charge Controller's dimensions (12.60 inches / 32 cm height, 7.87 inches / 20 cm width, 3.15 inches / 8 cm depth) and its compatibility with AGM, Gel, Flooded, and Lithium battery types.
3.3 Instrucciones de cableado
Follow the connection order carefully to avoid damage to the controller or other components.
- Conecte la batería: First, connect the battery to the controller's battery terminals. Ensure correct polarity (positive to positive, negative to negative). The controller will automatically detect the battery voltagy (12V/24V/36V/48V).
- Conecte los paneles solares: Next, connect the solar panel array to the controller's solar panel terminals. Ensure correct polarity.
- Conectar la carga: Por último, conecte las cargas de CC a las terminales de carga del controlador.
Orden de desconexión: Para desconectar el sistema, invierta el orden: primero desconecte la carga, luego los paneles solares y finalmente la batería.
Calibre del cable: Use 10 AWG wire for power terminals to ensure optimal performance and safety.
3.4 Compatibilidad de la batería
The controller is compatible with a wide range of battery types, including:
- AGM (estera de fibra de vidrio absorbente)
- Ácido de plomo sellado
- Gel
- Plomo-ácido inundado
- Lithium (LiFePO4, Li(NiCoMn)O2) - User programmable
4. Instrucciones de funcionamiento
Pantalla LCD 4.1
The integrated blacklight LCD display provides real-time information about your solar system's performance. It shows parameters such as battery voltage, charging current, load current, and accumulated energy (KWH).
4.2 Configuración del sistema
The controller allows for user-programmable settings to optimize charging for different battery types and system requirements. These settings typically include:
- Selección del tipo de batería: Choose the appropriate battery type (AGM, Gel, Flooded, Lithium, or USER-defined).
- Vol de absorcióntage: Establezca el volumentage at which the battery is held during the absorption charging stage.
- Vol flotantetage: Establezca el volumentage at which the battery is maintained after absorption, to keep it fully charged.
- Vol bajotage Desconexión (LVD): Configure el voltage threshold at which the load will be disconnected to protect the battery from over-discharge.
- Load Timer: Program the operating hours for the DC load output.
Refer to the detailed instructions within the controller's interface for navigating and adjusting these settings.
5. Mantenimiento
El mantenimiento regular garantiza la longevidad y el rendimiento óptimo de su controlador de carga solar.
- Limpieza: Periodically clean the controller's exterior with a dry cloth. Ensure vents are free from dust and debris to maintain proper airflow.
- Comprobaciones de conexión: Annually inspect all wiring connections for tightness and signs of corrosion. Loose connections can lead to overheating and system inefficiency.
- Operación del ventilador: The built-in cooling fan will activate automatically when the internal temperature exceeds 45℃ and turn off when it drops below 40℃. Ensure the fan is not obstructed and operates freely.
- Comprobación ambiental: Verify that the installation environment remains dry and free from excessive humidity or extreme temperatures.
6. Solución de problemas
Si encuentra problemas con su controlador de carga solar MPPT OOYCYOO, considere los siguientes pasos generales de solución de problemas:
- Sin pantalla/encendido: Verifique las conexiones de la batería y asegúrese de que el volumen de la bateríatage is within the controller's operating range. Verify that the battery is charged.
- Sin carga: Confirm solar panel connections and polarity. Check for sufficient sunlight and ensure solar panel voltage está por encima del volumen de la bateríatage. Inspect for any blown fuses in the solar array.
- La carga no funciona: Check load connections and ensure the load is not exceeding the controller's rated current. Verify that the battery voltage está por encima del Low Voltage Disconnect (LVD) setting.
- Calentamiento excesivo: Ensure the controller is mounted in a well-ventilated area and that its cooling vents are not obstructed. Reduce the load if consistently overheating.
- Códigos de error: If the LCD displays an error code, consult the specific error code section of the full user manual (if available) or contact customer support.
For persistent issues, it is recommended to contact OOYCYOO customer support.
7. Especificaciones
Technical specifications for the OOYCYOO 100 Amp MPPT Solar Charge Controller (Model KP60 100):
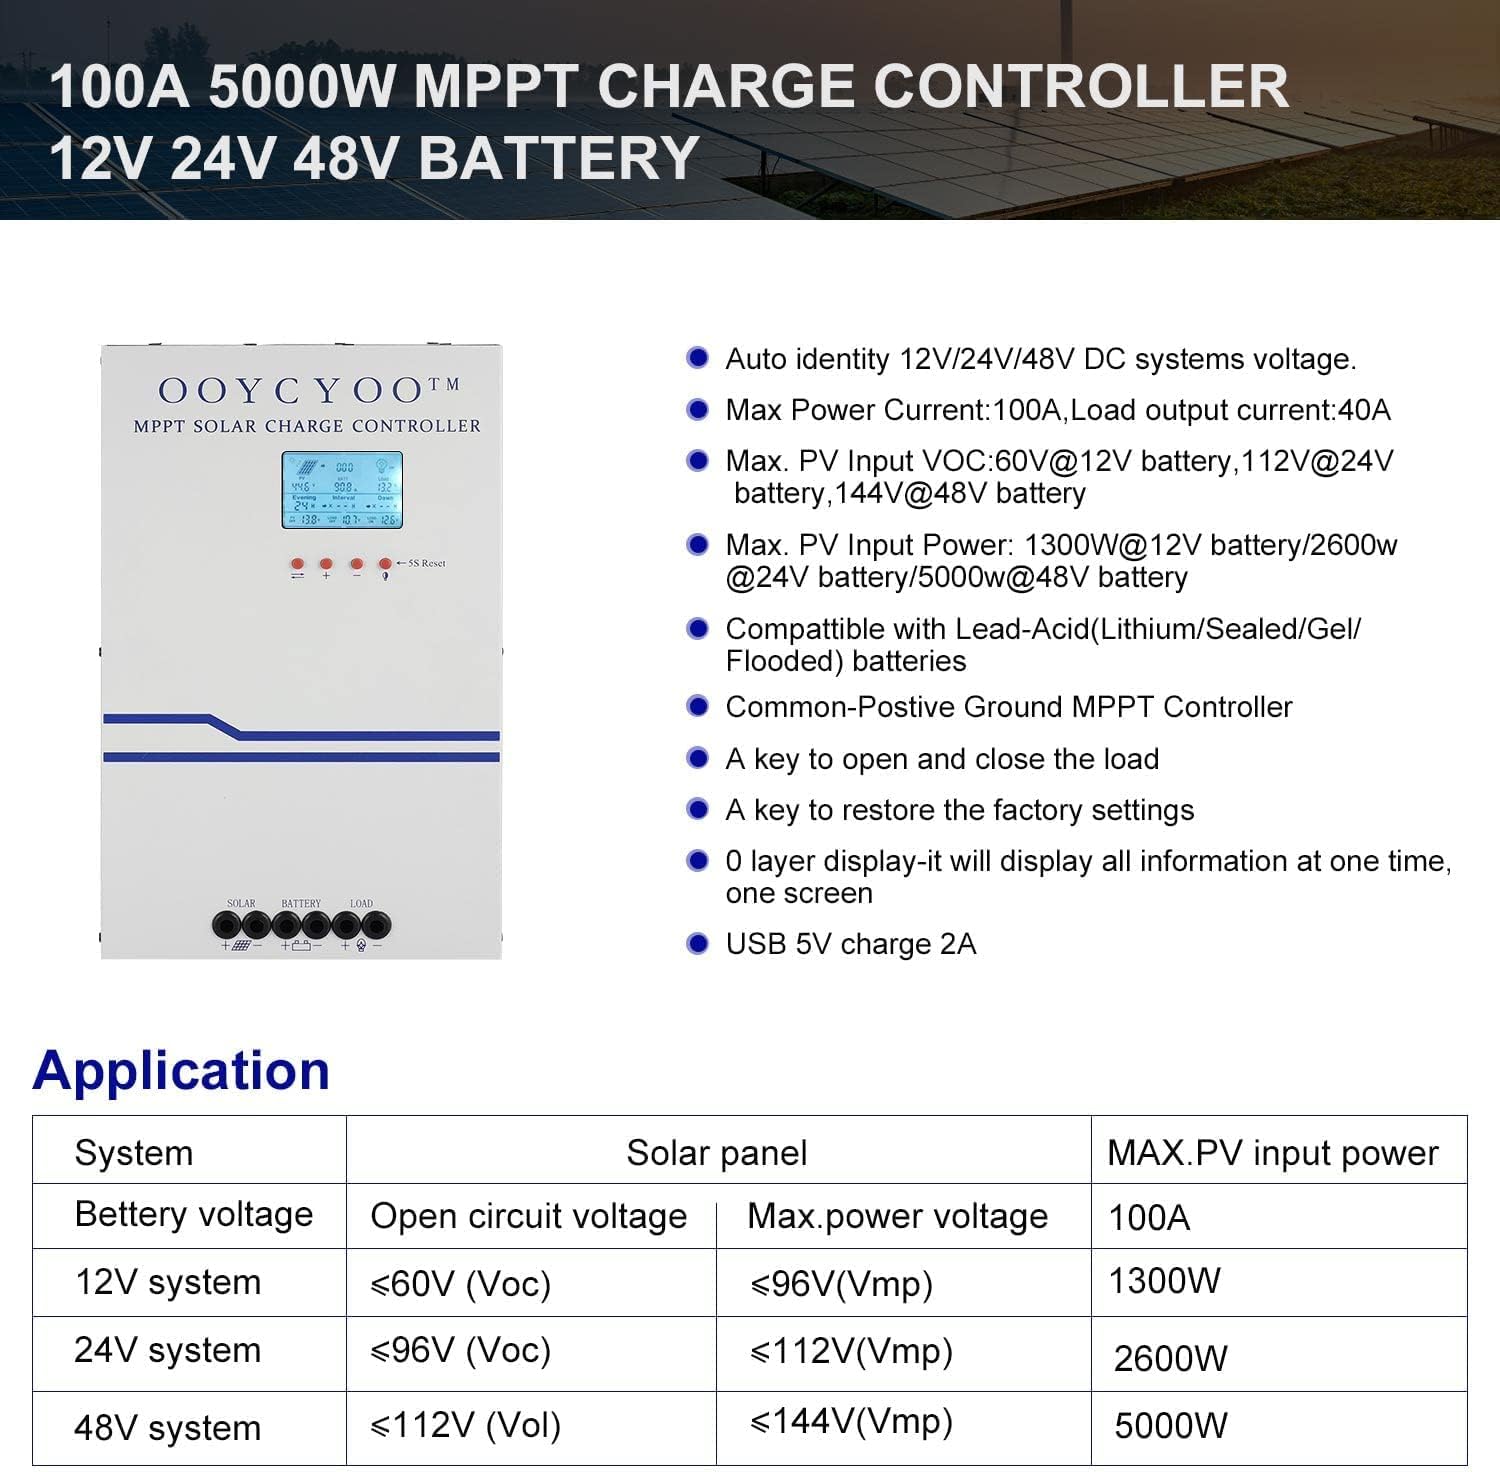
Figura 3: Encimaview of the OOYCYOO 100A 5000W MPPT Charge Controller, highlighting its auto-identification for 12V/24V/48V DC systems, maximum power current, PV input voltage limits, and maximum PV input power for different battery systems. Also shows compatibility with various battery types and key operational features.
| Parámetro | Valor |
|---|---|
| Corriente de carga nominal | 100A |
| Volumen nominal del sistematage | Identificación automática de 12 V/24 V/36 V/48 V CC |
| máx. Volumen de circuito abierto fotovoltaicotage | 150 V CC |
| Potencia máxima de entrada fotovoltaica (sistema de 12 V) | 1300W (Voc ≤96V) |
| Potencia máxima de entrada fotovoltaica (sistema de 24 V) | 2600W (Voc ≤112V) |
| Potencia máxima de entrada fotovoltaica (sistema de 48 V) | 5000W (Voc ≤150V) |
| Calibre del cable del terminal de alimentación | calibre 10 AWG |
| Dimensiones del producto (L x An x Al) | 12 x 7.8 x 3.2 pulgadas (30.5 x 19.8 x 8.1 cm) |
| Peso del artículo | 8.86 libras (4.02 kg) |
| Temperatura de funcionamiento | 40 ℃ (104 ℉) |
| Tipo de pantalla | Pantalla LCD |
8. Información de seguridad y protecciones
The OOYCYOO MPPT Solar Charge Controller is equipped with comprehensive protection features to ensure safe operation of your solar power system:
- Protección contra sobrecorriente/potencia fotovoltaica
- Protección contra cortocircuitos fotovoltaicos
- Protección de polaridad inversa fotovoltaica
- Protección contra carga inversa nocturna
- Protección de polaridad inversa de la batería
- Batería sobre vol.tage Protección
- Protección contra sobredescarga de batería
- Protección contra sobrecalentamiento de la batería
- Protección contra sobrecalentamiento del controlador
- Protección de baja temperatura de la batería de litio
- Protección contra cortocircuito de carga
- Protección de sobrecarga de carga
- TVS de alto volumentage Protección contra transitorios
9. Garantía y soporte
Warranty information for the OOYCYOO 100 Amp MPPT Solar Charge Controller is typically provided with the product packaging or through the point of purchase. Please retain your proof of purchase for warranty claims.
For technical support, troubleshooting assistance, or inquiries regarding your product, please refer to the contact information provided by OOYCYOO or your authorized dealer. This package includes a user manual in English for detailed guidance.


