1. Introducción
This manual provides essential instructions for the safe and efficient operation of your EPEVER Tracer4210AN 40A MPPT Solar Charge Controller. This device is designed to manage power flow from your solar panels to your battery bank, ensuring optimal charging and system protection. Please read this manual thoroughly before installation and use.
1.1 ¿Qué hay en la caja?
The package includes the EPEVER Tracer4210AN MPPT Solar Charge Controller, an MT50 Remote Meter, a Remote Temperature Sensor (RTS), and an RS485 PC Communication Cable. Mounting hardware is also provided.

Image 1.1: EPEVER Tracer4210AN 40A MPPT Solar Charge Controller with MT50 Remote Meter, Remote Temperature Sensor, and RS485 Communication Cable.
1.2 producto másview
The Tracer4210AN controller features an LCD display for key parameters, SELECT and ENTER buttons for navigation, and terminals for connecting solar panels, batteries, and loads. It also includes dedicated ports for the Remote Temperature Sensor (RTS) and RS485 communication.

Imagen 1.2: Frente view of the controller highlighting the LCD display, Select/Enter buttons, and connection terminals for solar panel, battery, and load.

Imagen 1.3: Lateral view of the controller indicating the Remote Temperature Sensor (RTS) interface and the RS485 communication port.
2. Características del producto
- Advanced MPPT control algorithm for tracking efficiency over 99.5%.
- Built-in LCD screen displays key charging parameters.
- Compatibility with multiple battery types: Sealed lead acid, gel, flooded, lithium, and user-defined.
- Suitable for solar panels up to 520W (12V battery) or 1040W (24V system).
- Current limiting function (40A) allows for future solar panel expansion.
- RS-485 communication bus interface and Modbus protocol for various communication requirements.
- Full-load operation without capacity drop within the working environment temperature range.
- Aluminum alloy material for effective heat dissipation.
3. Instalación
Proper installation is crucial for the safe and efficient operation of your solar charge controller. Ensure all connections are secure and follow the specified order.
3.1 Orden de conexión
The correct connection order is critical to prevent damage to the controller and other components. Always connect the battery first, then the solar panel, and finally the load.
- Conecte la batería al controlador.
- Conecte el panel solar al controlador.
- Conecte la carga al controlador.
For disassembly, reverse the order: Disconnect the load first, then the solar panel, and finally the battery.
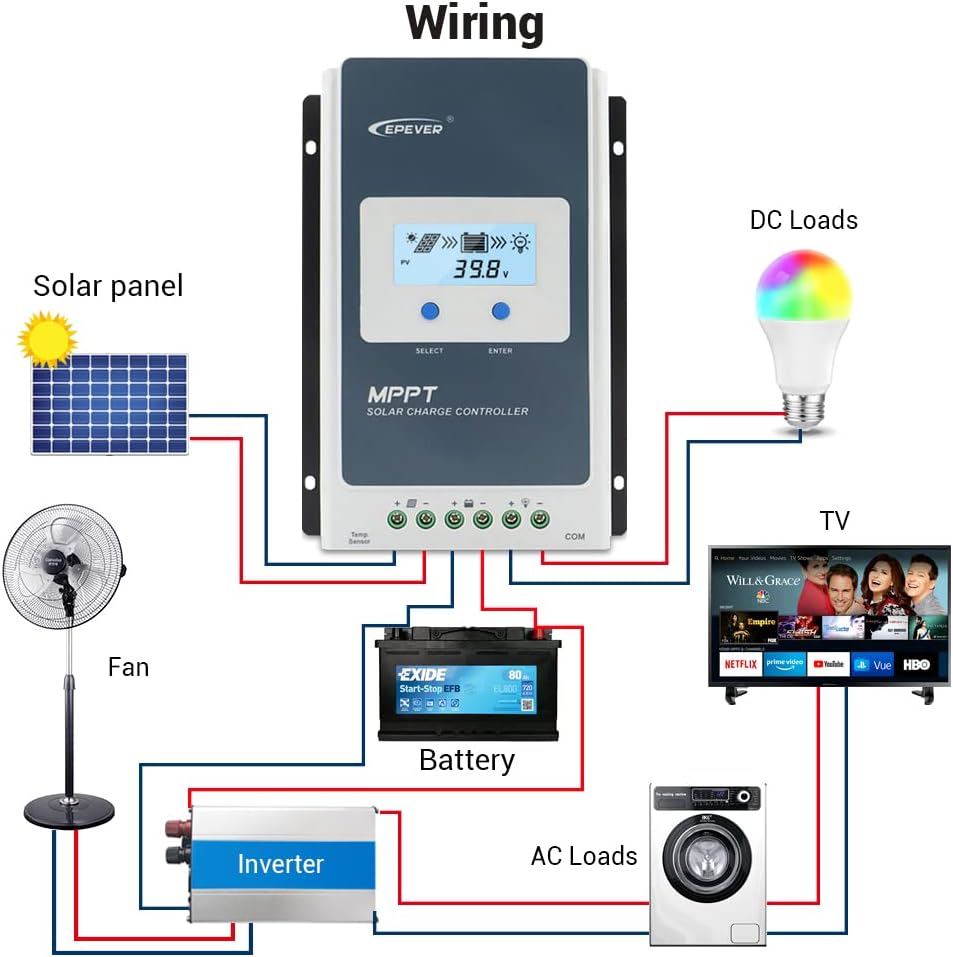
Image 3.1: General wiring diagram illustrating connections for solar panel, battery, and loads (DC and AC via inverter).
3.2 Connecting the Remote Temperature Sensor (RTS)
Connect the Remote Temperature Sensor (RTS) to the designated port on the controller. This sensor provides accurate battery temperature readings for temperature compensation during charging, optimizing battery life.
Vídeo 3.1: Este vídeo demuestra el desempaquetado, físico sobreview, and installation steps for the EPEVER Tracer-AN MPPT Solar Charge Controller, including connecting the temperature sensor. (Relevant segment: 0:08 - 1:29)
4. Instrucciones de funcionamiento
The EPEVER Tracer4210AN offers various settings to optimize your solar power system. These settings can be adjusted directly on the controller's LCD or via the MT50 Remote Meter.
4.1 Configuración del tipo de batería
It is essential to set the correct battery type for proper charging and to prevent battery damage. The controller supports Sealed, Gel, Flooded, Lithium, and User-defined battery types.
- Press and hold the "ENTER" button for 5 seconds when the battery voltage interface is displayed.
- Press the "SELECT" button to cycle through battery types when the battery type interface is flashing.
- Press the "ENTER" button to confirm the selected battery type.
Video 4.1: This video demonstrates how to set the battery type on the EPEVER Tracer-AN MPPT Solar Charge Controller. (Relevant segment: 2:00 - 2:35)
4.2 Configuración del modo de trabajo de carga
The load working mode determines how the connected load operates. Options include manual control, light ON/OFF, and various timer settings.
- Press and hold the "ENTER" button for 5 seconds when the load mode interface is displayed.
- Press the "SELECT" button to cycle through the available load modes.
- Press the "ENTER" button to confirm the desired load mode.
Modo de control manual:
When in Manual Control Mode, pressing the "ENTER" button will toggle the load ON or OFF.
Video 4.2: This video demonstrates how to set the load working mode and use manual control on the EPEVER Tracer-AN MPPT Solar Charge Controller. (Relevant segment: 2:35 - 3:30)

Image 4.1: Load Working Mode table, detailing various timer and control options.
4.3 Operación del medidor remoto MT50
The MT50 Remote Meter provides comprehensive monitoring and setting capabilities for the controller. It displays various operating data and system fault information. The buttons are easy to operate, and the numeric display is clear.
Video 4.3: This video demonstrates how to navigate and set parameters using the MT50 Remote Meter. (Relevant segment: 3:30 - 4:10)
5. Mantenimiento
El mantenimiento regular garantiza la longevidad y el rendimiento óptimo de su controlador de carga solar.
- Comprobar conexiones: Inspeccione periódicamente todas las conexiones del cableado para comprobar su firmeza y evitar la corrosión. Las conexiones sueltas pueden causar sobrecalentamiento y daños.
- Limpiar el controlador: Mantenga el controlador limpio y libre de polvo y residuos. Asegúrese de que las aletas del disipador de calor no estén obstruidas para mantener una refrigeración adecuada.
- Inspeccionar el cableado: Check all cables for signs of wear, fraying, or damage. Replace any damaged wiring immediately.
- Rendimiento del monitor: Regularly check the LCD display or MT50 remote meter for normal operating parameters and any error codes.
6. Solución de problemas
If you encounter issues with your EPEVER Tracer4210AN, refer to the following basic troubleshooting steps:
- Sin pantalla/encendido: Verify battery connections and ensure the battery has sufficient charge. Check for blown fuses in the battery circuit.
- Sin carga: Ensure solar panels are connected correctly and receiving sunlight. Check solar panel voltage and current. Verify battery type setting.
- La carga no funciona: Check load connections and ensure the load is not exceeding the controller's rated current. Verify the load working mode setting (e.g., not in manual OFF mode).
- Códigos de error: Consult the full product manual (available on the manufacturer's website) for specific error code interpretations and solutions.
For persistent issues, contact EPEVER customer support.
7. Especificaciones
The following table outlines the key technical specifications for the Tracer series, including the Tracer4210AN model.
Image 7.1: Detailed technical parameters for EPEVER Tracer series MPPT solar charge controllers.
| Parámetro | Value (Tracer4210AN) |
|---|---|
| Volumen nominal del sistematage | 12 / 24VDC automático |
| Corriente de carga nominal | 40A |
| Corriente de descarga nominal | 40A |
| Volumen de la bateríatage Rango | 8 ~ 32 V |
| máx. Volumen de circuito abierto fotovoltaicotage | 100V (92V at 25°C environment temperature) |
| Volumen MPPtage Rango | Volumen de la bateríatagy +2 V ~ 72 V |
| Máxima potencia de entrada fotovoltaica | 520W/12V, 1040W/24V |
| Autoconsumo | ≤12 mA |
| Volumen del circuito de descargatage gota | ≤0.23 V |
| Compensación de temperatura | -3 mV/°C/2 V (predeterminado) |
| Toma de tierra | Negativo común |
| Interfaz RS485 | 5 V CC / 100 mA |
| Tiempo de retroiluminación de la pantalla LCD | 60S (predeterminado) |
| Dimensiones del paquete | 11.61 x 7.99 x 6.97 pulgadas |
| Peso del artículo | 5.47 libras (2.49 kilogramos) |
| Tipo de pantalla | Pantalla LCD |
8. Garantía y soporte
For warranty information, detailed technical support, or to download the latest software and firmware, please visit the official EPEVER website or refer to the documentation included with your product. You may also contact your retailer for assistance.


