1. Introducción
Thank you for choosing the Dancover ProShed® Garden Shed. This manual provides essential information for the safe and efficient assembly, operation, and maintenance of your new garden shed. Please read all instructions carefully before beginning assembly and retain this manual for future reference.
The ProShed® Garden Shed is designed to provide a secure and weather-resistant storage solution for your garden tools, equipment, and other outdoor items. Its robust galvanized steel construction ensures durability, while the thoughtful design allows for relatively straightforward assembly.
Características principales:
- Construcción duradera de acero galvanizado.
- Spacious interior for various storage needs.
- Sliding doors for easy access.
- Integrated ventilation for air circulation.
- Designed for padlock compatibility (padlock not included).
2. Instrucciones de seguridad
Su seguridad es primordial. Por favor, respete las siguientes normas de seguridad durante el montaje y el uso:
- Lea el manual completo: Before starting assembly, read and understand all instructions.
- Use equipo de protección: Always wear appropriate personal protective equipment (PPE), including gloves and safety glasses, to prevent injuries from sharp edges or falling objects.
- Asamblea de dos personas: Assembly typically requires at least two people for safety and ease.
- Fundación estable: Ensure the shed is installed on a firm, level, and stable foundation. Uneven surfaces can compromise the shed's structural integrity.
- Componentes seguros: Ensure all fasteners are tightened securely during assembly.
- Ventilación: No bloquee las aberturas de ventilación.
- Condiciones climáticas: No intente realizar el montaje durante vientos fuertes, lluvias intensas u otras condiciones climáticas adversas.
- Niños y mascotas: Mantenga a los niños y las mascotas alejados del área de reunión.
- Artículos pesados: Do not store excessively heavy items on shelves or hang them from the roof structure unless specifically designed for such loads.
3. Contenido del paquete
Before beginning assembly, unpack all components and verify that all parts are present and undamaged. Refer to the detailed parts list provided with your product packaging. Typical components include:
- Paneles de pared de acero galvanizado
- Roof panels and ridge cap
- Frame components (beams, supports, corner brackets)
- Conjunto de puerta corredera
- Elementos de fijación (tornillos, tuercas, arandelas)
- Handles and other hardware
If any parts are missing or damaged, please contact Dancover customer support before proceeding with assembly.
4. Configuración y montaje
The ProShed® Garden Shed is designed for straightforward assembly, but careful planning and execution are crucial for a stable and durable structure.
4.1 Preparación del sitio
Selecting the correct location and preparing the foundation are critical steps:
- Choose a firm, level surface. Recommended foundations include concrete, paving slabs, or a wooden deck.
- If placing on grass, it is highly recommended to first install a suitable base or foundation frame (such as the Dancover anti-slip floor solution, sold separately) to ensure stability and prevent moisture issues.
- Ensure adequate drainage around the shed to prevent water accumulation.
4.2 Pasos de montaje
Follow the step-by-step assembly instructions provided in the separate assembly manual included with your product. General steps typically involve:
- Assemble the base frame.
- Attach the wall panels, ensuring they are correctly aligned and secured.
- Install the roof support beams and then the roof panels.
- Assemble and install the sliding door mechanism and doors.
- Secure all remaining fasteners and check for stability.

Figura 1: En general view of the ProShed Garden Shed, showcasing its aluminum grey finish and robust design.
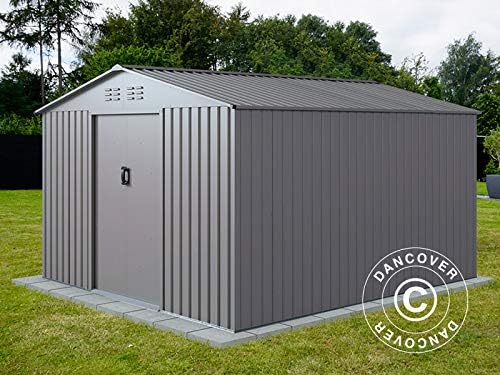
Figure 2: The ProShed Garden Shed situated in a garden, demonstrating its integration into an outdoor environment.
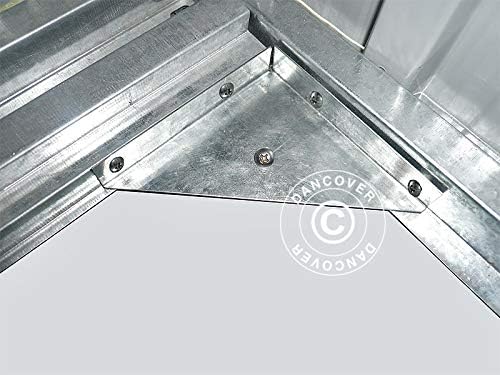
Figura 3: detallada view of a corner joint, illustrating the secure fastening and structural integrity of the shed's frame.
5. Instrucciones de funcionamiento
5.1 Operación de la puerta
The ProShed® features wide sliding doors for easy access. To open, gently slide the door along its track. To close, slide it back until it meets the frame. Ensure the track is clear of debris for smooth operation.

Figure 4: Close-up of the shed door handle, designed for easy grip and operation of the sliding doors.
5.2 Seguridad
The doors are equipped with a hole for a padlock (not supplied) to secure your stored items. Always ensure the doors are fully closed before locking.
5.3 Ventilación
The shed incorporates perforated panels near the roofline to provide essential ventilation. This helps to reduce condensation and maintain air circulation inside the shed. Do not obstruct these ventilation openings.

Figura 5: Exterior view of the ventilation openings located near the roof, designed to ensure proper airflow within the shed.

Figure 6: Interior perspective showing the roof structure and the internal view of the ventilation panels.
6. Mantenimiento
Regular maintenance will help prolong the life and appearance of your ProShed® Garden Shed.
- Limpieza: Clean the exterior surfaces periodically with a mild soap and water solution. Rinse thoroughly with clean water. Avoid abrasive cleaners or harsh chemicals that could damage the finish.
- Rieles de puerta: Mantenga los rieles de la puerta corrediza limpios y sin suciedad, hojas ni otros residuos para garantizar un funcionamiento suave. Lubrique con un espray de silicona si es necesario.
- Sujetadores: Periodically check all screws and bolts to ensure they remain tight. Re-tighten any loose fasteners to maintain structural integrity.
- Carga de nieve: In areas with heavy snowfall, regularly remove accumulated snow from the roof to prevent excessive load and potential damage.
7. Solución de problemas
A continuación se presentan algunos problemas comunes y sus posibles soluciones:
- Dificultad de montaje: Ensure all parts are correctly oriented according to the assembly manual. Do not force components. Verify that the foundation is perfectly level.
- Doors Sticking/Not Sliding Smoothly: Check the door tracks for obstructions (dirt, debris). Clean the tracks and apply a silicone lubricant. Ensure the shed is level and square, as an uneven foundation can cause misalignment.
- Fugas de agua: Verify that all panels are correctly overlapped and all fasteners are tight. Ensure the shed is on a proper, well-drained foundation. Check for any damage to panels or seals.
- Excessive Condensation Inside: Ensure ventilation openings are not blocked. Consider adding a moisture absorber if the problem persists, especially in humid climates.
8. Especificaciones
| Atributo | Valor |
|---|---|
| Dimensiones del producto (L x An x Al) | 319 x 277 x 192 cm |
| Peso | 85.1 kilogramos |
| Número de modelo | MS576032-fr |
| Tipo de material | Zinc coated steel |
| Color | Gris Aluminio |
| Material del marco | Aluminio |
| Requiere ensamblaje | Sí |
| Altura de la pared lateral | 1.55 metros |
| Ridge Height | 1.92 metros |
| Door Opening (W x H) | 0.96 x 1.52 m |
| Exterior Dimensions (incl. eaves) | 2.67 x 3.09 m |
| Roof Panel Thickness | 0.25 mm |
| Espesor del panel lateral | 0.25 mm |
| Impermeable | 100% impermeable |
| Minimum Base Dimensions | 2.69 x 3.11 m |
9. Garantía y soporte
9.1 Información de garantía
The Dancover ProShed® Garden Shed comes with a 10-year anti-corrosion and perforation warranty. This warranty covers defects in materials and workmanship that result in corrosion or perforation of the galvanized steel panels under normal use and maintenance. Please retain your proof of purchase for warranty claims.
9.2 Atención al cliente
For technical assistance, missing parts, or warranty claims, please contact Dancover customer support. Refer to the contact information provided on your purchase receipt or the Dancover official websitio.
When contacting support, please have your model number (MS576032-fr) and purchase details readily available.


