1. Instrucciones de seguridad importantes
Lea atentamente todas las instrucciones antes de usar este aparato y consérvelas para futuras consultas. El incumplimiento de estas instrucciones podría provocar una descarga eléctrica, un incendio o lesiones personales graves.
- Conecte siempre la unidad a una toma de corriente con conexión a tierra.
- No opere la unidad con un cable o enchufe dañado.
- Mantenga la unidad alejada de materiales inflamables y llamas abiertas.
- Asegúrese de que haya una ventilación adecuada alrededor de la unidad durante su funcionamiento.
- No inserte objetos en la entrada o salida de aire.
- Desenchufe la unidad antes de limpiarla o realizar cualquier mantenimiento.
- Este aparato no está diseñado para ser utilizado por personas (incluidos niños) con capacidades físicas, sensoriales o mentales reducidas, o con falta de experiencia y conocimientos, a menos que hayan recibido supervisión o instrucciones sobre el uso del aparato por parte de una persona responsable de su seguridad.
2. Producto terminadoview
The FlinQ Mobile Air Conditioner is a versatile unit designed to provide cooling, dehumidification, and fan functions for your living space. It is equipped with an energy-efficient design and comes with a window kit for easy installation.

Figura 2.1: Frente view of the FlinQ Mobile Air Conditioner, showing the main air outlet and control panel area.

Figure 2.2: The mobile air conditioner unit, displaying its energy efficiency label (Class A) and the included remote control for convenient operation.
3. Componentes y piezas
Familiarize yourself with the main components of your mobile air conditioner:
- Unidad principal (con panel de control)
- Manguera de escape
- Window Sealing Kit (adjustable window slider/plate)
- Mando a distancia
- Drain Hose (for continuous drainage in dehumidification mode)
- Air Filters (located on the back/side)
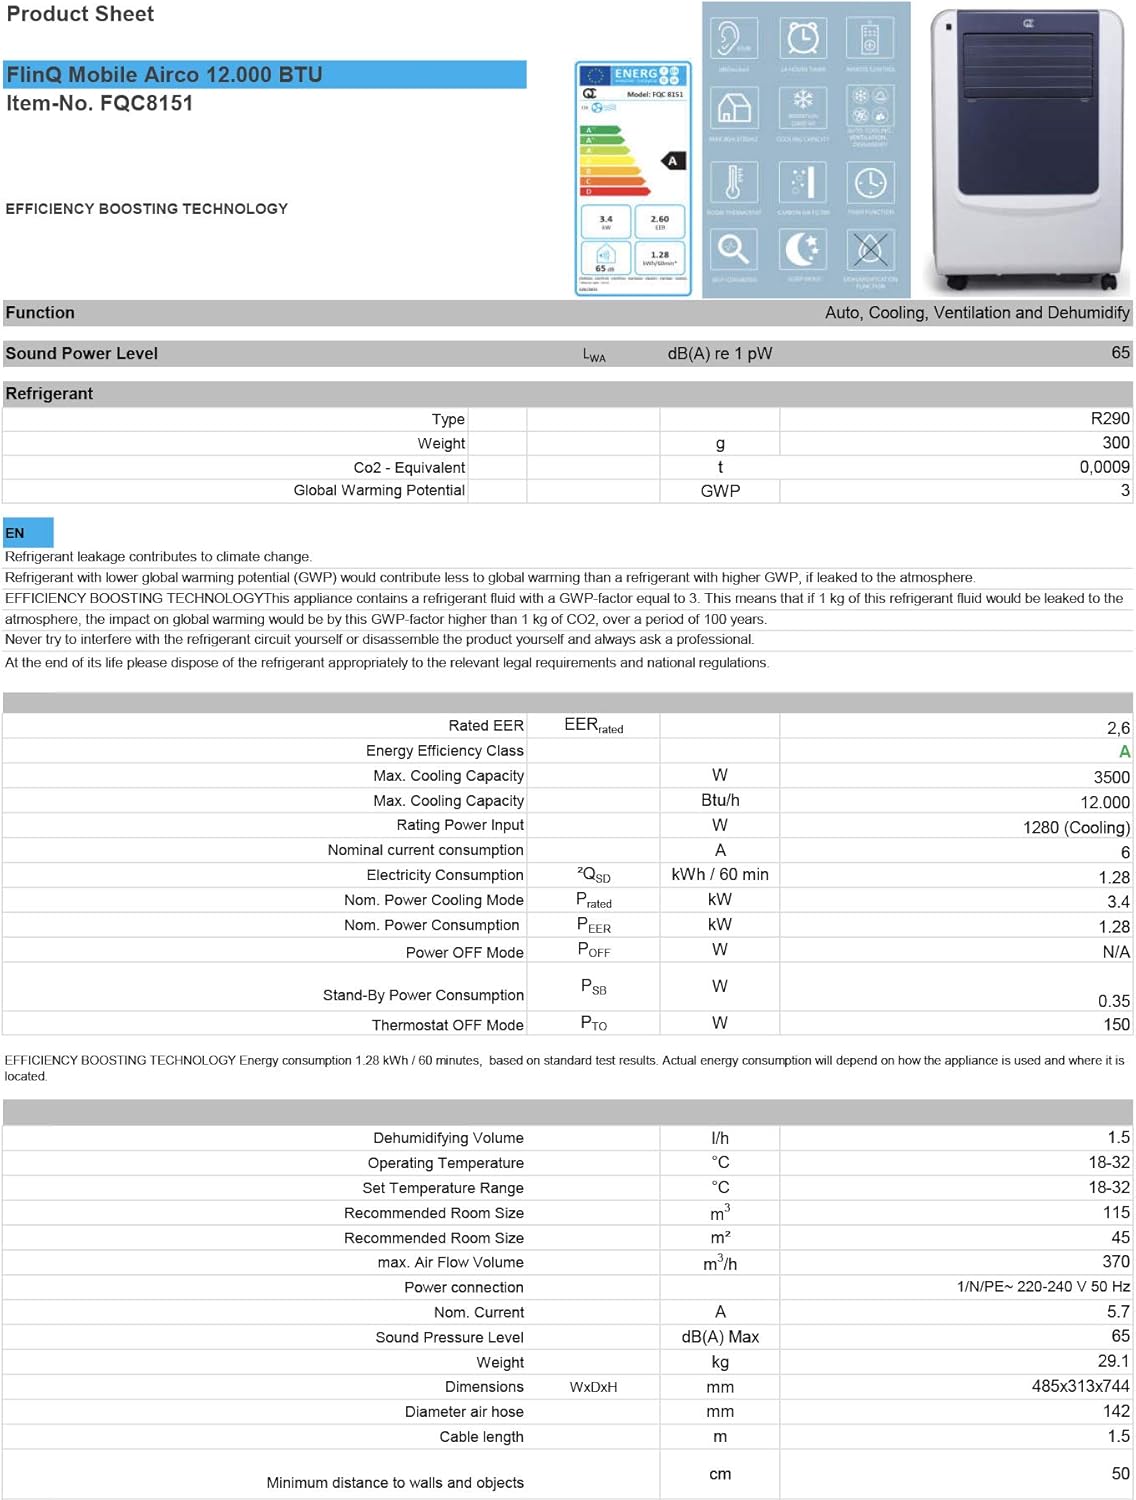
Figure 3.1: The remote control and a visual representation of the unit's key features, including noise level (65dB), 24-hour timer, cooling capacity (12000 BTU/h), room thermostat, carbon air filter, self-diagnosis, sleep mode, remote control function, timer function, auto cooling/fan/dehumidification, and dehumidification function.
4. Configuración e instalación
4.1 Desembalaje
Carefully remove the air conditioner and all accessories from the packaging. Inspect for any damage during transit. Keep the original packaging for future storage or transport.
4.2 Colocación
Place the unit on a flat, stable surface. Ensure there is at least 30 cm (12 inches) of clear space around the unit for proper airflow. Do not place it near heat sources or in direct sunlight.
4.3 Instalación del kit de ventana
To ensure efficient cooling, the hot air extracted by the unit must be vented outside. Use the provided window sealing kit for this purpose.
- Conecte el conector de la manguera de escape a la salida de aire en la parte posterior de la unidad.
- Extend the exhaust hose and attach the window adapter to the other end.
- Adjust the window slider/plate to fit your window opening.
- Insert the window adapter into the opening of the window slider/plate.
- Close the window as much as possible to seal the opening around the kit, minimizing air leakage.

Figura 4.1: Lado view of the mobile air conditioner, illustrating the connection point for the exhaust hose, which expels hot air from the room.
5. Instrucciones de funcionamiento
5.1 Panel de control
The control panel is located on the top of the unit and features various buttons and an LED display for setting modes, temperature, and timer functions.
5.2 control remoto
The remote control allows you to operate all functions of the air conditioner from a distance. Ensure the remote control batteries are inserted correctly.
Modos de funcionamiento de 5.3
Pulse el botón 'Modo' para recorrer los modos de funcionamiento disponibles:
- Modo de enfriamiento: Para enfriar la habitación, configure la temperatura deseada con los botones de ajuste.
- Modo de deshumidificación: Removes excess moisture from the air. The fan speed is typically fixed in this mode. Consider connecting a drain hose for continuous drainage.
- Modo de ventilador: Circulates air without cooling. You can adjust the fan speed (Low, Medium, High).

Figura 5.1: Primer plano view of the adjustable louvers on the air conditioner's front panel, which direct the airflow.
6. Mantenimiento
El mantenimiento regular garantiza un rendimiento óptimo y prolonga la vida útil de su aire acondicionado.
6.1 Limpieza de los filtros de aire
The air filters should be cleaned every two weeks or more frequently depending on usage and air quality. Dirty filters reduce efficiency and can damage the unit.
- Desconecte el aire acondicionado de la toma de corriente.
- Locate and remove the air filters (usually on the back or side of the unit).
- Wash the filters under running water (warm, not hot) or use a vacuum cleaner to remove dust.
- Allow the filters to air dry completely before reinserting them. Do not expose them to direct sunlight.

Figure 6.1: Illustration of how to remove the air filter from the mobile air conditioner for cleaning, highlighting the accessible filter panel.
6.2 Drenaje de agua
The unit collects condensed water during cooling and dehumidification. The internal tank will fill up, and the unit may stop operating when full. Drain the water regularly.
- Place a shallow pan or tray under the drain port (usually at the bottom rear of the unit).
- Retire el tapón de drenaje para permitir que salga el agua.
- For continuous drainage in dehumidification mode, attach the provided drain hose to the drain port.
6.3 Almacenamiento
Al almacenar la unidad durante un período prolongado:
- Drene toda el agua de la unidad.
- Limpiar los filtros de aire.
- Desconecte el cable de alimentación y enróllelo cuidadosamente.
- Guarde la unidad en un lugar seco y fresco, preferiblemente en su embalaje original.
7. Solución de problemas
Antes de contactar con el servicio de atención al cliente, consulte la siguiente tabla para conocer los problemas comunes y sus soluciones:
| Problema | Posible causa | Solución |
|---|---|---|
| La unidad no se enciende | Sin energía; Cable de alimentación no enchufado; Tanque de agua lleno | Verifique la toma de corriente; enchufe el cable de alimentación; drene el tanque de agua |
| La unidad no enfría lo suficiente | Dirty air filters; Exhaust hose blocked/leaking; Room too large; Doors/windows open | Clean filters; Check hose for blockages/proper sealing; Ensure room size is within capacity; Close doors/windows |
| La unidad es ruidosa | Unit not on a flat surface; Air filters dirty | Place on flat surface; Clean air filters |
| Fuga de agua de la unidad | El tapón de drenaje no está bien sellado; la unidad está inclinada | Ensure drain plug is secure; Place unit on a level surface |
8. Especificaciones
Technical details for the FlinQ Mobile Air Conditioner:
| Característica | Valor |
|---|---|
| Número de modelo | 8720168680396 |
| Dimensiones del producto | 74 x 48 x 31 cm |
| Peso del artículo | 29 g (Note: This weight seems unusually low for an AC unit, please refer to product packaging for accurate weight) |
| Nivel de ruido | 65 dB |
| Capacidad de enfriamiento | 12000 BTU/h |
| Tamaño de habitación recomendado | Hasta 45 m² |
| Características especiales | Mando a distancia |
| Clase de energía | A |

Figure 8.1: Official product sheet detailing technical specifications, energy consumption, cooling capacity, and dimensions of the FlinQ Mobile Air Conditioner.
9. Garantía y soporte
This FlinQ Mobile Air Conditioner comes with a limited warranty. Please refer to the warranty card included with your purchase for specific terms and conditions.
For technical support, service, or warranty claims, please contact your retailer or the manufacturer directly. Keep your proof of purchase for warranty validation.
Información del contacto:
- Marca: FLINQ
- Websitio: www.flinq.nl (Example, please refer to actual product documentation for correct websitio)
- Correo electrónico: support@flinq.nl (Example, please refer to actual product documentation for correct email)


