1. Introducción
Gracias por la compraasing the BYINTEK R19 Portable 3D Smart LED DLP Projector. This manual provides essential information for the safe and efficient operation of your device. Please read it thoroughly before use and retain it for future reference.

Image 1.1: The BYINTEK R19 Portable 3D Smart LED DLP Projector.
2. Información de seguridad
Tenga en cuenta las siguientes precauciones de seguridad para evitar daños al proyector y garantizar la seguridad del usuario:
- No mire directamente a la lente del proyector cuando la lamp Está encendido.
- Asegúrese de que haya una ventilación adecuada alrededor del proyector para evitar el sobrecalentamiento.
- No exponga el proyector a la lluvia, la humedad o temperaturas extremas.
- Utilice únicamente el adaptador de corriente suministrado con el proyector.
- Evite colocar el proyector sobre superficies inestables.
- No intente desmontar ni reparar el proyector usted mismo. Contacte con personal de servicio técnico cualificado.
3. Contenido del paquete
Verifique que todos los artículos estén presentes en el paquete:
- BYINTEK R19 Projector
- Mando a distancia
- Adaptador de corriente
- Manual de usuario (este documento)
- Cable HDMI (puede variar según la región/paquete)

Image 3.1: The BYINTEK R19 projector shown with its remote control.
4. Producto terminadoview
4.1. Componentes del proyector

Image 4.1: Diagram illustrating the projector's components and ports.
- Lente: Proyecta la imagen en la pantalla.
- Receptor IR: Recibe señales del mando a distancia.
- Altavoz (4Ω 5W x2): Proporciona salida de audio.
- Universal Bracket Hole (d=1/4 inch, 6mm): Para montaje en trípodes o soportes de techo.
4.2. Puertos de entrada/salida
- DC-in (19V): Puerto de entrada de energía.
- USB1/USB2: USB ports for connecting external storage or peripherals.
- Entrada HD: HDMI input for connecting video sources.
- Red: Puerto Ethernet para conexión a Internet por cable.
- Tarjeta TF: Ranura para tarjetas TransFlash (MicroSD).
- Salida de audio: 3.5mm audio jack for external speakers or headphones.
- AV: Puerto de entrada de audio/video.
5. Configuración
5.1 Colocación
Position the projector on a stable, flat surface or mount it using the universal bracket hole. Ensure the projector is perpendicular to the projection surface for optimal image geometry. The throw distance determines the screen size:
- Throw Range: 30-300 pulgadas
- Distancia de lanzamiento: 1-6 metros
- Approximately 2.15m for 84 inches, 2.5m for 100 inches, 3.1m for 120 inches, 3.86m for 150 inches.

Image 5.1: Illustration of throw distances for various screen sizes and different mounting methods (tabletop, tripod, ceiling).
5.2. Conexión de alimentación
Connect the supplied power adapter to the DC-in port (19V) on the projector and then plug it into a power outlet.
5.3. Encendido inicial
Press the Power ON/OFF button on the projector or the remote control to turn on the device. The projector will boot into the Android OS interface.
5.4. Ajuste de enfoque
Use the "Focus+" and "Focus-" buttons on the projector or the remote control to adjust the image clarity until it is sharp and clear on the screen.
6. Instrucciones de funcionamiento
6.1. Funciones de control remoto
The remote control allows for convenient navigation and control of the projector's features.

Image 6.1: The remote control for the BYINTEK R19, highlighting the one-button 3D switching function.
- Botón de encendido: Enciende/apaga el proyector.
- Panel de navegación (botón OK): Para navegar y seleccionar el menú.
- Botón Atrás: Regresa a la pantalla anterior.
- Botón de inicio: Returns to the main Android OS interface.
- Botones de volumen: Ajusta el volumen del audio.
- Focus Buttons: Ajusta el enfoque de la imagen.
- Botón 3D: One-touch switching for 3D mode (DLP-LINK shutter 3D, TNB, SBSH).
6.2. Navegación en el sistema operativo Android
The projector runs on an Android operating system, providing access to various applications and settings. Use the remote control's navigation pad to browse the interface.
6.3. Conexión de dispositivos
- HDMI (entrada HD): Connect laptops, Blu-ray players, gaming consoles, or other HDMI-enabled devices.
- USB: Inserte unidades USB para reproducción multimedia.
- Tarjeta TF: Inserte una tarjeta MicroSD para reproducir contenido multimedia.
- Wifi: Connect to a wireless network via the Android OS settings for internet access and online streaming.
- Compartir pantalla inalámbrica: Utilize the built-in screen sharing feature to mirror content from compatible smartphones or PCs.
- AV: Conecte dispositivos más antiguos mediante un cable AV.
6.4. 3D Mode Activation
The BYINTEK R19 supports 3D content. To activate 3D mode, ensure you are playing compatible 3D content and press the dedicated 3D button on the remote control. The projector supports DLP-LINK shutter 3D, TNB (Top and Bottom), and SBSH (Side-by-Side Half) formats. Active shutter 3D glasses (not included) are required for viewing contenido 3D.
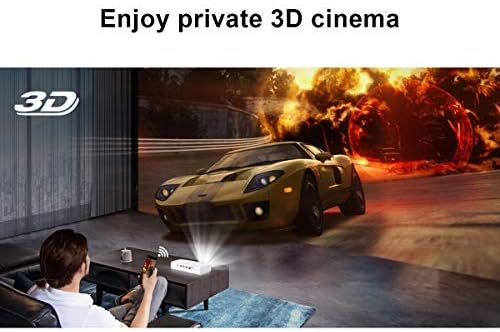
Image 6.2: A user experiencing a private 3D cinema with the BYINTEK R19 projector.
6.5. Screen Size and Usage
The projector can produce a large screen size up to 300 inches, offering an immersive viewing experience. It is suitable for various applications, including home theater, gaming, and presentations, particularly in dim light environments.

Image 6.3: Visual comparison demonstrating the large 300-inch projection size achievable with the BYINTEK R19, compared to a typical 50-inch television.

Imagen 6.4: Examples of the BYINTEK R19 projector in various settings, including business presentations, outdoor movie nights, home gaming, and home cinema.
7. Mantenimiento
7.1. Limpieza de la lente
Limpie suavemente la lente del proyector con un paño suave y sin pelusa, especialmente diseñado para superficies ópticas. No utilice limpiadores abrasivos ni disolventes.
7.2. Limpieza del Casing
Limpie el proyector casing con un paño suave y seco. Para manchas difíciles, ligeramente dampEnjuague el paño con agua y séquelo inmediatamente.
7.3. Almacenamiento
Cuando no lo utilice durante un período prolongado, guarde el proyector en un lugar fresco y seco, alejado de la luz solar directa y del polvo excesivo. Utilice el embalaje original o una funda protectora, si está disponible.
8. Solución de problemas
| Problema | Posible causa | Solución |
|---|---|---|
| No se proyecta ninguna imagen | Power cable disconnected; Projector not powered on; Input source not selected. | Check power connection; Press power button; Select correct input source (HDMI, USB, etc.). |
| La imagen es borrosa | Enfoque no ajustado; Proyector demasiado cerca/lejos de la pantalla. | Adjust focus using "Focus+" / "Focus-" buttons; Adjust projector distance. |
| Sin sonido | Volumen demasiado bajo; Silenciado; Altavoces externos no conectados correctamente. | Increase volume; Unmute; Check external speaker connection or use internal speakers. |
| El control remoto no funciona | Batteries depleted; Obstruction between remote and IR receiver. | Reemplace las baterías; asegúrese de que haya una línea de visión clara hacia el receptor IR. |
| Problemas de conexión wifi | Contraseña incorrecta; Enrutador demasiado lejos; Interferencia de red. | Verify password; Move projector closer to router; Check for network interference. |
9. Especificaciones
| Característica | Detalle |
|---|---|
| Marca | Por Intek |
| Modelo | R19 |
| Tecnología de visualización | LED, DLP |
| Resolución nativa | 1920 x 1080 (Full HD) |
| Resolución máxima admitida | 3840 x 2160 (4K) |
| Factor de forma | Portátil |
| Características especiales | Portable, 3D-Ready, Wi-Fi Ready, Android OS |
| Alcance de lanzamiento | 30-300 pulgadas |
| Distancia de lanzamiento | 1-6 metros |
| Tipo de montaje | Tabletop Mount (also tripod/ceiling compatible) |
| Color | Blanco |
| Tipo de controlador | Mando a distancia |
| Dispositivos compatibles | Laptop, Smartphone, Gaming Console, Blu-ray Player |
| Peso del artículo | 7.94 gramos (Note: This weight appears unusually low and may be a data entry error in the source specifications.) |
| Dimensiones del paquete | 16.93 x 12.1 x 7.09 cm |
10. Garantía y soporte
For information regarding warranty coverage, technical support, or service inquiries, please refer to the warranty card included with your product or visit the official BYINTEK webSitio. Conserve su recibo de compra como comprobante de compra.


