1. Instrucciones de seguridad importantes
Lea todas las advertencias de seguridad, instrucciones, ilustraciones y especificaciones que se incluyen con esta herramienta eléctrica. Si no sigue todas las instrucciones que se indican a continuación, puede sufrir una descarga eléctrica, un incendio o lesiones graves.
Advertencias generales de seguridad para herramientas eléctricas
- Seguridad en el área de trabajo: Mantenga el área de trabajo limpia y bien iluminada. Las áreas desordenadas u oscuras pueden provocar accidentes. No opere herramientas eléctricas en atmósferas explosivas, como en presencia de líquidos, gases o polvo inflamables. Las herramientas eléctricas generan chispas que pueden encender el polvo o los vapores. Mantenga a los niños y a las personas cercanas alejados mientras opera una herramienta eléctrica. Las distracciones pueden hacerle perder el control.
- Seguridad eléctrica: Los enchufes de las herramientas eléctricas deben coincidir con la toma de corriente. Nunca modifique el enchufe de ninguna manera. No utilice ningún adaptador de enchufe con herramientas eléctricas con conexión a tierra. Los enchufes sin modificar y las tomas de corriente compatibles reducirán el riesgo de descarga eléctrica. Evite el contacto del cuerpo con superficies conectadas a tierra, como tuberías, radiadores, cocinas y refrigeradores. Existe un mayor riesgo de descarga eléctrica si su cuerpo está conectado a tierra. No exponga las herramientas eléctricas a la lluvia ni a la humedad. La entrada de agua en una herramienta eléctrica aumentará el riesgo de descarga eléctrica. No maltrate el cable. Nunca utilice el cable para transportar, tirar o desenchufar la herramienta eléctrica. Mantenga el cable alejado del calor, el aceite, los bordes afilados o las piezas móviles. Los cables dañados o enredados aumentan el riesgo de descarga eléctrica. Al utilizar una herramienta eléctrica en exteriores, utilice un cable de extensión adecuado para uso en exteriores. El uso de un cable adecuado para uso en exteriores reduce el riesgo de descarga eléctrica. Si utiliza una herramienta eléctrica en adamp Si la ubicación es inevitable, utilice una fuente de alimentación protegida con un dispositivo de corriente residual (RCD). El uso de un RCD reduce el riesgo de descarga eléctrica.
- Seguridad personal: Manténgase alerta, preste atención a lo que hace y use el sentido común al operar una herramienta eléctrica. No utilice una herramienta eléctrica si está cansado o bajo la influencia de drogas, alcohol o medicamentos. Un momento de distracción al operar herramientas eléctricas puede provocar lesiones personales graves. Utilice equipo de protección personal. Use siempre protección para los ojos. El uso de equipo de protección, como mascarilla antipolvo, calzado de seguridad antideslizante, casco o protección auditiva, según las condiciones, reducirá las lesiones personales. Evite el arranque accidental. Asegúrese de que el interruptor esté en la posición de apagado antes de conectar la herramienta a la fuente de alimentación o a la batería, así como de levantarla o transportarla. Transportar herramientas eléctricas con el dedo sobre el interruptor o encender herramientas eléctricas con el interruptor encendido puede provocar accidentes. Retire cualquier llave de ajuste o llave inglesa antes de encender la herramienta eléctrica. Una llave inglesa o una llave inglesa colocada en una pieza giratoria de la herramienta eléctrica puede provocar lesiones personales. No se estire demasiado. Mantenga una postura y un equilibrio adecuados en todo momento. Esto permite un mejor control de la herramienta eléctrica en situaciones inesperadas. Vístase adecuadamente. No use ropa holgada ni joyas. Mantenga el cabello y la ropa alejados de las piezas móviles. La ropa suelta, las joyas o el cabello largo pueden quedar atrapados en las piezas móviles. Si se proporcionan dispositivos para la conexión de sistemas de extracción y recolección de polvo, asegúrese de que estén conectados y se utilicen correctamente. El uso de sistemas de recolección de polvo puede reducir los riesgos relacionados con el polvo. No permita que la familiaridad adquirida con el uso frecuente de herramientas le haga caer en la complacencia e ignorar los principios de seguridad. Un descuido puede causar lesiones graves en cuestión de segundos.
- Uso y cuidado de herramientas eléctricas: No fuerce la herramienta eléctrica. Utilice la herramienta eléctrica correcta para su aplicación. Una herramienta eléctrica adecuada funcionará mejor y con mayor seguridad a la velocidad para la que fue diseñada. No utilice la herramienta eléctrica si el interruptor no la enciende ni la apaga. Cualquier herramienta eléctrica que no pueda controlarse con el interruptor es peligrosa y debe repararse. Desconecte el enchufe de la fuente de alimentación o retire la batería, si es desmontable, de la herramienta eléctrica antes de realizar cualquier ajuste, cambiar accesorios o guardar herramientas eléctricas. Estas medidas de seguridad preventivas reducen el riesgo de arrancar la herramienta eléctrica accidentalmente. Guarde las herramientas eléctricas fuera del alcance de los niños y no permita que personas que no estén familiarizadas con ellas o con estas instrucciones las operen. Las herramientas eléctricas son peligrosas en manos de usuarios inexpertos. Realice el mantenimiento de las herramientas eléctricas y sus accesorios. Compruebe si hay desalineación o atascamiento de las piezas móviles, roturas de piezas o cualquier otra condición que pueda afectar el funcionamiento de la herramienta eléctrica. Si está dañada, repárela antes de usarla. Muchos accidentes son causados por herramientas eléctricas mal mantenidas. Mantenga las herramientas de corte afiladas y limpias. Las herramientas de corte con filos afilados y un mantenimiento adecuado tienen menos probabilidades de atascarse y son más fáciles de controlar. Utilice la herramienta eléctrica, los accesorios, las brocas, etc., de acuerdo con estas instrucciones, teniendo en cuenta las condiciones de trabajo y el trabajo a realizar. El uso de la herramienta eléctrica para operaciones distintas a las previstas podría provocar una situación peligrosa. Mantenga los mangos y las superficies de agarre secos, limpios y libres de aceite y grasa. Los mangos y las superficies de agarre resbaladizos impiden un manejo y control seguros de la herramienta en situaciones inesperadas.
- Uso y cuidado de la herramienta a batería: Recharge only with the charger specified by the manufacturer. A charger that is suitable for one type of battery pack may create a risk of fire when used with another battery pack. Use power tools only with specifically designated battery packs. Use of any other battery packs may create a risk of injury and fire. When battery pack is not in use, keep it away from other metal objects, like paper clips, coins, keys, nails, screws, or other small metal objects, that can make a connection from one terminal to another. Shorting the battery terminals together may cause burns or a fire. Under abusive conditions, liquid may be ejected from the battery; avoid contact. If contact accidentally occurs, flush with water. If liquid contacts eyes, additionally seek medical help. Liquid ejected from the battery may cause irritation or burns. Do not use a battery pack or tool that is damaged or modified. Damaged or modified batteries may exhibit unpredictable behavior resulting in fire, explosion, or risk of injury. Do not expose a battery pack or tool to fire or excessive temperature. Exposure to fire or temperature above 130 °C (265 °F) may cause explosion. Follow all charging instructions and do not charge the battery pack or tool outside the temperature range specified in the instructions. Charging improperly or at temperatures outside the specified range may damage the battery and increase the risk of fire.
- Servicio: Haga que su herramienta eléctrica sea reparada por una persona calificada que utilice únicamente piezas de repuesto idénticas. Esto garantizará que se mantenga la seguridad de la herramienta eléctrica. Nunca repare paquetes de baterías dañados. El servicio de los paquetes de baterías solo debe ser realizado por el fabricante o proveedores de servicio autorizados.
2. Contenido del paquete
Desempaque con cuidado todos los artículos y asegúrese de haber recibido lo siguiente:
- 1 taladro atornillador inalámbrico WORKPRO de 20 V
- 1 x WORKPRO 20V Cordless Impact Driver
- 2 baterías de iones de litio de 20 V y 2.0 Ah
- 1 x Fast Charger (2.4A)
- 10 x Destornillador Bits
- 6 x Twist Drills
- 2 x Belt Hooks
- 1 x Manual de instrucciones

Image: The complete WORKPRO 20V Cordless Drill and Impact Driver Combo Kit, including both tools, two batteries, a charger, and various drill and screwdriver bits.
3. Producto terminadoview
The WORKPRO 20V Cordless Drill and Impact Driver Combo Kit provides versatile solutions for drilling and fastening tasks. This kit includes a drill driver with adjustable torque and a powerful impact driver, both powered by 20V lithium-ion batteries.
Características principales
- Taladro atornillador inalámbrico de 20 V: Features 18+1 torque settings and two speed ranges (0-360 RPM and 0-1300 RPM) for various drilling and screwing applications. Equipped with a 10mm keyless chuck for easy accessory changes.
- 20V Cordless Impact Driver: Delivers up to 130Nm of torque with a maximum speed of 2600 RPM and an impact frequency of 0-3500 IPM. Features a 6.35mm (1/4") hexagonal quick-release chuck for rapid bit changes.
- 2.0Ah Lithium-ion Batteries: Two rechargeable 20V 2.0Ah batteries provide extended runtime. Integrated indicator lights display remaining battery capacity.
- Cargador rápido: A 2.4A fast charger allows for a full battery charge in approximately 60 minutes.
- Diseño ergonómico: Soft rubber non-slip handles ensure comfortable use during prolonged operation.
- Luces LED integradas: Both tools feature LED work lights to illuminate the work area, enhancing visibility and safety in dark conditions.
- Belt Hooks: Included belt hooks allow for convenient carrying and storage of the tools.

Imagen: Un interno view highlighting the powerful 20-volt motor in both the drill driver (25 Nm max torque) and the impact driver (130 Nm max torque).
4. Configuración
4.1 Carga de la batería
- Conecte el cargador rápido a una toma de corriente estándar.
- Deslice la batería de iones de litio de 20 V y 2.0 Ah en el cargador hasta que encaje en su lugar.
- The charger's indicator light will show the charging status. A full charge typically takes about 60 minutes.
- Una vez completamente cargada, retire la batería del cargador.

Image: A WORKPRO 20V 2.0Ah Lithium-ion battery being charged on the 2.4A fast charger, illustrating the 1-hour fast charging capability.
4.2 Instalación y extracción de la batería
- Para instalar: Align the battery with the base of the tool handle and slide it in until it locks securely.
- Para eliminar: Presione el botón de liberación de la batería (ubicado en el costado de la batería) y deslice la batería fuera de la herramienta.
4.3 Installing and Removing Drill Bits (Drill Driver)
- Asegúrese de que la herramienta esté apagada y que la batería esté extraída por seguridad.
- Rotate the 10mm keyless chuck counter-clockwise to open the jaws.
- Inserte la broca en el mandril, asegurándose de que esté centrada.
- Gire el mandril en el sentido de las agujas del reloj para apretar firmemente las mordazas alrededor de la broca.
- Para eliminar: Rotate the chuck counter-clockwise to loosen and remove the bit.

Image: Visual guide demonstrating how to quickly change bits on the drill driver by rotating the chuck to loosen and tighten.
4.4 Installing and Removing Screwdriver Bits (Impact Driver)
- Asegúrese de que la herramienta esté apagada y que la batería esté extraída por seguridad.
- Pull the quick-release collar of the 6.35mm (1/4") hexagonal chuck forward.
- Insert the screwdriver bit into the chuck.
- Release the collar to lock the bit in place. Pull on the bit to ensure it is secure.
- Para eliminar: Pull the quick-release collar forward and pull the bit out.

Imagen: Un primer plano view showing the 10mm keyless chuck of the drill driver and the 6.5mm (1/4") hexagonal chuck of the impact driver, along with their bright LED lights for visibility.
4.5 Adjusting Torque (Drill Driver)
The drill driver features an 18+1 position torque adjustment ring. Rotate the ring to select the desired torque setting. Lower settings are for driving small screws or working with soft materials, while higher settings are for larger screws or harder materials. The 'drill' symbol setting is for drilling applications, providing maximum torque.
4.6 Selecting Speed (Both Tools)
Both the drill driver and impact driver feature a 2-speed transmission switch, typically located on top of the tool. Position 1 (low speed) is for higher torque applications and controlled drilling/driving. Position 2 (high speed) is for faster drilling or driving with less torque.
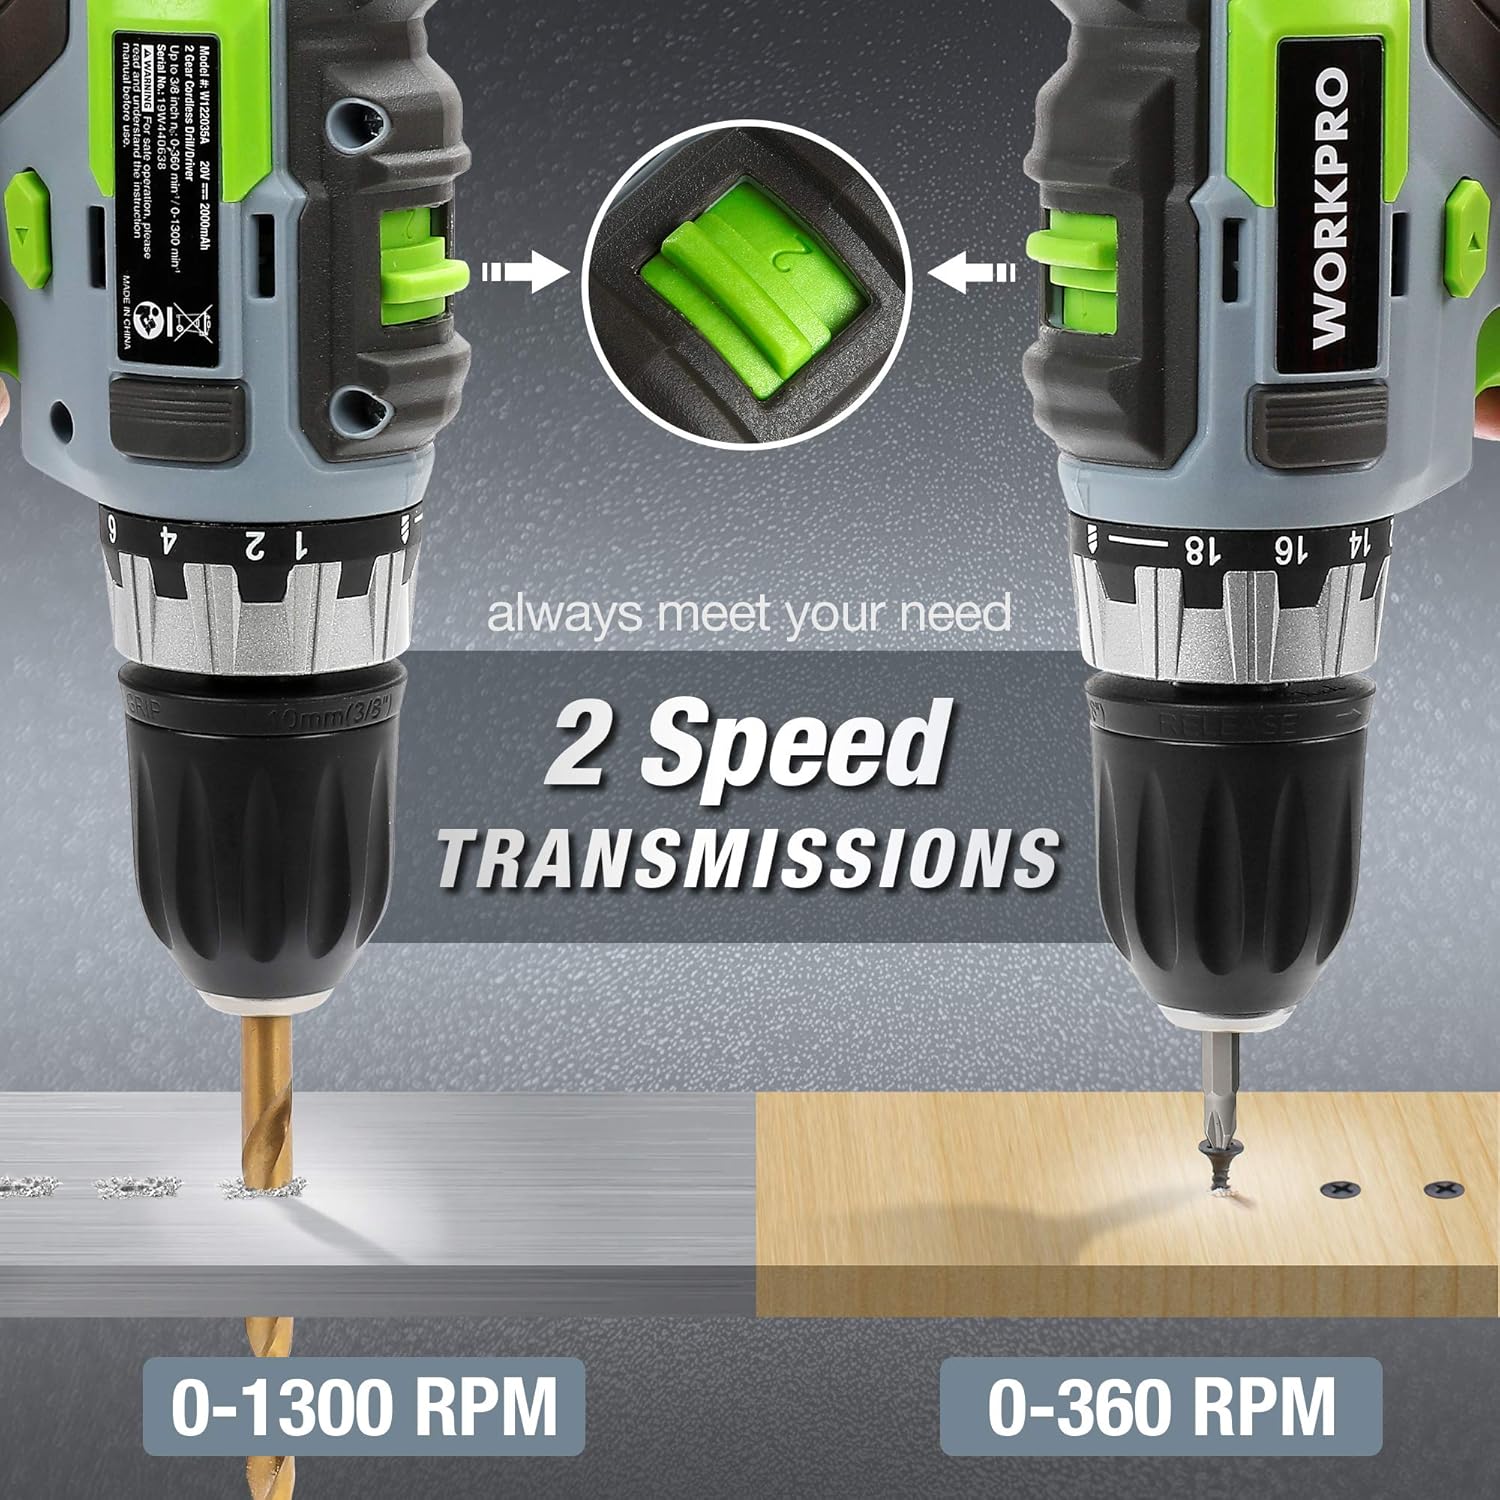
Image: Both the WORKPRO drill driver and impact driver illustrating their 2-speed transmission settings, with the drill driver operating at 0-1300 RPM and the impact driver at 0-360 RPM for different tasks.
5. Operación
5.1 Encendido / Apagado
To start the tool, press the trigger switch. The tool speed is variable depending on how far the trigger is pressed. To stop the tool, release the trigger switch.
5.2 Interruptor de avance/retroceso
A forward/reverse selector switch is located above the trigger. Push the lever to the left for forward rotation (drilling and screwing). Push the lever to the right for reverse rotation (removing screws or freeing a stuck drill bit). Center the switch for the lock position, which prevents accidental starting.

Image: A diagram illustrating the forward, reverse, and lock positions of the rotation control switch on the WORKPRO drill driver, with instructions for each setting.
5.3 Uso de la luz de trabajo LED
Both tools are equipped with an LED work light that activates when the trigger is pressed, illuminating the work surface for improved visibility in dimly lit areas.

Image: The WORKPRO impact driver in use, with its integrated LED work light brightly illuminating the fastening point, demonstrating its utility in dark environments.
5.4 Técnicas de perforación
- Always secure the workpiece to prevent movement.
- Select the appropriate drill bit and speed setting for the material.
- Start drilling at a low speed to create a pilot hole, then increase speed as needed.
- Aplique una presión constante y uniforme. No fuerce el taladro.
- Para agujeros profundos, retire periódicamente la broca para limpiar los residuos.
5.5 Screwing Techniques
- Seleccione la punta de destornillador correcta para la cabeza del tornillo.
- For the drill driver, adjust the torque setting to prevent over-tightening or stripping screws.
- For the impact driver, its high torque is suitable for driving long or stubborn screws.
- Aplique una presión firme y constante para mantener la broca acoplada a la cabeza del tornillo.

Image: A collage showing the WORKPRO drill driver and impact driver being used in various applications, including drilling into wood and metal, and driving screws.
5.6 Uso del gancho para cinturón
The included belt hooks can be attached to either tool for convenient temporary storage on a belt or workbench edge, allowing for hands-free movement between tasks.

Image: Demonstrates the 1-hour fast charging of the 2.0Ah Li-ion battery and the convenient belt hook feature for carrying the tool.
6. Mantenimiento
El mantenimiento regular garantiza un rendimiento óptimo y prolonga la vida útil de sus herramientas.
6.1 Limpieza
- Desconecte siempre la batería antes de limpiarla.
- Utilice un paño suave y seco.amp Paño para limpiar el exterior de la herramienta. No utilice productos químicos agresivos ni limpiadores abrasivos.
- Limpie el polvo o los residuos de las aberturas de ventilación utilizando aire comprimido o un cepillo suave.
- Keep the chucks clean and free of debris to ensure proper bit retention.
6.2 Cuidado de la batería
- Guarde las baterías en un lugar fresco y seco, lejos de la luz solar directa y de temperaturas extremas.
- No guarde las baterías descargadas durante períodos prolongados. Recárguelas periódicamente si no las usa.
- Avoid dropping or physically damaging batteries.
6.3 Almacenamiento
- Store the tools and batteries in a secure, dry location, out of reach of children.
- Ensure batteries are removed from the tools before storage.
7. Solución de problemas
If you encounter issues with your WORKPRO tools, refer to the following common problems and solutions:
| Problema | Posible causa | Solución |
|---|---|---|
| La herramienta no arranca | Battery not charged or improperly installed; Forward/Reverse switch in lock position; Faulty switch. | Charge battery and ensure it is securely installed; Move switch out of lock position; Contact customer support for switch replacement. |
| Pérdida de potencia durante el funcionamiento | Battery low; Overload protection activated. | Recharge battery; Reduce load on the tool, allow it to cool down. |
| Bit slips or wobbles in chuck | Chuck not tightened properly; Bit shank is dirty or damaged; Incorrect bit size. | Retighten chuck firmly; Clean or replace bit; Use correct bit size. |
| La batería no se carga | Cargador no enchufado; Batería o cargador defectuoso; Batería demasiado caliente/fría. | Ensure charger is plugged in; Try another battery/charger if available; Allow battery to reach room temperature before charging. Contact customer support if problem persists. |
8. Especificaciones
| Característica | Especificación |
|---|---|
| Marca | TRABAJO PRO |
| Número de modelo | W004578A |
| Volumentage | 20 voltios (CC) |
| Tipo de batería | Iones de litio |
| Capacidad de la batería | 2.0 Ah (x2 incluidas) |
| Cargador Ampanhelo | 2.4 A (Fast Charger) |
| Drill Driver Torque | 25 Nm (18+1 settings) |
| Drill Driver Speed | 0-360 RPM / 0-1300 RPM |
| Tamaño del portabrocas del taladro | Portabrocas sin llave de 10 mm |
| Par de torsión del destornillador de impacto | 130 Nm |
| Impact Driver Speed | 0-2600 RPM |
| Impact Driver Impact Frequency | 0-3500 IPM |
| Tamaño del mandril del destornillador de impacto | 6.35mm (1/4") Hexagonal Quick-Release Chuck |
| Dimensiones del producto (L x An x Al) | 22.5 x 17 x 6 cm |
| Peso del artículo | 4 kilogramos |
| Material | Plástico |
| Código Postal | 820909766186 |
9. Garantía y soporte
Los productos WORKPRO se fabrican con altos estándares de calidad. Para obtener información sobre la garantía, asistencia técnica o consultas de servicio, consulte la tarjeta de garantía incluida con su compra o visite el sitio web oficial de WORKPRO. webSitio web. Conserve su comprobante de compra para cualquier reclamación de garantía.


