1. Introducción
The EPEVER Tracer-BN Series MPPT solar charge controller is designed for solar power systems, featuring advanced Maximum Power Point Tracking (MPPT) technology. This manual provides essential instructions for the Tracer3215BN model, ensuring efficient and safe operation of your solar charging system. It is suitable for 12V/24V battery systems and supports a maximum PV input voltagy de 150V.

Imagen: Frente view of the EPEVER MPPT Charge Controller Tracer3215BN.
2. Instrucciones de seguridad
Observe the following safety guidelines during installation and operation to prevent damage to the controller or injury:
- Ensure proper wiring polarity for all connections (PV, battery, load).
- Do not exceed the maximum PV input voltagy de 150VDC.
- Connect the battery first before connecting solar panels or loads.
- The controller features multiple electronic protections, including:
- Protección contra cortocircuitos fotovoltaicos
- sobrevoltaje fotovoltaicotage protección de alarma
- PV current limiting protection
- Protección de polaridad inversa fotovoltaica
- Protección de sobrecarga de la batería
- Batería sobre protección de descarga
- Protección contra polaridad inversa de la batería
- Protección contra sobrecarga de carga
- Protección contra cortocircuitos de carga
- Protección contra sobrecalentamiento
- Install the controller in a well-ventilated area to ensure adequate heat dissipation.
- Evite exponer el controlador a la luz solar directa, humedad o ambientes corrosivos.
3. Características del producto
The Tracer3215BN controller incorporates advanced features for optimal solar system performance:
- Tecnología MPPT avanzada: High tracking efficiency (≥ 99.5%) and peak conversion efficiency (98%).
- Fast Tracking: Ultra-fast tracking speed and accurate Maximum Power Point (MPP) recognition.
- Wide MPP Operating Voltage Rango: Adapts to various solar panel configurations.
- PV Current Limiting: Reliable automatic PV current limiting function.
- Diseño duradero: Die-cast aluminum housing for excellent heat dissipation and extended lifespan.
- Compatibilidad de la batería: Supports Sealed, Gel, Flooded, and User-defined battery types. Includes battery temperature compensation.
- Flexible Load Control: Multiple load working modes: Manual Control, Light ON/OFF, Light On+Timer, and Time Control.
- Monitoreo de datos: Real-time energy statistics and data monitoring.
- Comunicación: RS485 port with industrial standard MODBUS open architecture for communication with MT50, APP, or PC software.
- Actualización de firmware: Supports firmware upgrades for future enhancements.

Image: Visual summary of the Tracer-BN series features.
4. Components and Ports Identification
Familiarize yourself with the controller's external components and connection ports:
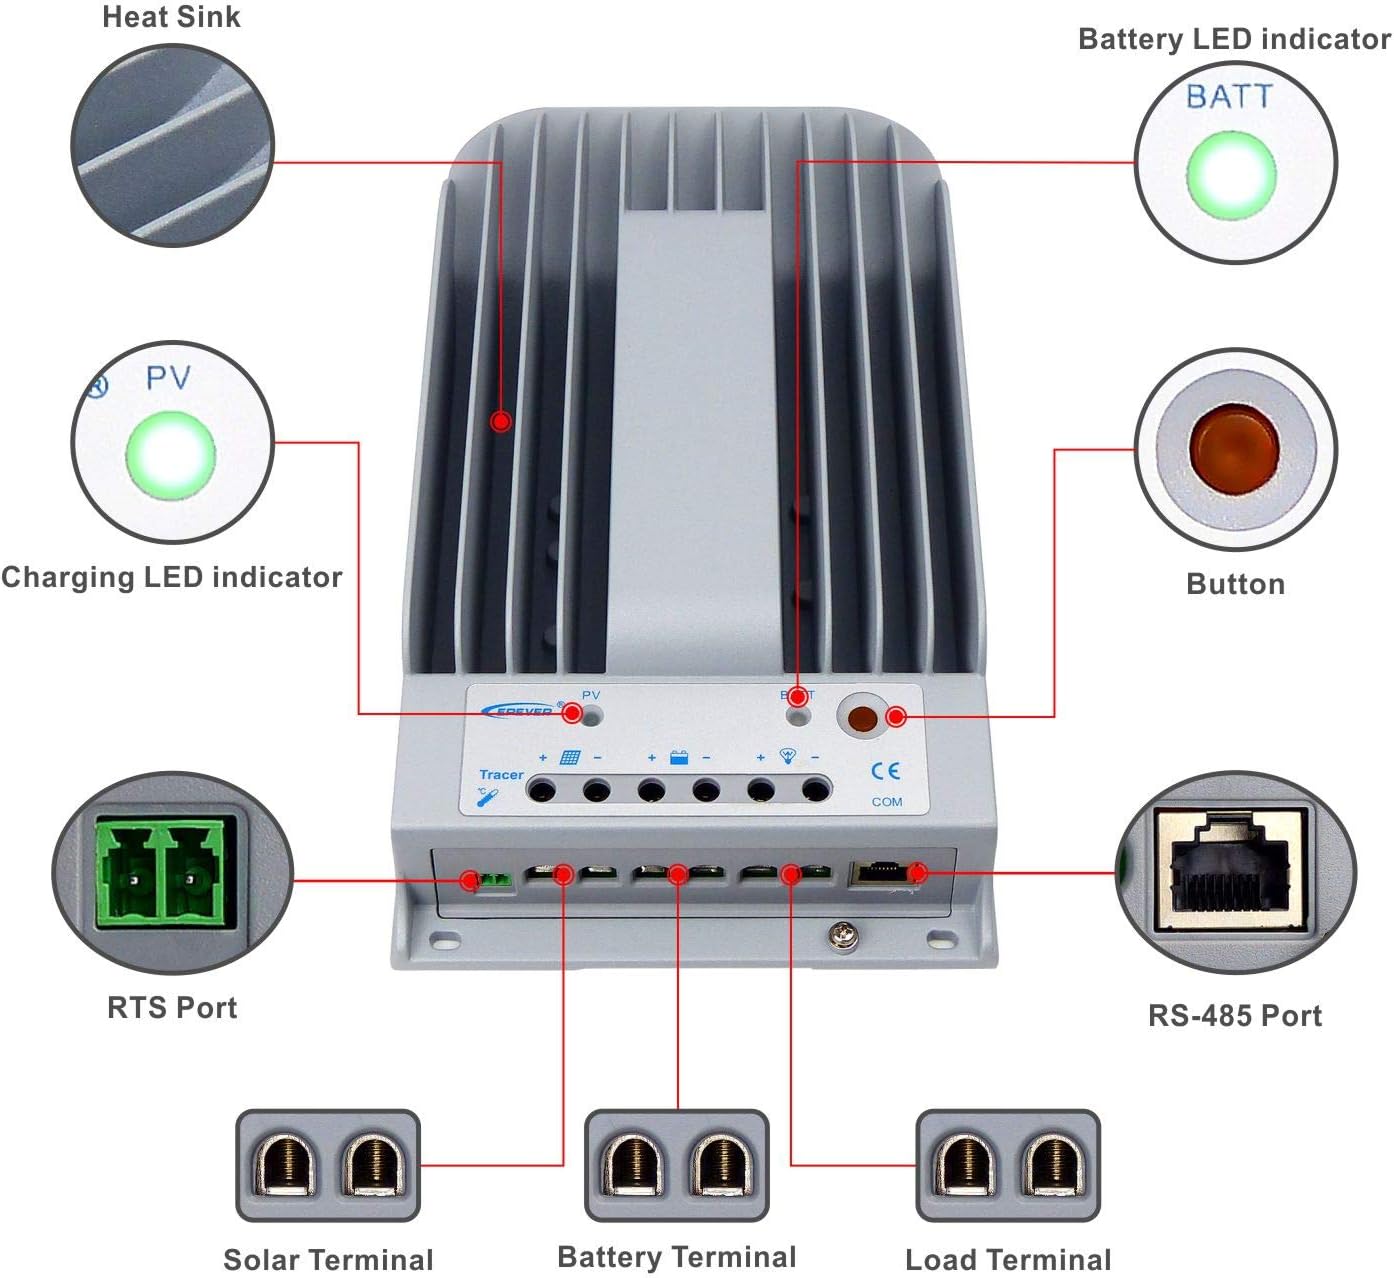
Image: Labeled diagram of the controller's external features.
| Artículo | Nombre | Artículo | Nombre |
|---|---|---|---|
| 1 | Disipador de calor | 6 | Terminal de carga |
| 2 | Indicador LED de carga | 7 | RS-485 puerto |
| 3 | Puerto RTS | 8 | Botón |
| 4 | Terminales solares | 9 | Indicador LED de batería |
| 5 | Terminal de la batería |
Explicación:
- RTS Port (3): Connection for a Remote Temperature Sensor to remotely detect battery temperature.
- RS-485 Port (7): Used to monitor the controller via PC and update controller software using an RS485 (RJ45 Interface) connection.
5. Configuración e instalación
Follow these steps for proper installation of your Tracer3215BN controller:
- Montaje: Mount the controller vertically on a flat surface in a well-ventilated indoor area, away from direct sunlight, high temperatures, and moisture. Ensure sufficient space around the heat sink for air circulation. The mounting dimensions are 130mm x 204mm with Φ4.7 mounting holes.
- Orden de cableado: Connect the system components in the following sequence to ensure safety and proper operation:
- Paso 1: Conecte la batería: Connect the battery to the controller's battery terminals. Ensure correct polarity. The controller will detect the system voltage (12V/24V auto work).
- Paso 2: Conecte el panel solar: Connect the solar panel array to the controller's solar terminals. Ensure correct polarity.
- Paso 3: Conecte la carga: Conecte la carga de CC a los terminales de carga del controlador. Asegúrese de que la polaridad sea correcta.
- Dimensionamiento del cable: Use appropriate cable sizes. For the Tracer3215BN, a power cable size of 6AWG (16mm²) is recommended.
- Toma de tierra: The controller features common negative grounding. Ensure proper grounding according to local electrical codes.
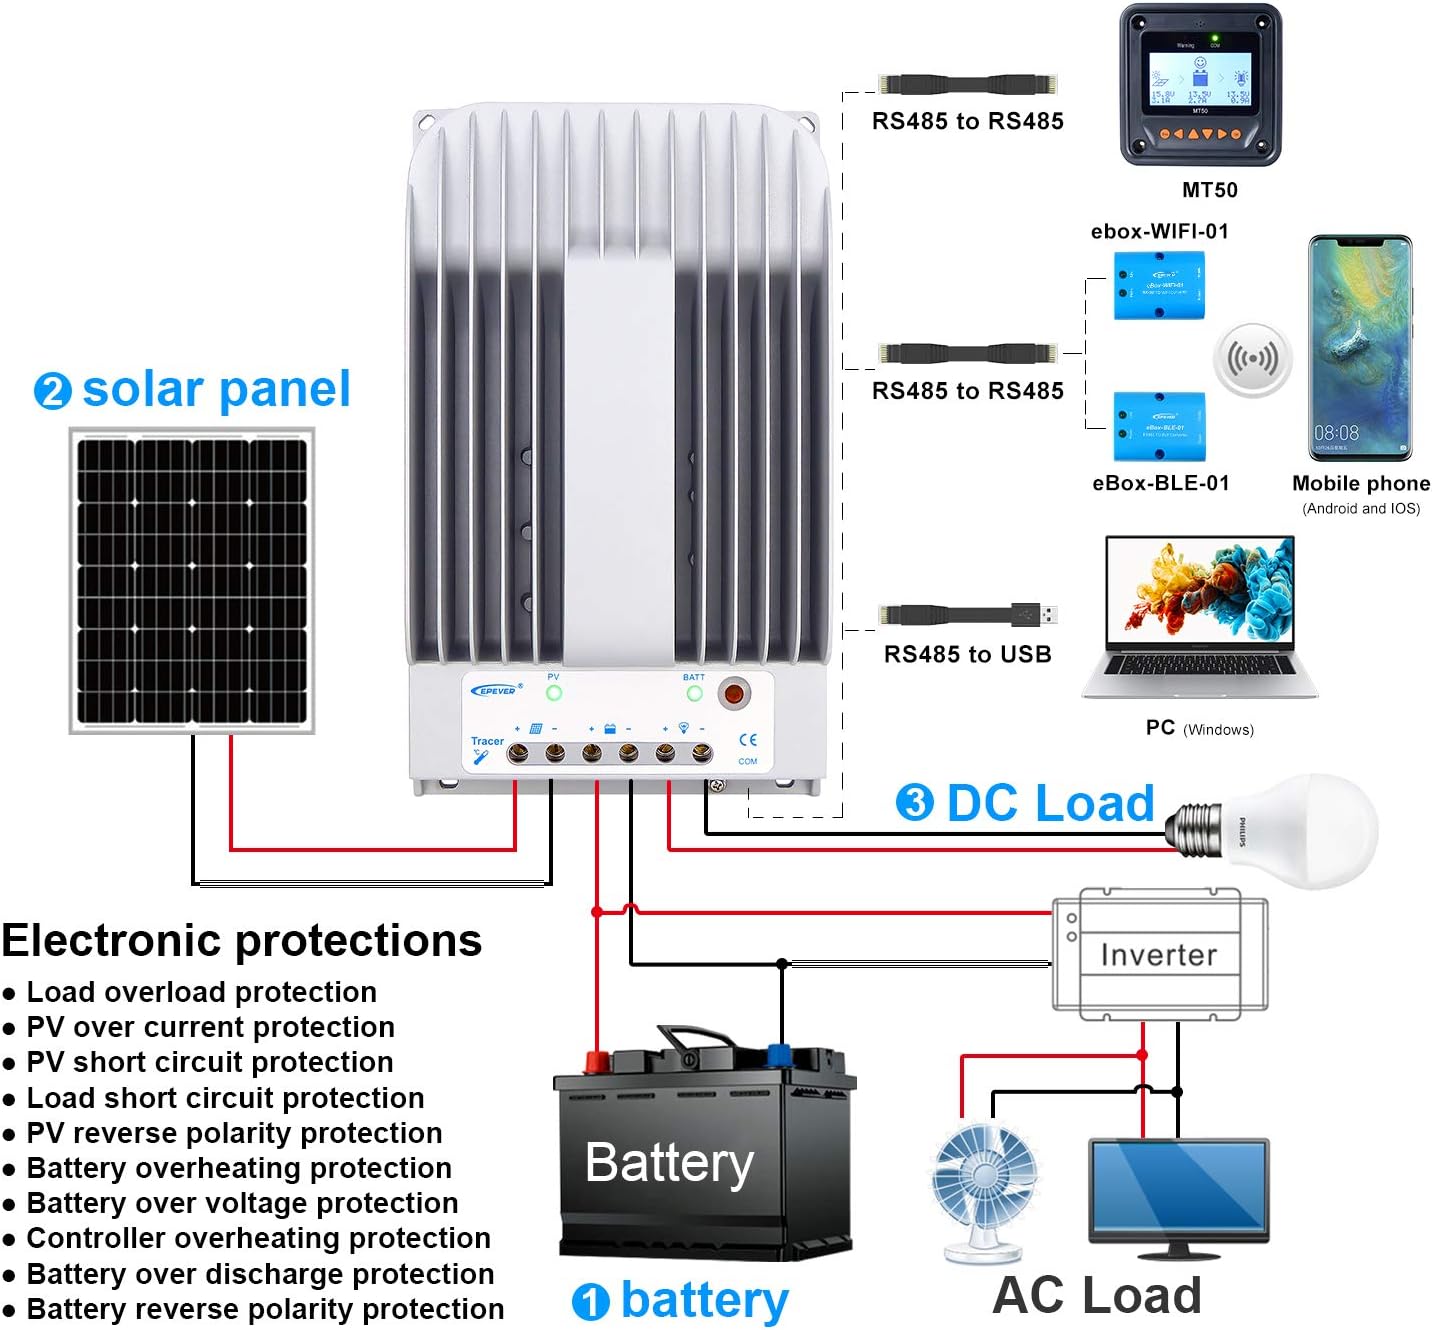
Image: Wiring diagram illustrating connections for battery, solar panel, and DC load.

Image: Controller dimensions for mounting reference.
6. Instrucciones de funcionamiento
Once installed, the controller operates automatically. However, you can configure settings and monitor performance:
- Selección del tipo de batería: The controller supports Sealed, Gel, Flooded, and User-defined battery types. Select the appropriate type through the controller's interface (if available) or via external monitoring tools (MT50, APP, PC software) to ensure correct charging parameters.
- Modos de trabajo de carga: Configure the DC load output behavior using the available modes:
- Control manual: Turn the load ON/OFF manually.
- Luz ENCENDIDA/APAGADA: La carga se enciende al anochecer y se apaga al amanecer.
- Luz encendida + temporizador: Load turns ON at dusk and stays ON for a set duration.
- Control de tiempo: Load operates during specified time periods.
- Monitoreo y configuración: Use the optional MT50 remote meter, mobile application, or PC software connected via the RS485 port to monitor real-time data, view energy statistics, and adjust parameters.
7. Mantenimiento
Regular maintenance ensures the longevity and optimal performance of your charge controller:
- Inspeccionar las conexiones: Revise periódicamente todas las conexiones del cableado (fotovoltaico, batería, carga) para comprobar su firmeza y evitar la corrosión. Las conexiones sueltas pueden causar sobrecalentamiento y daños.
- Controlador limpio: Keep the controller's exterior clean and free from dust and debris. Ensure the heat sink fins are clear for effective cooling.
- Ventilación: Verify that the installation area remains well-ventilated and free from obstructions that could impede airflow around the controller.
- Rendimiento del monitor: Regularly check the controller's display or monitoring software for any error codes or unusual readings.
- Estado de la batería: Asegúrese de que su banco de baterías reciba el mantenimiento adecuado de acuerdo con las pautas del fabricante de la batería.
8. Solución de problemas
If you encounter issues with your Tracer3215BN controller, consider the following:
- Sin carga:
- Verifique las conexiones del panel fotovoltaico y asegúrese de que la polaridad sea correcta.
- Verificar el volumen de entrada fotovoltaicatage is within the controller's operating range (Max 150VDC).
- Ensure sufficient sunlight on the solar panels.
- La carga no funciona:
- Verifique las conexiones de carga y asegúrese de que la polaridad sea correcta.
- Verifique el volumen de la bateríatage está por encima del volumen bajotagy umbral de desconexión.
- Check the selected load working mode.
- Ensure the load current does not exceed the rated discharge current (30A).
- Sobrecalentamiento del controlador:
- Asegúrese de que haya una ventilación adecuada alrededor del controlador.
- Reduce the load or PV input if consistently operating at maximum capacity in high ambient temperatures.
- Códigos de error: Refer to the controller's display or monitoring software for specific error codes and consult the EPEVER official documentation for their meaning and resolution.
9. Especificaciones técnicas
Key technical data for the Tracer3215BN MPPT Charge Controller:

Imagen: Tabla de especificaciones técnicas detalladas.
| Parámetro | Valor |
|---|---|
| Vol. Nominal del sistematage | 12VDC / 24VDC Auto work |
| Corriente de carga nominal | 30A |
| Corriente de descarga nominal | 30A |
| Max. Vol de entrada solartage | 150 V CC |
| Max. PV Input Power (12V Battery) | 390 W |
| Max. PV Input Power (24V Battery) | 780 W |
| Self-consumption (12V) | ≤60 mA |
| Self-consumption (24V) | ≤30 mA |
| Dimensiones de montaje | 130 mm x 204 mm |
| Tamaño del orificio de montaje | Φ4.7 |
| Cable de alimentación | 6 AWG (16 mm²) |
| Dimensión | 281 mm x 160 mm x 60 mm |
| Peso | 2.3 kilos |
| Temperatura del entorno de trabajo | -35℃ ~ +55℃ |
| Humedad relativa | ≤95% (NC) |
| Recinto | IP30 |
| Toma de tierra | Negativo común |
| Puerto de comunicación | RS485 / RJ45 Interface |
10. Información de garantía
For detailed warranty terms and conditions, please refer to the product packaging, the official EPEVER website, or contact your authorized dealer. Warranty coverage typically includes defects in materials and workmanship under normal use.
11. Soporte
Should you require technical assistance, have questions regarding installation, operation, or troubleshooting, please contact:
- EPEVER Customer Service: Refer to the official EPEVER websitio para detalles de contacto.
- Agente de ventas autorizado: GolandCentury (as mentioned in product information).
When contacting support, please have your product model (Tracer3215BN) and any relevant error codes or observations ready.


