Introducción
This manual provides comprehensive instructions for the safe and efficient operation, maintenance, and care of your Solis Grind & Infuse Compact 1018 Espresso Machine. Please read this manual thoroughly before first use and keep it for future reference.
Instrucciones de seguridad importantes
Siga siempre las precauciones básicas de seguridad al utilizar aparatos eléctricos para reducir el riesgo de incendio, descarga eléctrica y lesiones a las personas.
- Lea todas las instrucciones.
- No toque superficies calientes. Utilice asas o perillas.
- Para protegerse contra incendios, descargas eléctricas y lesiones a personas, no sumerja el cable, los enchufes ni el aparato en agua u otro líquido.
- Es necesaria una estrecha supervisión cuando cualquier aparato sea utilizado por niños o cerca de ellos.
- Desenchufe el aparato del tomacorriente cuando no lo utilice y antes de limpiarlo. Deje que se enfríe antes de colocar o quitar piezas y antes de limpiarlo.
- No opere ningún aparato con un cable o enchufe dañado o después de que el aparato funcione mal o haya sufrido algún daño de cualquier tipo.
- El uso de accesorios no recomendados por el fabricante del aparato puede provocar incendios, descargas eléctricas o lesiones a las personas.
- No utilizar en exteriores.
- No deje que el cable cuelgue del borde de la mesa o mostrador, ni que toque superficies calientes.
- No lo coloque sobre o cerca de un quemador de gas o eléctrico caliente, ni dentro de un horno caliente.
- Siempre conecte primero el enchufe al aparato y luego el cable a la toma de corriente. Para desconectarlo, apague cualquier control y desenchúfelo de la toma de corriente.
- No utilice el aparato para ningún fin distinto del previsto.
Contenido del paquete
Verifique que todos los artículos estén presentes en el embalaje:
- Solis Grind & Infuse Compact 1018 Espresso Machine (Black)
- Single-wall filter baskets (1-cup and 2-cup)
- Double-wall filter baskets (1-cup and 2-cup)
- Filter basket for 44mm pods
- Tamper
- Cuchara de café
- Jarra de leche
- Cartucho de filtro de agua
- Tiras de prueba de dureza del agua
- Herramientas de limpieza

Figura 1: Accesorios incluidos. This image displays all the accessories that come with the Solis Grind & Infuse Compact 1018 espresso machine, including various filter baskets, a tamper, a milk jug, and cleaning tools.
Producto terminadoview
Familiarícese con los componentes de su máquina de café expreso.

Figura 2: Frente View of the Espresso Machine. This image shows the overall front view of the Solis Grind & Infuse Compact 1018, highlighting its compact design and main controls.

Figura 3: Componentes clave. This image points out the integrated grinder and the manometer for optimal extraction control on the Solis Grind & Infuse Compact 1018.

Figure 4: Manometer Detail. Un primer plano view of the manometer, which helps monitor the extraction pressure during brewing.

Figure 5: Integrated Grinder Hopper. This image shows the top of the machine with coffee beans visible in the integrated grinder's hopper.
Características principales:
- Molinillo integrado: 11 adjustable grind settings for optimal coffee extraction.
- Control de temperatura PID: Ensures precise water temperature for consistent brewing.
- Bomba de 15 bares: Provides optimal pressure for rich espresso extraction.
- Manómetro: Allows monitoring of extraction pressure.
- Portafiltro de 51 mm: Stainless steel portafilter with double spout.
- Steam/Hot Water Wand: Swiveling nozzle for milk frothing and hot water dispensing.
- Tanque de agua de 2.5 L: Transparent and removable for easy refilling.
- Programmable Cup Size: Customize espresso volume.
- Función de preinfusión: Gently wets coffee grounds for enhanced aroma.
- Cierre automático: Se apaga después de 30 minutos de inactividad.
Configuración
- Desembalaje: Retire con cuidado todos los componentes del embalaje. Conserve el embalaje para su posterior transporte o almacenamiento.
- Colocación: Place the machine on a flat, stable, heat-resistant surface, away from water sources and heat. Ensure adequate ventilation.
- Tanque de agua: Remove the transparent water tank from the back of the machine. Rinse it with fresh water and fill it to the MAX line with cold, filtered water. Insert the water filter cartridge if desired. Place the tank back securely.
- Enjuague inicial: Antes del primer uso, realice un ciclo de enjuague inicial.
- Llene el tanque de agua.
- Ensure the portafilter is not inserted.
- Coloque un recipiente grande debajo del cabezal de preparación y la varilla de vapor.
- Encienda la máquina.
- Once heated, press the 1-cup button to dispense water through the brew head.
- Turn the steam/hot water knob to dispense hot water through the wand.
- Repeat until the water tank is nearly empty. This primes the pump and cleans internal components.
- Configuración del molinillo: Fill the bean hopper with fresh whole coffee beans. Adjust the grind setting according to your preference (start with a medium-fine setting).
Instrucciones de funcionamiento
1. Preparación del espresso
- Prepare el portafiltro: Seleccione el filtro adecuado (1 taza o 2 tazas) e insértelo en el portafiltro.
- Moler café: Place the portafilter under the grinder chute. Press the grind button to dispense freshly ground coffee into the filter basket. Adjust grind time or grind setting as needed to achieve the desired dose and fineness.
- Tamp El café: Utilice la tampPresione el café molido firme y uniformemente en el filtro. Asegúrese de que la superficie esté nivelada.
- Insertar portafiltro: Wipe any excess coffee from the rim of the portafilter. Insert the portafilter into the brew head and turn it firmly to the right until it is securely locked.
- Copa del lugar: Place one or two pre-warmed espresso cups under the portafilter spouts.
- Preparar espresso: Press the 1-cup or 2-cup button. The machine will pre-infuse the coffee, then begin extraction. Monitor the manometer for optimal pressure (typically in the middle of the "optimal" range).
- Detener la extracción: The machine will stop automatically based on the programmed cup size. You can manually stop extraction by pressing the button again.
- Quitar el portafiltro: Carefully remove the portafilter by turning it to the left. Discard the used coffee puck.

Figure 6: Preparing Espresso. This image shows the portafilter filled with ground coffee, ready to be inserted into the machine for brewing.
2. Espumar la leche
- Preparar leche: Fill a cold stainless steel milk jug with cold milk (dairy or non-dairy) up to just below the spout.
- Activar vapor: Turn the steam/hot water knob to the steam position. Wait for the steam light to indicate readiness.
- Varilla de vapor de purga: Briefly open the steam knob to release any condensed water from the wand. Close it immediately.
- Leche espumosa: Immerse the tip of the steam wand just below the surface of the milk. Open the steam knob fully. Angle the jug to create a swirling motion. For microfoam, keep the tip near the surface to incorporate air, then lower it to heat the milk.
- Monitorizar temperatura: Heat the milk until the jug is too hot to touch (approximately 60-65°C or 140-150°F).
- Detener el vapor: Close the steam knob, then remove the milk jug.
- Varilla de vapor limpia: Limpie inmediatamente la varilla de vapor con un paño.amp Paño para eliminar cualquier residuo de leche. Abra brevemente la perilla de vapor para eliminar cualquier resto de leche del tubo.

Figura 7: Espumado de leche. A hand is shown using the steam wand to froth milk in a stainless steel jug, demonstrating the process for creating milk foam.
3. Dispensación de agua caliente
Para dispensar agua caliente para té o café americano:
- Coloque una taza debajo del tubo de vapor/agua caliente.
- Turn the steam/hot water knob to the hot water position.
- Hot water will dispense from the wand. Turn the knob back to stop.
Mantenimiento y limpieza
La limpieza y el mantenimiento regulares garantizan un rendimiento óptimo y la longevidad de su máquina de café expreso.
Limpieza diaria:
- Portafiltros y cestas de filtro: Después de cada uso, retire el portafiltro y deseche el café molido. Enjuague el portafiltro y la canasta del filtro con agua caliente.
- Varilla de vapor: Always wipe the steam wand immediately after frothing milk. Briefly purge steam to clear any internal residue.
- Bandeja de goteo: Vacíe y enjuague la bandeja de goteo diariamente.
- Exterior: Limpie el exterior de la máquina con un paño suave yamp Paño. No utilice limpiadores abrasivos ni disolventes.
Limpieza semanal:
- Cabezal de preparación: Use a cleaning brush to scrub the brew head and gasket to remove coffee residue.
- Tanque de agua: Remove, empty, and thoroughly clean the water tank with mild detergent and rinse well.
Descalcificar:
The frequency of descaling depends on your water hardness and usage. Use the provided water hardness test strips to determine your water hardness. Descale the machine every 1-3 months, or when indicated by the machine (if applicable).
- Vacíe el depósito de agua y llénelo con una solución descalcificadora mezclada según las instrucciones del fabricante.
- Coloque un recipiente grande debajo del cabezal de preparación y la varilla de vapor.
- Encienda la máquina.
- Run approximately half of the descaling solution through the brew head by pressing the 2-cup button.
- Run the remaining solution through the steam wand by opening the steam knob.
- Turn off the machine and let it sit for 15-20 minutes to allow the descaling solution to work.
- Vacíe el tanque de agua, enjuáguelo bien y vuelva a llenarlo con agua fresca.
- Perform several rinse cycles by dispensing water through both the brew head and steam wand until the tank is empty, ensuring all descaling solution is flushed out.
Solución de problemas
Consulte esta sección para conocer problemas comunes y sus soluciones.
| Problema | Posible causa | Solución |
|---|---|---|
| No dispensa café / Flujo lento |
|
|
| Coffee dispenses too fast / Weak espresso |
|
|
| No sale vapor de la varilla |
|
|
| Fuga de agua de la máquina |
|
|
Presupuesto
| Característica | Detalle |
|---|---|
| Marca | Solís |
| Número de modelo | 98015 |
| Color | Negro |
| Dimensiones del producto (L x An x Al) | 19 x 25 x 34 cm |
| Volumen del tanque de agua | 2.5 litros |
| Fuerza | 1600 vatios |
| Material | Acero inoxidable |
| Apagado automático | Sí (después de 30 minutos) |
| Características especiales | Integrated Milk Frother, Programmable Cup Size, PID Temperature Control, Manometer, Pre-infusion |
| Peso del artículo | 7.6 kilogramos |
| Presión de la bomba | 15 barra |
| Tamaño del portafiltro | 51 milímetros |
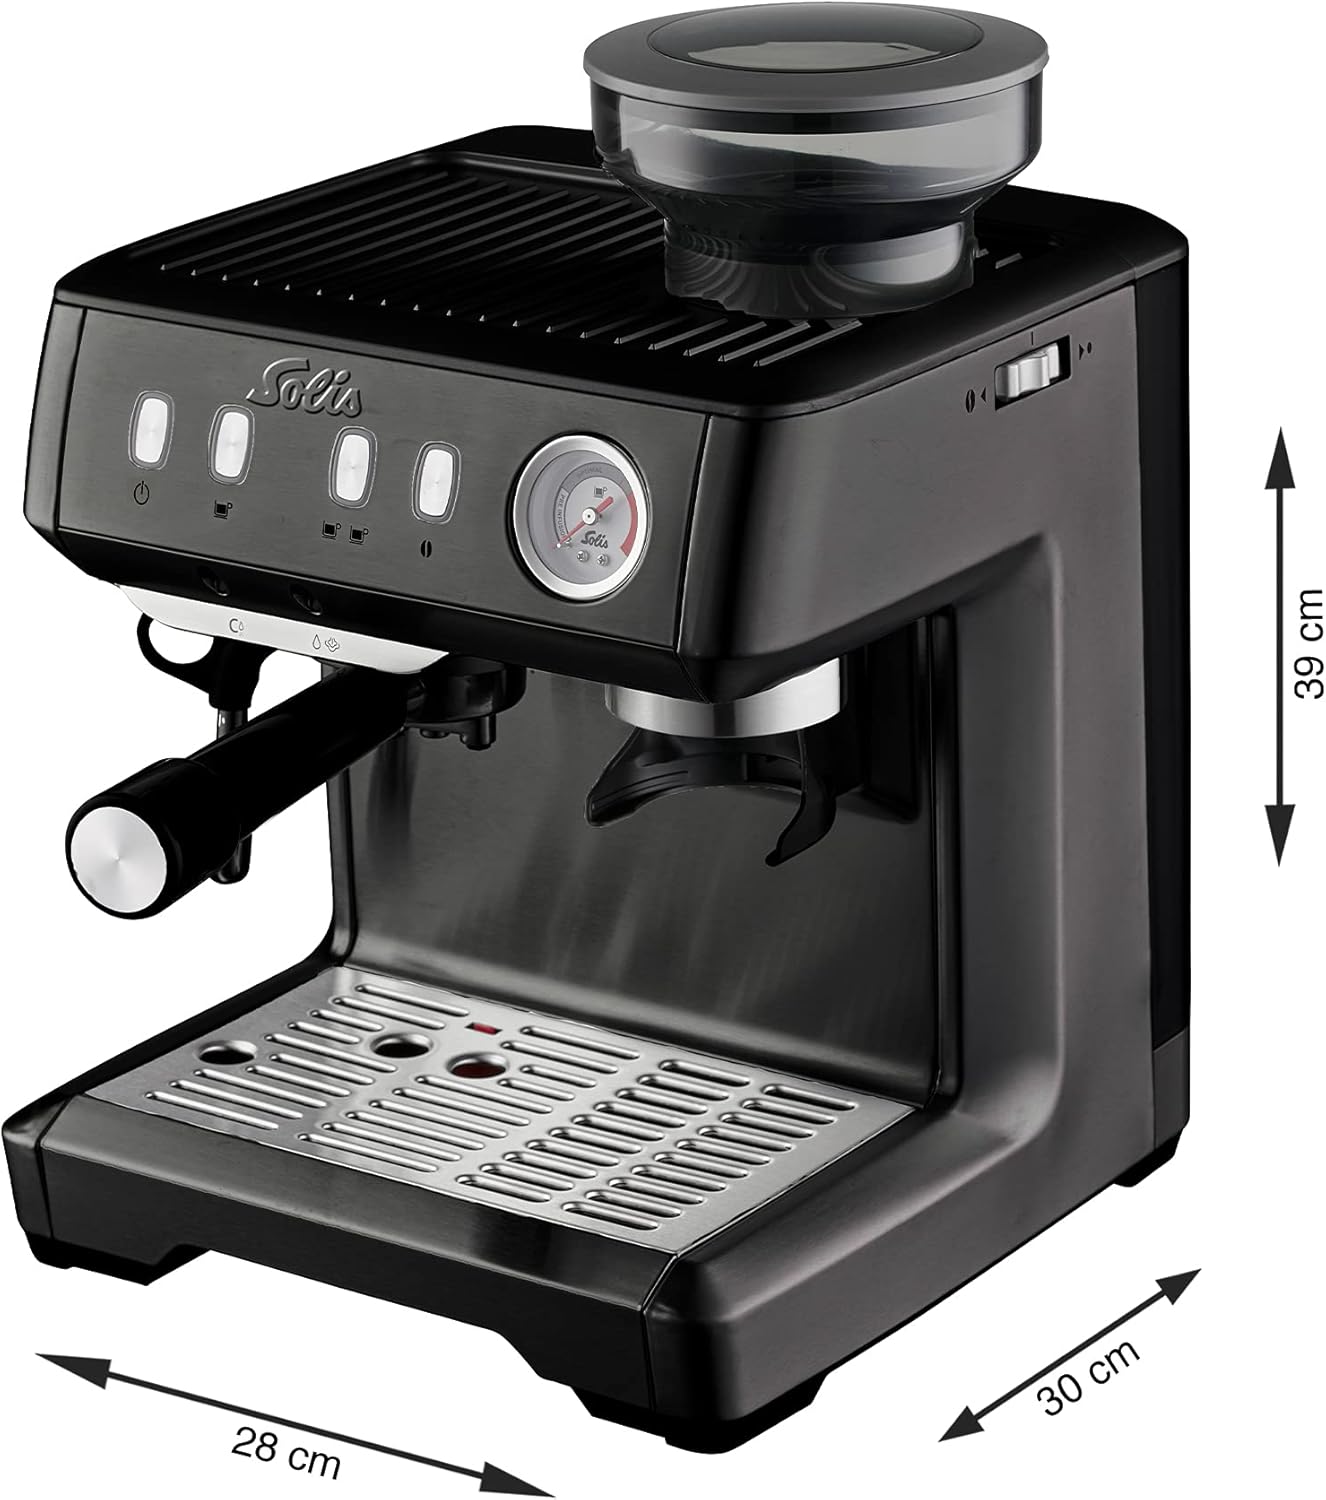
Figura 8: Dimensiones del producto. This image illustrates the length, width, and height of the Solis Grind & Infuse Compact 1018 espresso machine.
Garantía y soporte
Your Solis Grind & Infuse Compact 1018 Espresso Machine is covered by a manufacturer's warranty. Please refer to the warranty card included in your packaging for specific terms and conditions, including the warranty period and coverage details.
For technical support, service, or to order replacement parts, please contact Solis customer service. Contact information can typically be found on the manufacturer's websitio o en la tarjeta de garantía.
Cuando se comunique con el soporte, tenga a mano el número de modelo (98015) y la fecha de compra.