Instrucciones de seguridad importantes
Al utilizar un aparato eléctrico, siempre se deben seguir precauciones básicas de seguridad, incluidas las siguientes:
- Lea todas las instrucciones antes de usar esta máquina de coser.
- Guarde estas instrucciones en un lugar adecuado cerca de la máquina.
- Mantenga los dedos alejados de todas las piezas móviles. Se requiere un cuidado especial alrededor de la aguja de la máquina de coser.
- Utilice siempre la placa de aguja correcta. Una placa incorrecta puede provocar la rotura de la aguja.
- No utilice agujas dobladas.
- No tire ni empuje la tela mientras cose. Esto podría desviar la aguja y romperla.
- Apague la máquina de coser cuando realice cualquier ajuste en el área de la aguja, como enhebrar la aguja, cambiar la aguja, enhebrar la bobina o cambiar el prensatelas.
- Desenchufe siempre la máquina de coser del tomacorriente cuando retire las cubiertas, lubrique o haga cualquier otro ajuste de mantenimiento del usuario mencionado en el manual de instrucciones.
- Nunca deje caer ni inserte ningún objeto en ninguna abertura.
- No utilizar en exteriores.
- No lo utilice en lugares donde se utilicen productos en aerosol (spray) o se administre oxígeno.
Producto terminadoview
The SINGER M1155 is a versatile sewing machine designed for various sewing projects. It features a compact design and user-friendly controls.
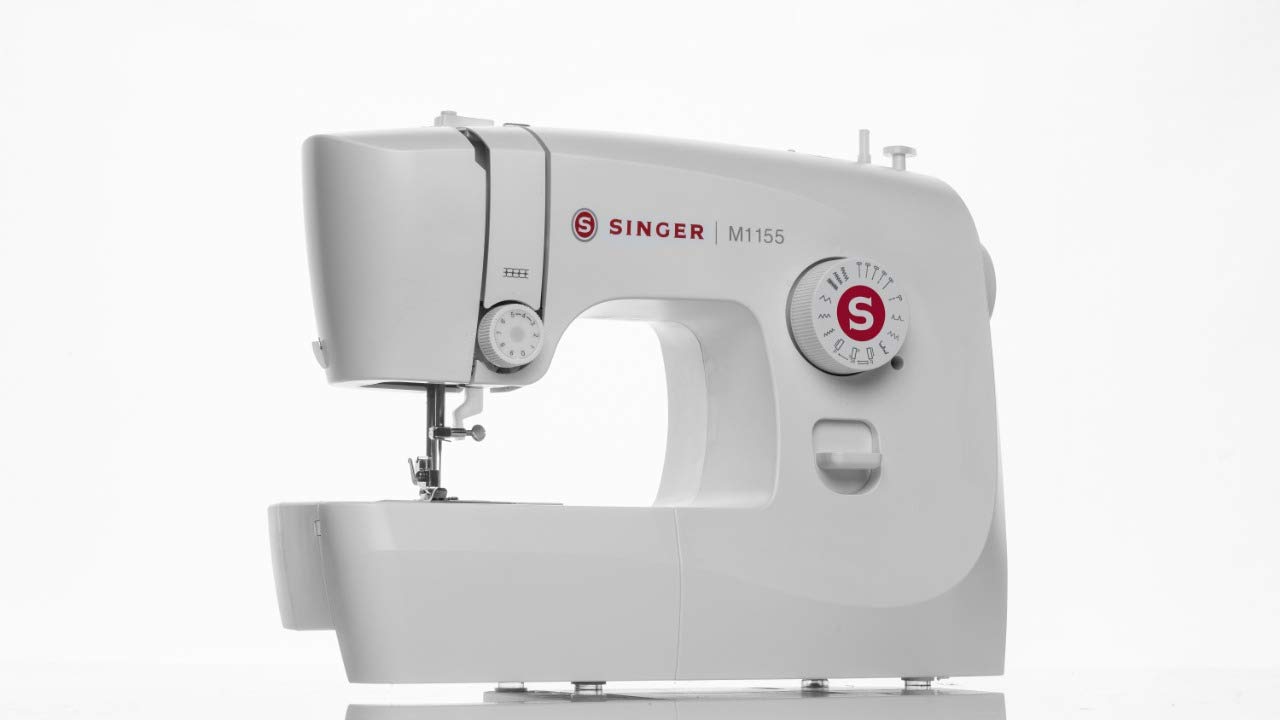
Imagen: Frente view de la máquina de coser SINGER M1155, mostradaasing su diseño compacto y controles principales.
Componentes clave:
- Selector de puntadas: Used to choose from 14 built-in stitches.
- Dial de tensión: Adjusts thread tension for different fabrics.
- Placa de aguja: Provides a flat surface for sewing.
- Presilla: Holds fabric securely in place.
- Luz LED: Ilumina el área de costura para una mejor visibilidad.
- Volante: Sube y baja la aguja manualmente.
- Interruptor de alimentación: Enciende y apaga la máquina.
- Conector del pedal: For connecting the foot control.

Imagen: Trasera view of the SINGER M1155 Sewing Machine, showing the power input and on/off switch.
Configuración
1. Desembalaje y colocación
Retire con cuidado la máquina de su embalaje. Colóquela sobre una superficie estable y plana. Asegúrese de que haya suficiente espacio alrededor para un manejo cómodo.
2. Conexión de alimentación
Connect the foot control to the machine's foot pedal connector. Plug the power cord into the machine's power input, then into a suitable electrical outlet. Use the power switch located at the back of the machine to turn it on.
3. Bobinado de la bobina
The SINGER M1155 features automatic bobbin winding. Follow the threading guides on the machine to wind thread onto an empty bobbin. Ensure the bobbin is wound evenly for smooth stitching.
4. Enhebrado de la máquina
The machine is designed for easy threading. Follow the numbered threading path for the upper thread, ensuring the thread passes through all guides and the tension discs correctly. The machine features a top drop-in bobbin system for convenient bobbin insertion.
5. Instalación de la aguja
Ensure the machine is turned off before changing the needle. Loosen the needle clamp screw, remove the old needle, and insert a new needle with the flat side facing the back of the machine. Tighten the needle clamp screw securely. The machine supports needle positions for left and center stitching.

Imagen: Primer plano view of the needle and presser foot area, illustrating the working space for threading and needle changes.
Instrucciones de funcionamiento
1. Selección de puntadas
The SINGER M1155 offers 14 built-in stitches and 19 built-in functions, including a 4-step buttonhole. Turn the stitch selector dial to choose the desired stitch pattern. Refer to the stitch chart on the machine for available options.

Image: The stitch selection dial on the SINGER M1155, showing various stitch patterns and settings.
2. Costura básica
Place the fabric under the presser foot. Lower the presser foot lever. Gently press the foot control to start sewing. Guide the fabric smoothly without forcing it. The machine has a 5 MM stitch width capability.
3. Uso de la luz LED
The integrated LED light illuminates your sewing area, providing clear visibility for detailed work and reducing eye strain. It activates automatically when the machine is powered on.

Image: The SINGER M1155 Sewing Machine with an arrow pointing to the LED light, indicating its position for illuminating the sewing area.
4. Almacenamiento de accesorios
The machine includes an accessory storage compartment within its extension table. This provides convenient storage for your bobbins, needles, and other small sewing tools.

Image: The SINGER M1155 Sewing Machine with its accessory drawer pulled out, showing space for storing small sewing tools.
Mantenimiento
El mantenimiento regular garantiza la longevidad y el rendimiento óptimo de su máquina de coser.
1. Limpieza
- Eliminación de pelusa: Periodically remove the needle plate and clean out any lint or thread buildup from the bobbin case area and feed dogs using a small brush.
- Limpieza de superficies: Limpie el exterior de la máquina con un paño suave y seco. No utilice productos químicos agresivos ni limpiadores abrasivos.
2. Lubricación
Refer to the full service manual for specific lubrication points and frequency. Generally, modern sewing machines like the M1155 require minimal user lubrication.
Solución de problemas
Aquí encontrará soluciones a problemas comunes que podría encontrar:
- Puntadas saltadas: Ensure the needle is inserted correctly and is not bent. Use the appropriate needle type and size for your fabric and thread. Re-thread the machine completely.
- Rotura de hilo: Check for correct threading, proper thread tension, and ensure the needle is not bent or dull. Use quality thread.
- Fruncido de tela: Adjust thread tension. Use a smaller stitch length. Ensure the correct presser foot is used for the fabric type.
- La máquina no arranca: Check if the power cord is securely plugged in and the power switch is on. Ensure the foot control is properly connected.
- Operación ruidosa: Clean the machine thoroughly, especially the bobbin area, to remove any lint or debris. Ensure all parts are correctly assembled.
Presupuesto
| Característica | Detalle |
|---|---|
| Marca | SINGER |
| Número de modelo | S0442431 |
| Puntadas incorporadas | 14 |
| Funciones integradas | 19 |
| Tipo de ojal | 4 Step Button Hole |
| Tipo de bobina | Bobina de inserción superior |
| Iluminación | Luz LED |
| Bobinado de bobina | Automático |
| Marco | Marco de metal resistente |
| Ancho de puntada | 5 milímetros |
| Posición de la aguja | Left & Center |
| Material | Plástico |
| Color | Blanco |
| Fuente de poder | Eléctrico con cable |
| Peso del artículo | 5 kilogramo 860 gramo |
| Dimensiones del artículo LxAnxAl | 50 x 50 x 28 centímetros |
| Componentes incluidos | Main Product, Foot Control, Accessories Box, Warranty Card |
Garantía y soporte
Your SINGER M1155 Sewing Machine comes with a warranty. Please refer to the included Warranty Card for details regarding coverage and terms. Keep your purchase receipt as proof of purchase.
For technical assistance, service, or warranty claims, please contact Singer India Limited directly.
Fabricante: Singer India Limited
Número gratuito: 18001033474


