Introducción
This manual provides essential instructions for the proper setup, operation, and maintenance of your ISLANDSAFE Digital Small Personal Safe, Model QT. Please read this manual thoroughly before using the safe to ensure correct functionality and security.
Información de seguridad
- Keep emergency keys in a secure location away from the safe and out of reach of children. Do not store them inside the safe.
- Ensure the safe is placed on a stable, level surface or securely mounted to a wall or cabinet.
- Do not attempt to force the safe open if the electronic lock malfunctions. Use the emergency override methods.
- Reemplace las baterías rápidamente cuando aparezca el indicador de batería baja para evitar quedarse bloqueado.
- This safe is water-resistant, not waterproof. Avoid exposing it to excessive moisture or direct water contact.
Contenido del paquete
- ISLANDSAFE Digital Personal Safe (Model QT)
- Llaves de anulación de emergencia (2)
- Caja de batería de emergencia
- Removable Shelf (1)
- Mounting Hardware (Expansion Screws)
- Manual de instrucciones
Producto terminadoview
The ISLANDSAFE Digital Personal Safe is designed to secure your valuables with an electronic combination lock and robust construction. It features a matte finish alloy steel body, dual solid steel bolts, and a pry-resistant door for enhanced security. The interior includes a soft lining and a removable shelf for organized storage.

Image: The ISLANDSAFE Digital Safe with its door open, revealing a spacious interior with a removable shelf, storing various items such as a camera, lens, and small containers.
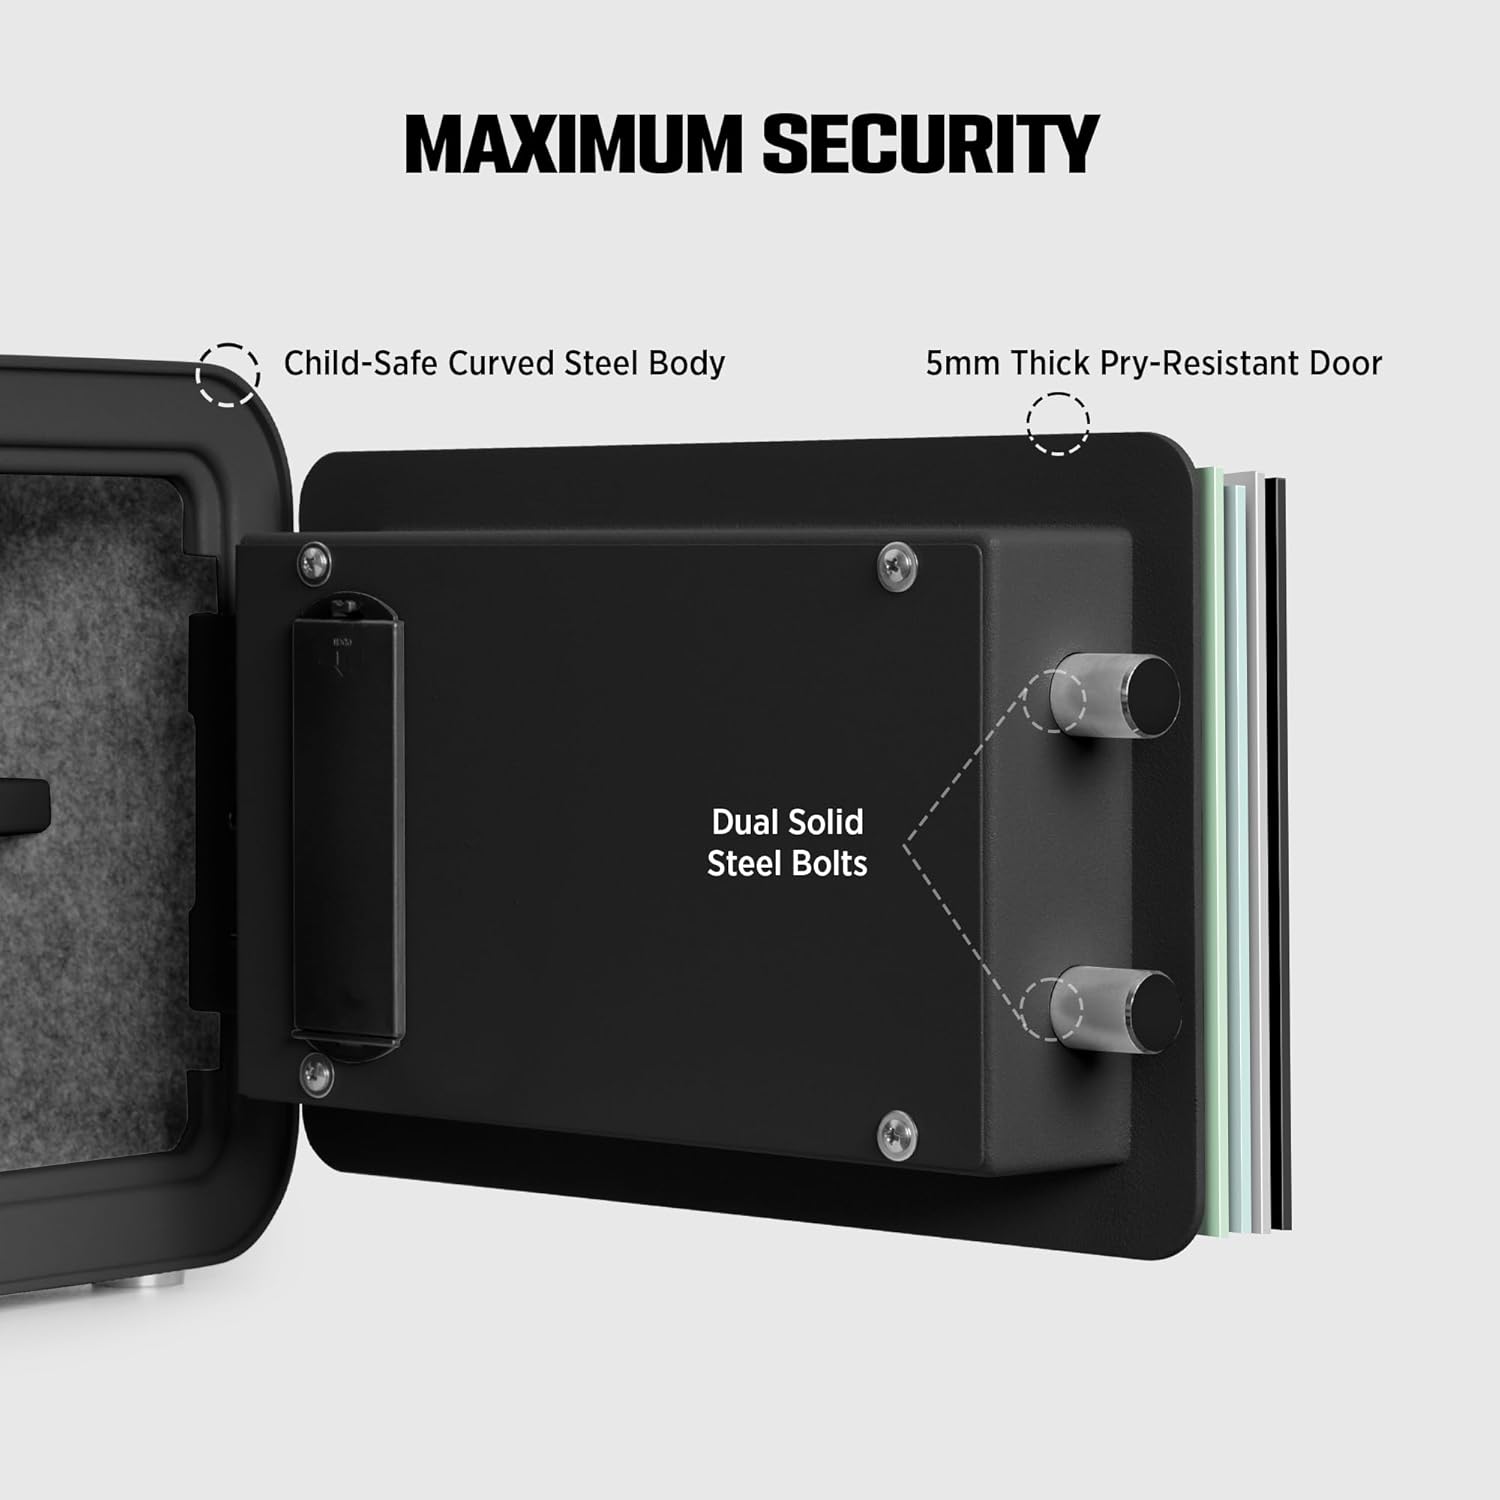
Imagen: Un detalle view of the safe's door mechanism, illustrating the 5mm thick pry-resistant door and dual solid steel locking bolts for maximum security.

Imagen: Primer plano views showcasing the safe's design elements: streamlined curved edges, soft interior lining, a built-in LED light for visibility, and protective floor pads.
Configuración
1. Instalación de baterías
- Localice el compartimiento de la batería en el interior de la puerta de la caja fuerte.
- Insert 4 AA Alkaline batteries (not included) according to the polarity markings.
- Cierre la tapa del compartimento de la batería.
2. Initial Passcode Setting
The safe comes with a factory default passcode (usually 1-2-3-4 or 0-0-0-0). It is crucial to change this immediately.
- With the safe door open, press the red reset button located on the inside of the door near the hinge. You will hear a beep.
- En el teclado, ingrese el código de acceso deseado de 3 a 8 dígitos.
- Press the '#' button to confirm. The safe will beep, indicating the new passcode is set.
- Pruebe la nueva contraseña con la puerta abierta antes de cerrarla.
3. Montaje de la caja fuerte
The safe has pre-drilled mounting holes on the back for secure installation.
- Choose a suitable location on a wall or inside a cabinet.
- Mark the drilling points through the pre-drilled holes on the safe's back.
- Drill pilot holes in the marked locations.
- Alinee la caja fuerte con los orificios perforados y fíjela utilizando los tornillos de expansión provistos.
Operación de la caja fuerte

Image: Visual guide to the three secure access modes: Keypad Entry, Override Key, and Emergency Power, with step-by-step instructions for each.
1. Entrada mediante teclado
- Enter your personal passcode (3-8 digits).
- Presione el botón '#'. La luz verde se encenderá.
- Dentro de los 5 segundos, gire la perilla en el sentido de las agujas del reloj para abrir la puerta de la caja fuerte.
2. Override Key Access
Use this method if you forget your passcode or if the batteries are completely drained.
- Remove the small cover plate on the keypad to reveal the keyhole.
- Insert one of the emergency override keys and turn it counter-clockwise.
- While holding the key in the turned position, turn the main knob clockwise to open the safe door.
- Remove the key once the door is open.
3. Emergency Power Box Usage
This method is for when batteries are dead and emergency keys are not immediately available, or if the keypad is unresponsive due to low power.
- Conecte la caja de batería de emergencia al puerto de alimentación externo en el teclado.
- Introduzca su contraseña en el teclado.
- Presione el botón '#'. La luz verde se encenderá.
- Dentro de los 5 segundos, gire la perilla en el sentido de las agujas del reloj para abrir la puerta de la caja fuerte.
4. Changing the Passcode
Follow these steps to change your passcode at any time:
- Open the safe door using your current passcode or emergency key.
- Presione el botón rojo de reinicio en el interior de la puerta. Oirá un pitido.
- Ingrese su nuevo código de acceso de 3 a 8 dígitos en el teclado.
- Press the '#' button to confirm. A beep will indicate successful programming.
- Verify the new passcode with the door open before closing it.
5. Sistema de alarmas
The ISLANDSAFE Digital Personal Safe is equipped with a dual alarm system to deter unauthorized access.
- Failed Entry Alarm: If an incorrect passcode is entered 3 consecutive times, the safe will activate a 60-second audible alarm.
- Vibration/Attack Alarm: If the safe experiences violent shaking or an attempted attack, a vibration sensor will trigger a 60-second audible alarm.

Image: An illustration detailing the dual alarm system, showing triggers for failed entry and violent impact, leading to a 60-second audible alert.
Mantenimiento
1. Reemplazo de la batería
When the low battery indicator light illuminates on the keypad, it is time to replace the batteries. Use 4 new AA Alkaline batteries. Refer to the "Installing Batteries" section under Setup for detailed steps.
2. Limpieza
To clean the exterior of your safe, use a soft, damp cloth. Avoid abrasive cleaners or solvents that could damage the finish. For the interior, a dry cloth is sufficient. Ensure no moisture enters the electronic components.
Solución de problemas
| Problema | Posible causa | Solución |
|---|---|---|
| La caja fuerte no se abre con contraseña. | Incorrect passcode entered; batteries are low or dead; knob not turned within 5 seconds. | Re-enter passcode carefully. Replace batteries or use emergency power box. Turn knob immediately after green light. |
| El teclado no responde. | Las baterías están completamente agotadas. | Use the emergency power box or emergency override key to open the safe and replace batteries. |
| La alarma suena inesperadamente. | Incorrect passcode entered multiple times; safe was shaken or impacted. | Enter correct passcode to disarm. Avoid moving or impacting the safe while locked. |
| Cannot change passcode. | Reset button not pressed correctly; new passcode not confirmed with '#'. | Ensure the reset button is pressed until a beep is heard. Confirm new passcode by pressing '#'. |
Presupuesto

Image: A detailed diagram illustrating the exterior and interior dimensions of the safe, along with other key specifications.
| Característica | Detalle |
|---|---|
| Marca | ISLA SEGURA |
| Número de modelo | QT |
| Dimensiones exteriores (profundidad x anchura x altura) | 11" x 13.7" x 9.8" |
| Capacidad | 0.8 pies cúbicos |
| Tipo de bloqueo | Cerradura de combinación electrónica |
| Material | Acero aleado |
| Características especiales | Alarm System, Anti-Theft, Portable, Removable Shelf |
| Tipo de montaje | Montaje en pared |
| Peso del artículo | 10 kilogramos (22 libras) |
| Tipo de alarma | Vibración |
| Nivel de resistencia al agua | Resistente al agua |
| Pilas necesarias | Yes (4x AA Alkaline, not included) |
Garantía y soporte
ISLANDSAFE is committed to providing quality products and customer satisfaction. For any questions, concerns, or technical assistance regarding your safe, please utilize our 24-hour online customer service. Contact information can typically be found on the product packaging or the official ISLANDSAFE websitio.


