1. Introducción
This manual provides comprehensive instructions for the installation, operation, and maintenance of your Cabletech URZ0336B DVB-T2 H.265 HEVC Digital Tuner. Please read this manual thoroughly before using the device to ensure proper functionality and to prevent damage.
2. Información de seguridad
Always observe the following safety precautions to avoid electric shock, fire, or damage to the device:
- No exponga el dispositivo a la lluvia ni a la humedad.
- No abra la casing. Deje todo servicio a personal cualificado.
- Asegúrese de que haya una ventilación adecuada alrededor del dispositivo. No bloquee las aberturas de ventilación.
- Utilice únicamente el adaptador de corriente suministrado con el dispositivo.
- Mantenga el dispositivo alejado de fuentes de calor y de la luz solar directa.
- Desconecte el enchufe de alimentación de la toma de pared si el dispositivo no se utilizará durante un período prolongado.
3. Contenido del paquete
Por favor revise el paquete para ver los siguientes artículos:
- Cabletech URZ0336B DVB-T2 H.265 HEVC Digital Tuner
- Mando a distancia
- Pilas AAA (2x)
- Adaptador de corriente
- Manual de usuario (este documento)
4. Producto terminadoview
Familiarize yourself with the main components and connections of your Cabletech URZ0336B tuner.
4.1. Dispositivo y control remoto
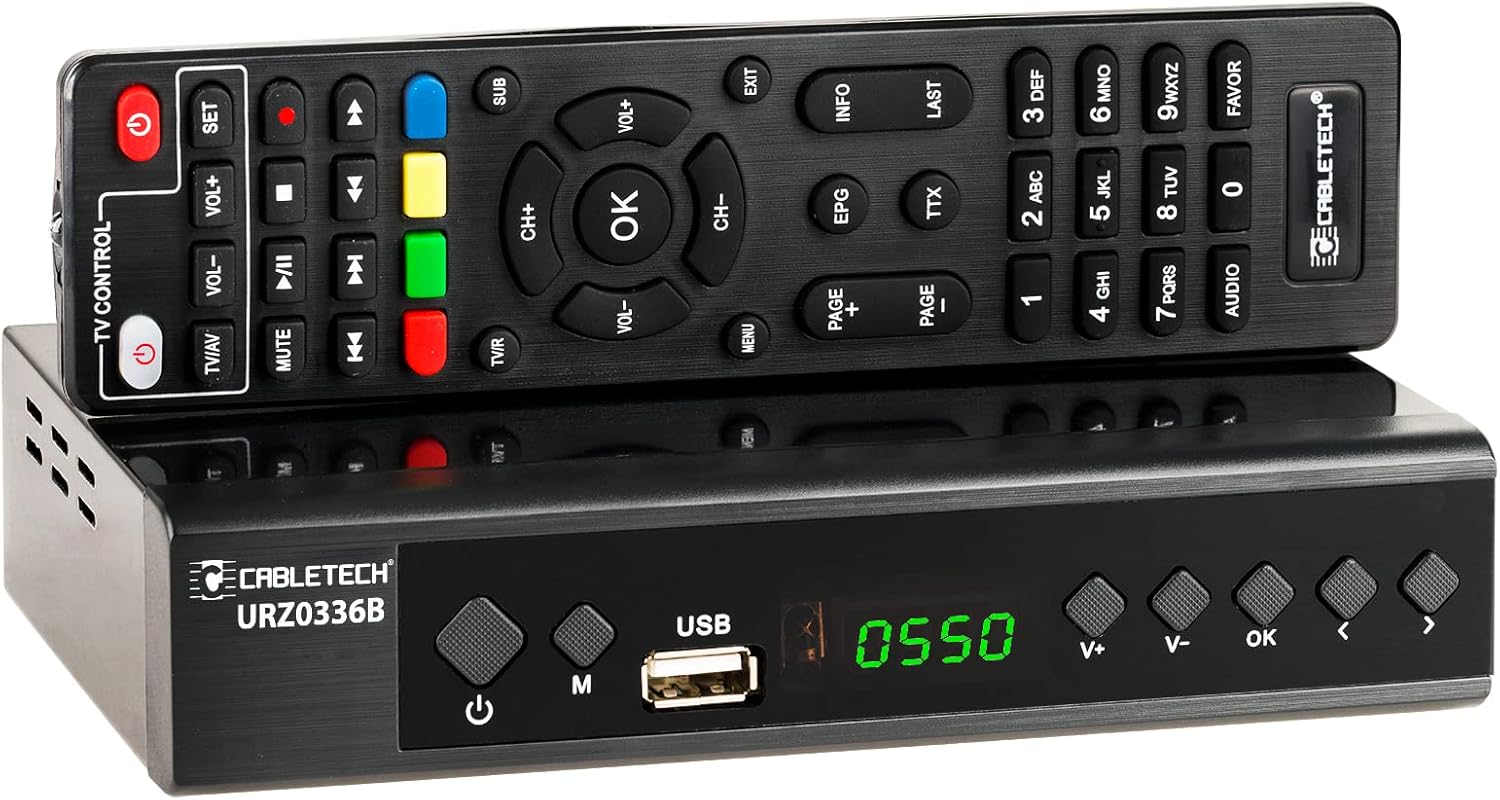
Image: The Cabletech URZ0336B DVB-T2 H.265 HEVC Digital Tuner shown with its accompanying remote control. The tuner is a compact black box, and the remote is also black with various control buttons.
4.2. Panel frontal
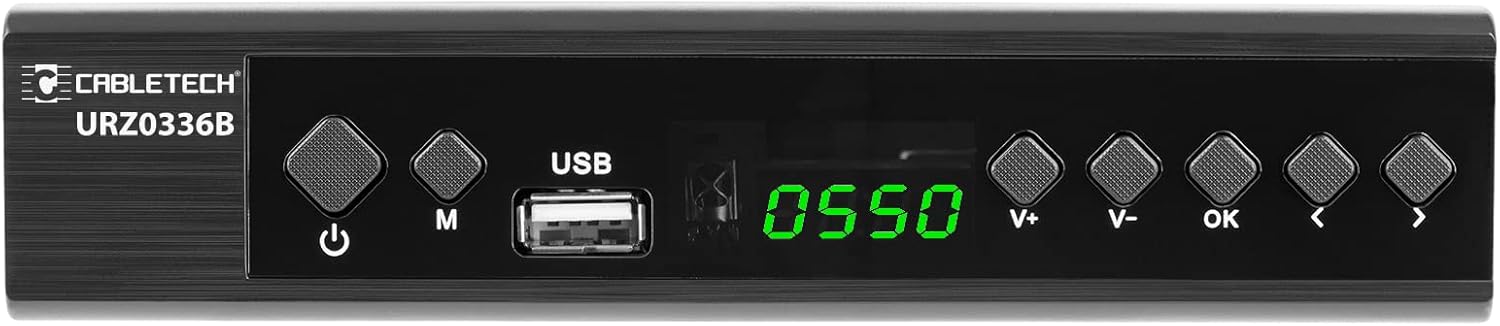
Image: Close-up of the Cabletech URZ0336B front panel, featuring a power button, menu button (M), USB 2.0 port, LED display showing "0550", and navigation/volume buttons (V+, V-, OK, <, >).
- Botón de encendido: Turns the device on/off or to standby.
- Botón M (Menú): Accede al menú principal.
- Puerto USB 2.0: For software updates, PVR recording, and media playback.
- Pantalla LED: Muestra el número de canal o la hora.
- V+/V- Buttons: Ajusta el volumen.
- Botón OK: Confirma selecciones.
- </> Buttons: Navigates through menus or changes channels.
4.3. Conexiones del panel trasero

Image: The rear panel of the Cabletech URZ0336B, showing various input and output ports: ANT IN (IEC socket), COAXIAL, USB, HD OUT (HDMI), SCART, and the power input (110-240V~ 50/60Hz).
- HORMIGA EN: Connects to your DVB-T/T2 antenna.
- COAXIAL: Salida de audio digital.
- USB: Additional USB 2.0 port for external devices.
- SALIDA HD (HDMI): Se conecta a su televisor para disfrutar de video y audio de alta definición.
- Euroconector: Se conecta a televisores o videograbadoras más antiguas.
- Entrada de energía: Se conecta al adaptador de corriente.
4.4. Disposición del control remoto

Imagen: Detallada view of the Cabletech URZ0336B remote control, showing buttons for power, TV/AV, volume, channel, mute, playback controls, EPG, TTX, INFO, numeric keypad, and special function buttons.
The remote control provides full functionality for operating your tuner. Insert 2x AAA batteries into the battery compartment before first use.
5. Configuración
5.1. Connecting the Tuner
- Conectar la antena: Connect your DVB-T/T2 antenna cable to the HORMIGA EN puerto en el panel trasero del sintonizador.
- Conectar al televisor:
- For HD TVs: Connect an HDMI cable from the SALIDA HD (HDMI) puerto del sintonizador a una entrada HDMI de su televisor.
- Para televisores más antiguos: Conecte un cable SCART desde el Euroconector puerto del sintonizador a la entrada SCART de su televisor.
- Conecte la electricidad: Connect the power adapter to the tuner's power input and then plug it into a wall outlet.
- Inserte las baterías: Open the battery compartment on the remote control and insert 2x AAA batteries, observing polarity.
5.2. First-Time Installation and Channel Scan
- Encienda su televisor y seleccione la fuente de entrada HDMI o SCART correcta a la que está conectado el sintonizador.
- Power on the Cabletech URZ0336B tuner using the power button on the front panel or remote control.
- The first-time installation wizard should appear on your TV screen. Follow the on-screen prompts.
- Seleccione su idioma y país preferidos.
- Iniciar una Busqueda automatica for channels. The tuner will scan for all available DVB-T/T2 channels in your area. This process may take several minutes.
- Once the scan is complete, the tuner will save the found channels and display the first channel.
Note: If you experience poor signal quality, adjust your antenna position or consider using a signal ampmás duradero.
6. Instrucciones de funcionamiento
6.1. Funciones básicas
- Encendido/apagado: Presione el FUERZA Botón en el control remoto.
- Cambio de canal: Utilice el CH + / CH- buttons or the numeric keypad to enter a channel number.
- Control de volumen: Utilice el VOL + / VOL- botones.
- Silenciar: Presione el MUTE Botón para silenciar temporalmente el audio.
- Menú: Presione el MENÚ Botón para acceder al menú principal de configuraciones y funciones.
- Aceptar: Confirms selections in menus or displays the channel list.
- SALIDA: Sale del menú o pantalla actual.
6.2. Guía electrónica de programación (EPG)
The 7-day EPG provides a schedule of current and upcoming programs.
- Presione el Guía electrónica de programas Botón en el control remoto.
- Navigate through channels and program times using the arrow buttons.
- Prensa OK a view details about a selected program.
6.3. PVR (Program Recording) and Timeshift
Connect a USB storage device (e.g., USB flash drive or external hard drive) to one of the USB 2.0 ports to use PVR and Timeshift functions.
- Grabación PVR:
- Presione el REC button (red circle) on the remote to start immediate recording of the current program. Press DETENER (square) to end recording.
- Schedule recordings via the EPG: Select a program in the EPG and press OK, then choose the record option.
- Cambio de hora:
- Mientras mira un programa, presione el botón PAUSA button. The tuner will begin recording the live broadcast to the USB device.
- Luego puedes JUGAR, AVANCE RÁPIDO, o REBOBINAR within the buffered content.
- Prensa DETENER to exit Timeshift and return to live TV.
6.4. Reproducción multimedia
The tuner supports playback of various media files desde un dispositivo de almacenamiento USB conectado.
- Connect your USB device to a USB port on the tuner.
- Go to the main menu and select "Media" or "USB".
- Navega a la deseada file type (MP3, WMA, JPEG, BMP, AVI) and select the file Para jugar.
6.5. Supported Applications
The tuner supports various online applications when connected to the internet via an external MT7601 Wi-Fi adapter (not included).
- Clima: View Pronósticos meteorológicos locales.
- Televisión por IP: Access Internet Protocol Television streams.
- YouTube: Watch videos from YouTube.
- : Read RSS news feeds.
Note: An external MT7601 Wi-Fi adapter is required for internet connectivity and access to these applications.
6.6. Control parental
Set up parental control to restrict access to certain channels or programs based on age ratings.
- Acceda a la sección “Control Parental” en el menú principal.
- Enter your PIN (default is usually 0000 or 1234, check your device for specifics).
- Configure age restrictions or lock specific channels.
6.7. Función de temporizador
The timer function allows you to schedule the tuner to turn on/off at specific times or to switch to a particular channel.
- Navigate to the "Timer" section in the main menu.
- Set the event type (e.g., Power On, Power Off, Record), time, and duration.
7. Mantenimiento
7.1. Limpieza
To clean the device, disconnect it from the power supply and wipe the exterior with a soft, dry cloth. Do not use liquid or aerosol cleaners.
7.2 Actualización de software
Software updates can improve performance and add new features. Updates are performed via the USB port.
- Descargue el último firmware file from the official Cabletech support websitio (si está disponible).
- Copiar el firmware file al directorio raíz de una unidad flash USB.
- Connect the USB flash drive to the tuner's USB port.
- Go to the "System" or "Tools" menu, then select "Software Update" or "Upgrade by USB".
- Follow the on-screen instructions to complete the update. Do not power off the device during the update process.
8. Solución de problemas
If you encounter issues with your tuner, refer to the following common problems and solutions:
| Problema | Posible causa | Solución |
|---|---|---|
| Sin imagen ni sonido | Entrada de TV incorrecta seleccionada; Conexiones de cable sueltas; Sintonizador no encendido. | Select correct TV input (HDMI/SCART); Check all cable connections; Ensure tuner is powered on. |
| Mensaje de "Sin señal" | Antenna not connected; Poor antenna signal; No channels scanned. | Connect antenna properly; Adjust antenna position; Perform an automatic channel scan. |
| El control remoto no funciona | Las pilas están agotadas o insertadas incorrectamente; Obstrucción entre el control remoto y el sintonizador. | Replace batteries; Check battery polarity; Remove any obstructions; Point remote directly at the tuner. |
| No se puede grabar en USB | USB device not connected or formatted incorrectly; Insufficient storage space. | Ensure USB device is connected; Format USB device to FAT32 or NTFS; Free up space on USB device. |
| No internet access for apps | No MT7601 Wi-Fi adapter connected; Network configuration issues. | Connect a compatible MT7601 Wi-Fi adapter; Check network settings in the tuner's menu. |
9. Especificaciones
| Característica | Detalle |
|---|---|
| Número de modelo | URZ0336B |
| UPC | GX6702S5 |
| Memoria interna | 32 MB |
| RAM | 512 MB DDR2 |
| Conector ANT | Toma IEC |
| Rango de frecuencia | VHF: 170–230 MHz, UHF: 470–862 MHz |
| Desmodulación | QPSK, 16QAM, 64QAM, 256QAM |
| Ancho de banda | 7 MHz, 8 MHz |
| Descodificación | MPEG-1, MPEG-2, MPEG-4, H.264, H.265, AAC, HE-AAC, AC-3, DD+ |
| Entradas/Salidas | 2x USB 2.0, HDMI, SCART, COAXIAL |
| Relación de aspecto | Auto, 16:9 WS, 16:9 PB, 16:9 PS; 4:3 LB, 4:3 PS, 4:3 Full |
| Formatos compatibles | MP3, WMA, JPEG, BMP, AVI |
| Resolución de pantalla | 480i, 480p, 576i, 576p, 720p, 1080i, 1080p |
| Resolución de vídeo | 1920 x 1080 píxeles |
| Descodificación de audio | MPEG-1 LayerI/II, Dolby-Downmix 2-Channel (License), AAC LC, HE-AAC v1/V2, PCM-Downmix, IEC958 SPDIF |
| File Sistema | FAT32, NTFS |
| Compatibilidad | Fully compatible with DVB-T2/DVB-T |
| Mando a distancia | Requires 2x AAA batteries |
| Consumo de energía | Max. 6 W (Operating), Max. 50/60 Hz (Standby) |
| Dimensiones (An x Al) | 168 mm x 36 mm |
| Soporte de Wi-Fi | Requires external MT7601 chip adapter |
| Tuner Bit Depth | 10 bits |
10. Garantía y soporte
This product comes with a standard manufacturer's warranty. For specific warranty terms and conditions, please refer to the documentation included with your purchase or contact Cabletech customer support.
For technical assistance, troubleshooting beyond this manual, or warranty claims, please contact your retailer or the official Cabletech support channels.


