1. Introducción
This manual provides essential information for the safe and efficient assembly, operation, and maintenance of your Vente-unique EXPERTLAND ADELMO Galvanized Steel Garden Shed. Please read these instructions thoroughly before beginning assembly or use. Retain this manual for future reference.
2. Información de seguridad
Advertencias generales de seguridad:
- Utilice siempre el equipo de protección personal (EPP) adecuado durante el montaje, incluidos guantes y protección para los ojos.
- Asegúrese de que el área de montaje esté libre de obstrucciones y niños.
- No intente montar el cobertizo si hay vientos fuertes o condiciones climáticas adversas.
- Verify all parts are present and undamaged before starting assembly. Contact customer support immediately if any parts are missing or damaged.
- Securely anchor the shed to a level, stable foundation to prevent tipping or movement.
- Keep all sharp edges and small parts away from children.
- No almacene líquidos inflamables ni materiales peligrosos dentro del cobertizo sin la ventilación y las precauciones de seguridad adecuadas.
3. Características del producto
The EXPERTLAND ADELMO garden shed is designed for outdoor storage, offering durability and functionality. Key features include:
- Material: Galvanized steel with a wood-effect finish for enhanced durability and aesthetic appeal.
- Puertas: Double sliding doors for convenient access and space-saving operation.
- Ventilación: Integrated ventilation grilles to ensure air circulation and reduce condensation, keeping stored items dry.
- Ventana: A PVC window (48 x 35 cm) provides natural light inside the shed.
- Resistencia: Construcción resistente al agua.

Figura 3.1: Exterior view of the EXPERTLAND ADELMO garden shed.

Figura 3.2: Lado view showing the integrated PVC window and wood-effect panels.
4. Especificaciones
| Atributo | Valor |
|---|---|
| Modelo | ADELMO |
| Dimensiones exteriores (L x P x H) | 340 cm x 323 cm x 226 cm (10.98 m²) |
| Ground Dimensions (L x D) | 330 cm x 309 cm (10.19 m²) |
| Dimensiones de la puerta (L x H) | 138 cm x 181 cm |
| Espesor de acero | 0.25 milímetros |
| Material | Galvanized Steel, Wood Effect |
| Window Material | PVC (48 x 35 cm) |
| Peso | 120 kilogramos |
| Resistencia al agua | Impermeable |
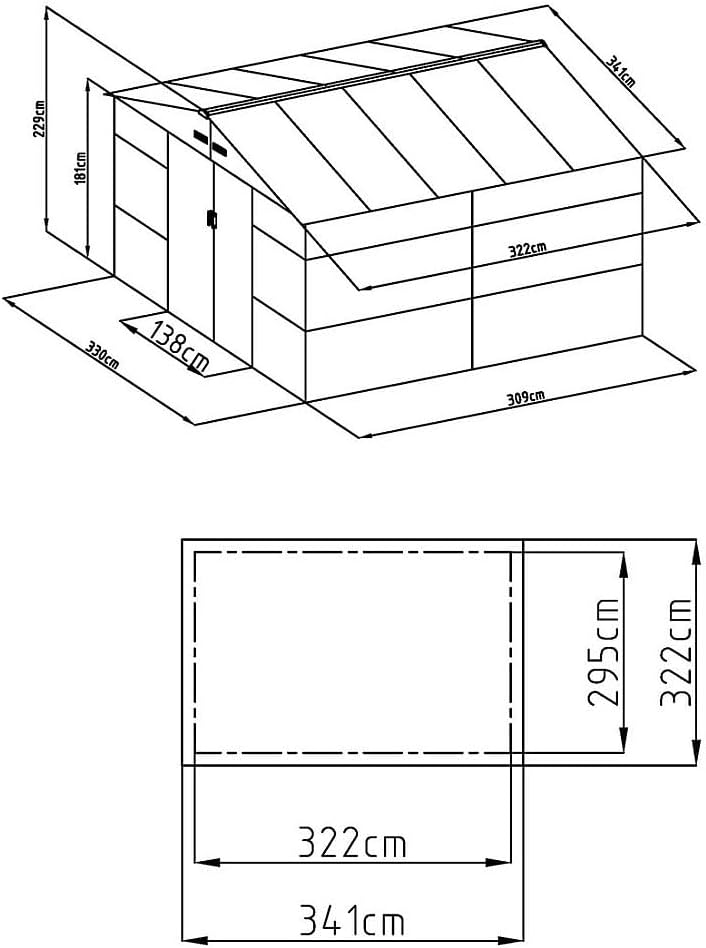
Figure 4.1: Dimensional diagram of the garden shed.
5. Configuración y montaje
Assembly of the EXPERTLAND ADELMO garden shed requires careful attention to detail. It is recommended that two or more people perform the assembly.
5.1 Preparación del sitio
- Choose a level and stable site for the shed. A concrete slab or a well-compacted gravel base is ideal.
- Asegúrese de que haya suficiente espacio libre alrededor del cobertizo para el montaje y el acceso futuro.
- Limpie el área de cualquier residuo, roca o vegetación.
5.2 Pasos de montaje (Directrices generales)
- Desembalaje e identificación de las piezas: Desembale con cuidado todos los componentes y verifíquelos con la lista de piezas proporcionada en la guía de montaje separada.
- Conjunto del marco base: Assemble the base frame on your prepared site, ensuring it is square and level.
- Instalación de paneles de pared: Attach the wall panels to the base frame, following the numerical or alphabetical order indicated in the assembly guide. Secure panels using the provided fasteners.
- Roof Frame and Panels: Construct the roof frame and then attach the roof panels. Ensure all roof sections overlap correctly for water resistance.
- Instalación de la puerta: Install the double sliding doors into their tracks. Adjust as necessary for smooth operation.
- Window and Ventilation: Install the PVC window and ensure ventilation grilles are clear.
- Anclaje: Securely anchor the shed to the ground using appropriate anchoring hardware (not always included, may need to be purchased separately based on foundation type).
Nota: Refer to the detailed graphical assembly instructions included with your product for specific step-by-step guidance and fastener details.
6. Instrucciones de funcionamiento
6.1 puertas corredizas
The shed features double sliding doors for easy access. To open, gently slide one or both doors along their tracks. To close, slide them back until they meet in the center. Ensure the doors are fully closed to protect contents from weather.

Figure 6.1: Double sliding doors in the open position.

Figure 6.2: Double sliding doors in the closed position.
6.2 Ventilación
The integrated ventilation grilles are designed to provide continuous airflow. Do not block these grilles, as proper ventilation helps prevent moisture buildup and maintains the condition of stored items.
7. Mantenimiento
El mantenimiento regular prolongará la vida útil de su cobertizo de jardín.
- Limpieza: Clean the shed exterior periodically with water and a mild detergent. Avoid abrasive cleaners or harsh chemicals that could damage the galvanized finish.
- Rieles de puerta: Keep the sliding door tracks clear of dirt, leaves, and debris to ensure smooth operation. Lubricate tracks with a silicone-based spray if movement becomes stiff.
- Sujetadores: Periodically check all screws and bolts for tightness, especially after strong winds. Tighten any loose fasteners.
- Rejillas de ventilación: Asegúrese de que las rejillas de ventilación permanezcan libres de obstrucciones para permitir un flujo de aire adecuado.
- Base: Inspect the shed's foundation and anchoring points annually to ensure stability.
8. Solución de problemas
Esta sección aborda problemas comunes que puede encontrar con su cobertizo de jardín.
| Problema | Posible causa | Solución |
|---|---|---|
| Las puertas se atascan o son difíciles de deslizar. | Escombros en las orugas, orugas dobladas, falta de lubricación. | Limpie bien las vías. Compruebe si hay secciones dobladas y, si es posible, enderécelas. Aplique lubricante de silicona a las vías. |
| Fuga de agua dentro del cobertizo. | Improperly sealed panels, damaged roof, unlevel foundation. | Inspect all panel seams and roof overlaps. Apply silicone sealant if necessary. Ensure the shed is on a level foundation. |
| El cobertizo se siente inestable o tambaleante. | Loose anchoring, unlevel ground, loose fasteners. | Verify all anchoring points are secure. Re-level the foundation if needed. Tighten all assembly fasteners. |
| Condensación dentro del cobertizo. | Blocked ventilation, high humidity. | Ensure ventilation grilles are clear. Consider adding a dehumidifier if humidity is consistently high. |
9. Garantía y soporte
For warranty information or technical support, please contact Vente-unique customer service. Details regarding specific warranty periods and conditions are typically provided with your purchase documentation.
Información del contacto: Refer to your purchase receipt or the Vente-unique webSitio para obtener los detalles de contacto de atención al cliente más actualizados.
Recursos en línea: Visita la tienda oficial Vente-unique website for additional product information, FAQs, and support resources: Tienda Vente-unique


