1. Introducción
Thank you for choosing the AQQA 1.5 Gallon Aquarium Kit. This manual provides essential information for the proper assembly, operation, and maintenance of your new aquarium. Please read all instructions carefully before use to ensure a safe and optimal environment for your aquatic life.

Image 1.1: The AQQA 1.5 Gallon Aquarium Kit, showcasing its compact design suitable for various settings.
2. Instrucciones de seguridad
- Desenchufe siempre todos los componentes eléctricos antes de realizar cualquier mantenimiento o limpieza.
- Ensure the aquarium is placed on a stable, level surface capable of supporting its full weight when filled with water and decorations.
- Do not operate the pump or light if the power cord is damaged.
- Keep electrical connections dry. Use a drip loop for all power cords to prevent water from traveling along the cord to the outlet.
- This product is made of glass and is fragile. Handle with care during assembly and cleaning.
- Sólo para uso en interiores.
3. Contenido del paquete
Verifique que todos los componentes estén presentes y sin daños antes de continuar con el ensamblaje:
- Glass Aquarium Tank
- Aquarium Lid with Integrated LED Light and Temperature Display
- 3-in-1 Filter Water Pump (includes water circulation, oxygenation, and filtration components)
- Filter Sponge/Cartridge
- Air Tube and T-Connector
- Ranin Pipe (Water Outlet Pipe)
- Fixing Buckle

Imagen 3.1: Másview of the AQQA 1.5 Gallon Aquarium Kit components, including the temperature LCD display, LED light, and 120GPH water pump.
4. Montaje y configuración
4.1 Filter Pump Assembly
The 3-in-1 filter pump is crucial for water circulation, oxygenation, and filtration. Follow these steps for assembly:
- Attach the water intake with foam to the bottom of the water pump.
- Connect the Ranin Pipe (water outlet pipe) to the pump's outlet.
- Attach the air tube to the T-connector, then connect the T-connector to the pump's air intake. Ensure the oxygen pipe is positioned above the water level for aeration.
- Secure the assembled pump unit inside the aquarium using the fixing buckle or suction cups provided.

Image 4.1: Visual guide for assembling the 3-in-1 filter pump, showing components like the Ranin Pipe, Fixing Buckle, Water Pump, Air Tube, T-Connector, and Water Intake with foam.

Imagen 4.2: Detallada view of the 3-in-1 filter pump, highlighting its functions for water circulation, oxygenation, and filtration.
4.2 Aquarium Placement and Filling
- Choose a location away from direct sunlight, heat sources, and drafts.
- Rinse the tank and any decorations thoroughly with clean water (do not use soap or detergents).
- Add substrate (gravel or sand) if desired, then place decorations.
- Carefully fill the tank with dechlorinated water, leaving a small gap from the top rim.
- Place the lid securely on the aquarium.
5. Operación
Sistema de filtro 5.1
Once the tank is filled and the pump is assembled, plug in the pump. The 120 GPH pump will begin circulating water, providing filtration and aeration. The filter sponge helps remove debris and odors, while beneficial bacteria colonize to maintain water quality.
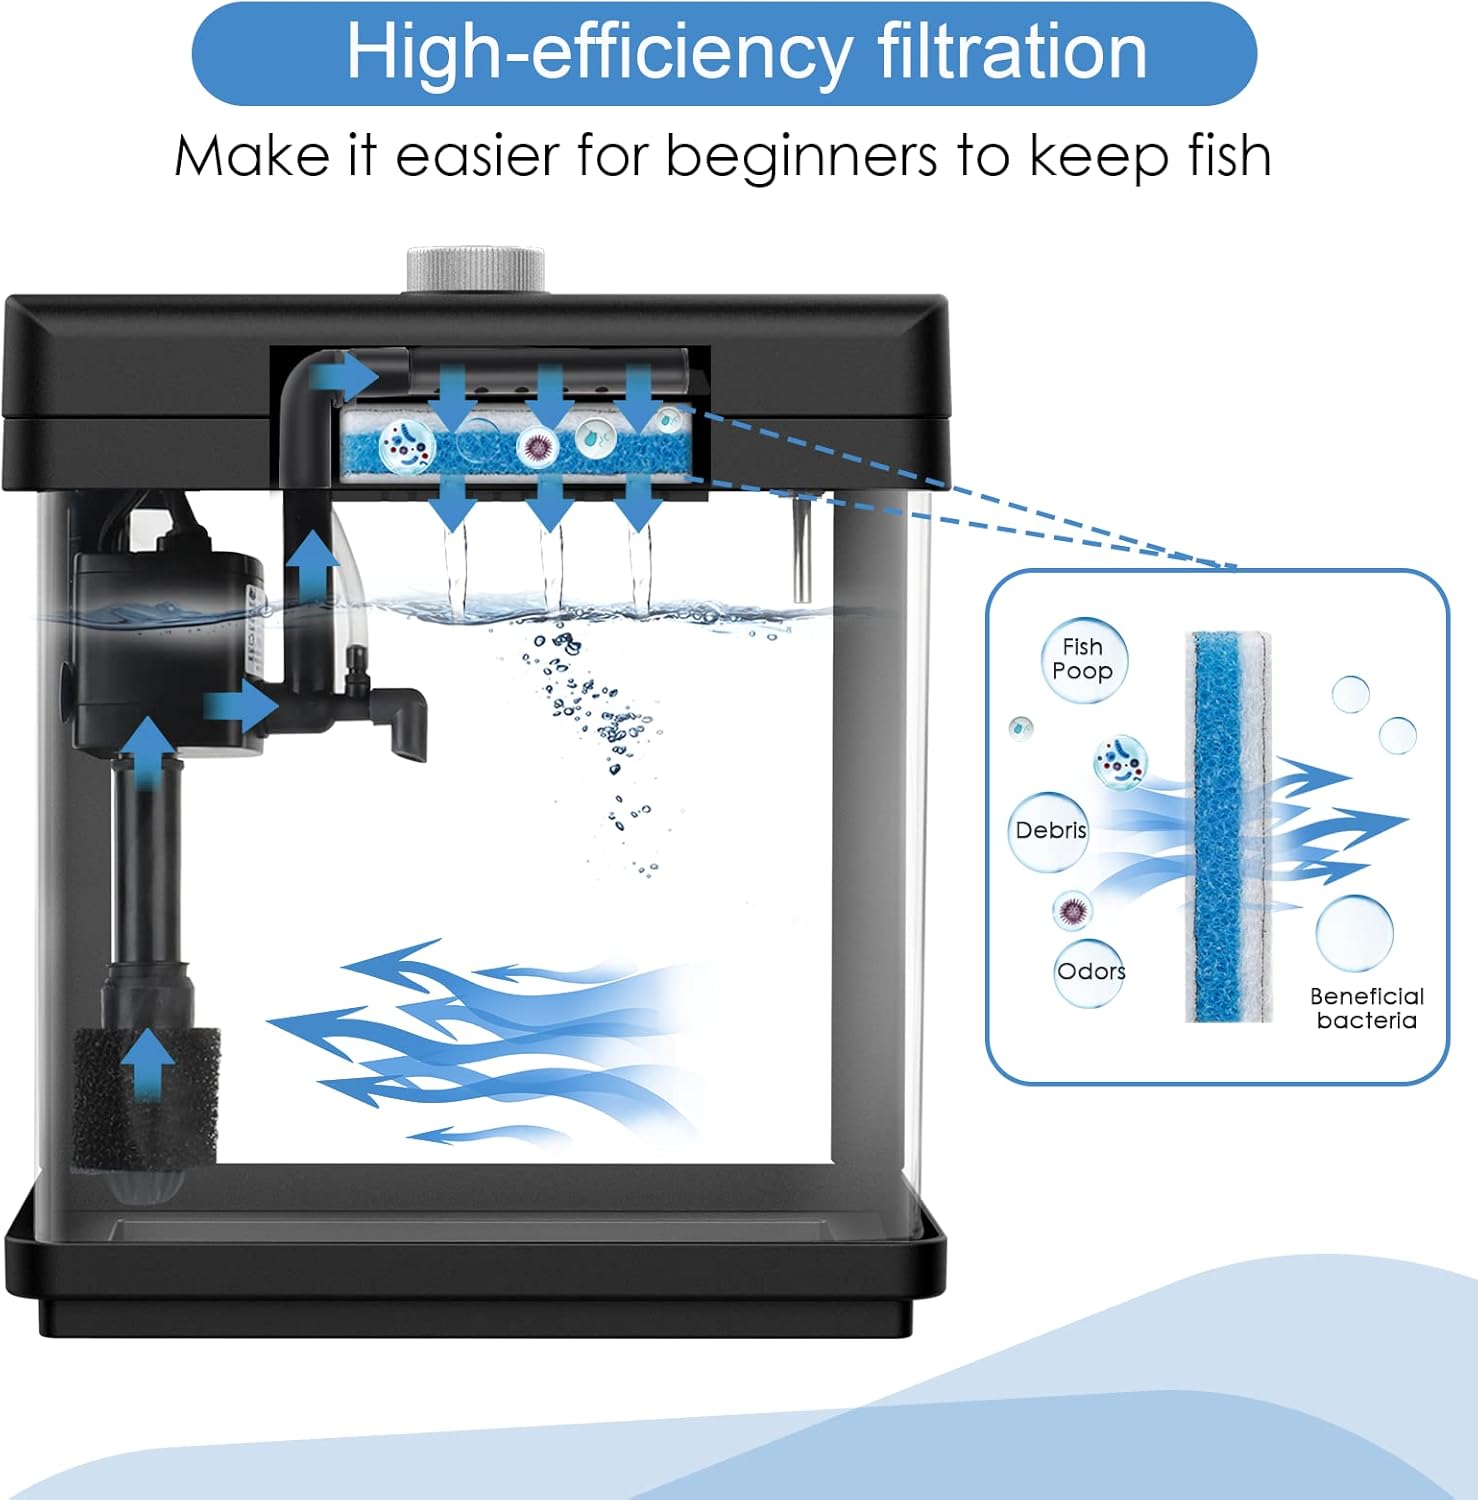
Image 5.1: Illustration of the high-efficiency filtration system, showing water flow and removal of fish waste, debris, and odors.
5.2 iluminación LED
The integrated LED light offers 8 adjustable colors and brightness control:
- Cambio de color: Press the button on the lid to cycle through the 8 available colors: White, Green, Red, Purple, Lake Green, Blue, Yellow, and a Multi-color cycle.
- Ajuste de brillo: Rotate the button on the lid to increase or decrease the light's brightness.

Image 5.2: The control knob for adjusting LED light brightness and cycling through 8 distinct colors.

Imagen 5.3: Examples of the 8 adjustable LED light colors: White, Green, Red, Purple, Turquoise, Blue, Yellow, and a 7-Color Looping mode.
5.3 Visualización de temperatura
The aquarium features a built-in digital temperature display on the lid, showing the water temperature in Celsius. This provides real-time monitoring of your aquarium's conditions.

Image 5.4: The integrated temperature LCD display on the aquarium lid, showing the water temperature in Celsius.
6. Mantenimiento
6.1 Limpieza de rutina
- Limpieza de vidrios: Use an aquarium-safe cleaner or magnetic algae scraper to clean the interior glass surfaces as needed.
- Cambios de agua: Perform regular partial water changes (e.g., 25% weekly) to maintain water quality. Always use dechlorinated water.
- Limpieza del sustrato: Use an aquarium gravel vacuum during water changes to remove debris from the substrate.
6.2 Reemplazo del cartucho de filtro
The filter cartridge should be replaced regularly (typically every 2-4 weeks, depending on bioload) to ensure effective filtration. Replacement cartridges can be found by searching for B094R5CV51.
- Desconecte la bomba de filtrado.
- Carefully remove the old filter cartridge from the filter housing.
- Insert a new filter cartridge into the housing.
- Reconnect the filter pump to power.
7. Solución de problemas
| Problema | Posible causa | Solución |
|---|---|---|
| La bomba de filtro no funciona | Apagado automáticotage, clogged impeller, pump failure | Check power connection. Unplug, clean impeller and housing, then re-plug. If still not working, pump may need replacement. |
| Water flow from filter is too strong | High pump output for small fish | Some users report strong flow for Betta fish. Consider adding a flow diffuser or adjusting the oxygen pipe to reduce direct current. |
| Aquarium is leaking | Seal failure, crack in glass | Immediately drain water to prevent damage. Inspect for cracks. For minor seal issues, aquarium-safe silicone sealant may be applied after thorough drying. If a crack is present, the tank should be replaced. |
| La luz LED no funciona | Power issue, light unit malfunction | Ensure the power cord is securely plugged in. Press and hold the control knob to turn the light on/off. If still unresponsive, contact customer support. |
| Temperature display inaccurate or blank | Sensor issue, display malfunction | Verify the temperature probe is fully submerged. If the issue persists, contact customer support. |
8. Especificaciones
| Característica | Detalle |
|---|---|
| Número de modelo | GUS-AQ120 |
| Volumen del tanque | 1.5 galones |
| Dimensiones del producto (L x An x Al) | 8.7" x 5.7" x 9.6" |
| Peso del artículo | 3.08 libras (1.4 kilogramos) |
| Material | Glass (tank), ABS Plastic (lid) |
| Tipo de filtro | Built-in 3-in-1 Filter Water Pump (120 GPH) |
| Iluminación | Adjustable 8-Color LED Light (White, Green, Red, Purple, Lake Green, Blue, Yellow, Multi-color cycle) |
| Características especiales | Digital Temperature LCD Display (Celsius), Adjustable Brightness |
| Usos específicos | Indoor Freshwater & Saltwater Aquarium |
9. Garantía y soporte
For warranty information or technical support, please refer to the product packaging or contact AQQA customer service directly through their official channels. Keep your purchase receipt as proof of purchase.


