1. Introducción
Thank you for choosing the Karaca BakeXL Bread Maker. This versatile appliance is designed to simplify your baking experience, allowing you to prepare fresh bread, knead dough, make jam, and even yogurt with ease. Your bread maker also comes with a booklet containing 45 different recipes to get you started. Please read this manual thoroughly before first use to ensure safe operation and optimal performance. Keep this manual for future reference.
2. Instrucciones de seguridad importantes
- Asegúrese siempre de que el aparato esté desenchufado antes de limpiarlo o cuando no esté en uso.
- No sumerja el aparato, el cable o el enchufe en agua ni en ningún otro líquido.
- Mantenga las manos y los utensilios alejados de las piezas móviles durante el funcionamiento para evitar lesiones.
- Do not touch hot surfaces. Use oven mitts when removing the bread pan or handling hot bread.
- Este aparato es solo para uso doméstico. No lo utilice al aire libre.
- Asegúrese de que el aparato esté colocado sobre una superficie estable y resistente al calor, lejos de materiales inflamables.
- Es necesaria una estrecha supervisión cuando cualquier aparato sea utilizado por niños o cerca de ellos.
- No opere ningún aparato con un cable o enchufe dañado, o después de que el aparato funcione mal o haya sufrido algún daño de cualquier tipo.
- No utilice accesorios no recomendados por el fabricante, ya que esto puede causar lesiones.
3. Producto terminadoview
Familiarize yourself with the components of your Karaca BakeXL Bread Maker:

Figura 3.1: Exterior view of the Karaca BakeXL Bread Maker. This image shows the sleek black and silver design of the appliance from an angled perspective, highlighting its compact form.

Figura 3.2: Bread Maker with lid open. This view reveals the interior cavity where the bread pan is placed, along with the heating element and the mechanism for the kneading paddles.

Figura 3.3: Bread Maker with the bread pan removed. This image displays the main unit alongside the removable bread pan, illustrating how it detaches for easy cleaning and ingredient loading.
Funciones del panel de control:

Figura 3.4: Close-up of the control panel. This image provides a clear view of the digital display and various buttons for program selection, loaf size, crust color, and start/stop functions.
- MENÚ: Selects the desired program (e.g., Basic Bread, Whole Wheat, Jam, Yogurt).
- TAMAÑO DEL PAN: Adjusts the loaf weight (e.g., 1000g, 1250g, 1500g).
- COLOR: Sets the crust darkness (Light, Medium, Dark).
- DELAY TIMER (+/-): Sets a delayed start time for baking.
- INICIO / PARO: Inicia o cancela el programa seleccionado.
4. Configuración y primer uso
- Unpack the bread maker and all accessories. Remove any packaging materials.
- Limpie el exterior del aparato con un paño húmedo.amp paño.
- Wash the bread pan and kneading paddles with warm, soapy water. Rinse thoroughly and dry completely.
- Insert the kneading paddles onto the shafts at the bottom of the bread pan.
- Place the bread pan into the baking chamber, ensuring it clicks securely into place.
- Position the bread maker on a stable, flat, and heat-resistant surface, ensuring adequate ventilation around the unit.
- For the first use, it is recommended to run the "Bake" program (usually program 12 or similar) for 10 minutes without ingredients to burn off any manufacturing residues. Allow the unit to cool completely afterward.
5. Instrucciones de funcionamiento
General Baking Steps:
- Ensure the kneading paddles are correctly installed in the bread pan.
- Add liquid ingredients first, followed by dry ingredients. Make sure yeast is added last and does not come into direct contact with liquid or salt. Refer to your recipe booklet for precise ingredient order.
- Coloque el molde para pan en la panificadora y cierre la tapa.
- Conecte el aparato. Se mostrará el programa predeterminado.
- Presione el MENÚ Botón para seleccionar el programa deseado.
- Presione el TAMAÑO DEL PAN button to select the desired loaf weight (e.g., 1000g, 1250g, 1500g).
- Presione el COLOR button to select your preferred crust darkness (Light, Medium, Dark).
- If desired, use the TEMPORIZADOR DE RETARDO buttons to set a delayed start.
- Presione el INICIAR/DETENER button to begin the program. The machine will beep, and the timer will start counting down.
- Once the program is complete, the machine will beep multiple times. Unplug the appliance.
- Using oven mitts, carefully remove the bread pan by twisting and lifting it out.
- Invert the pan onto a wire rack to release the bread. If the kneading paddles remain in the bread, remove them carefully with a non-metallic utensil.
- Deje que el pan se enfríe sobre una rejilla durante al menos 20 a 30 minutos antes de cortarlo.

Figura 5.1: A user selecting settings on the control panel. This image shows a hand pressing one of the control buttons, demonstrating the interactive nature of the bread maker's interface.
Notas específicas del programa:
- Bread Programs (Basic, French, Whole Wheat, Sweet, Rapid): These programs handle the entire process from kneading to baking. Follow the recipe booklet for specific ingredient ratios.
- Dough Program: This program kneads and allows the dough to rise, but does not bake it. Ideal for pizza dough, rolls, or pastries that will be baked in a conventional oven.
- Jam Program: Use this program for making homemade jams. Ensure fruits are chopped and sugar is added according to a suitable recipe.
- Yogurt Program: This program maintains a consistent temperature for fermenting yogurt. Follow specific yogurt recipes for best results.
6. Mantenimiento y limpieza
Regular cleaning ensures the longevity and hygiene of your bread maker.
- Siempre desenchufe el aparato y deje que se enfríe completamente antes de limpiarlo.
- Molde para pan y paletas para amasar: Remove the bread pan and paddles. Wash them with warm, soapy water using a soft sponge. Do not use abrasive cleaners or metal scouring pads, as this can damage the non-stick coating. Rinse and dry thoroughly.
- Exterior: Limpie el exterior de la panificadora con un paño suave y seco.amp paño. No utilice productos químicos agresivos ni limpiadores abrasivos.
- Tapa: La tapa se puede limpiar con un paño.amp cloth. Ensure no water enters the ventilation slots.
- Cámara de cocción: Utilice un paño suave y seco.amp Paño para limpiar el interior de la cámara de cocción. Retire cualquier miga o residuo.
- Nunca sumerja la unidad principal en agua ni en ningún otro líquido.
7. Solución de problemas
| Problema | Posible causa | Solución |
|---|---|---|
| El pan no sube. | Expired yeast, incorrect water temperature, too much salt/sugar, yeast in direct contact with liquid/salt. | Check yeast expiry. Use lukewarm water (38-43°C). Ensure ingredients are added in the correct order as per recipe. |
| El pan es demasiado denso. | Demasiada harina, muy poco líquido, amasado insuficiente. | Measure ingredients precisely. Ensure correct program is selected. |
| El pan se derrumba por la mitad. | Demasiado líquido, demasiada levadura, alta humedad. | Reduce liquid slightly. Ensure correct yeast amount. |
| Paletas de amasar atrapadas en el pan. | Ocurrencia común. | Remove carefully with a non-metallic utensil after bread has cooled. |
| La máquina no arranca. | No enchufado, tapa no cerrada correctamente, programa no seleccionado. | Check power connection. Ensure lid is fully closed. Select a program and press START/STOP. |
8. Especificaciones
- Marca: HUEVA
- Número de modelo: 000001000018219001
- Color: Negro
- Dimensiones del producto: 30 cm (Profundidad) x 36 cm (Ancho) x 46 cm (Alto)
- Peso: 7.22 kilogramos
- Capacidad: 1500 gramos
- potencia/vatiotage: 850 vatios
- Material: Plástico
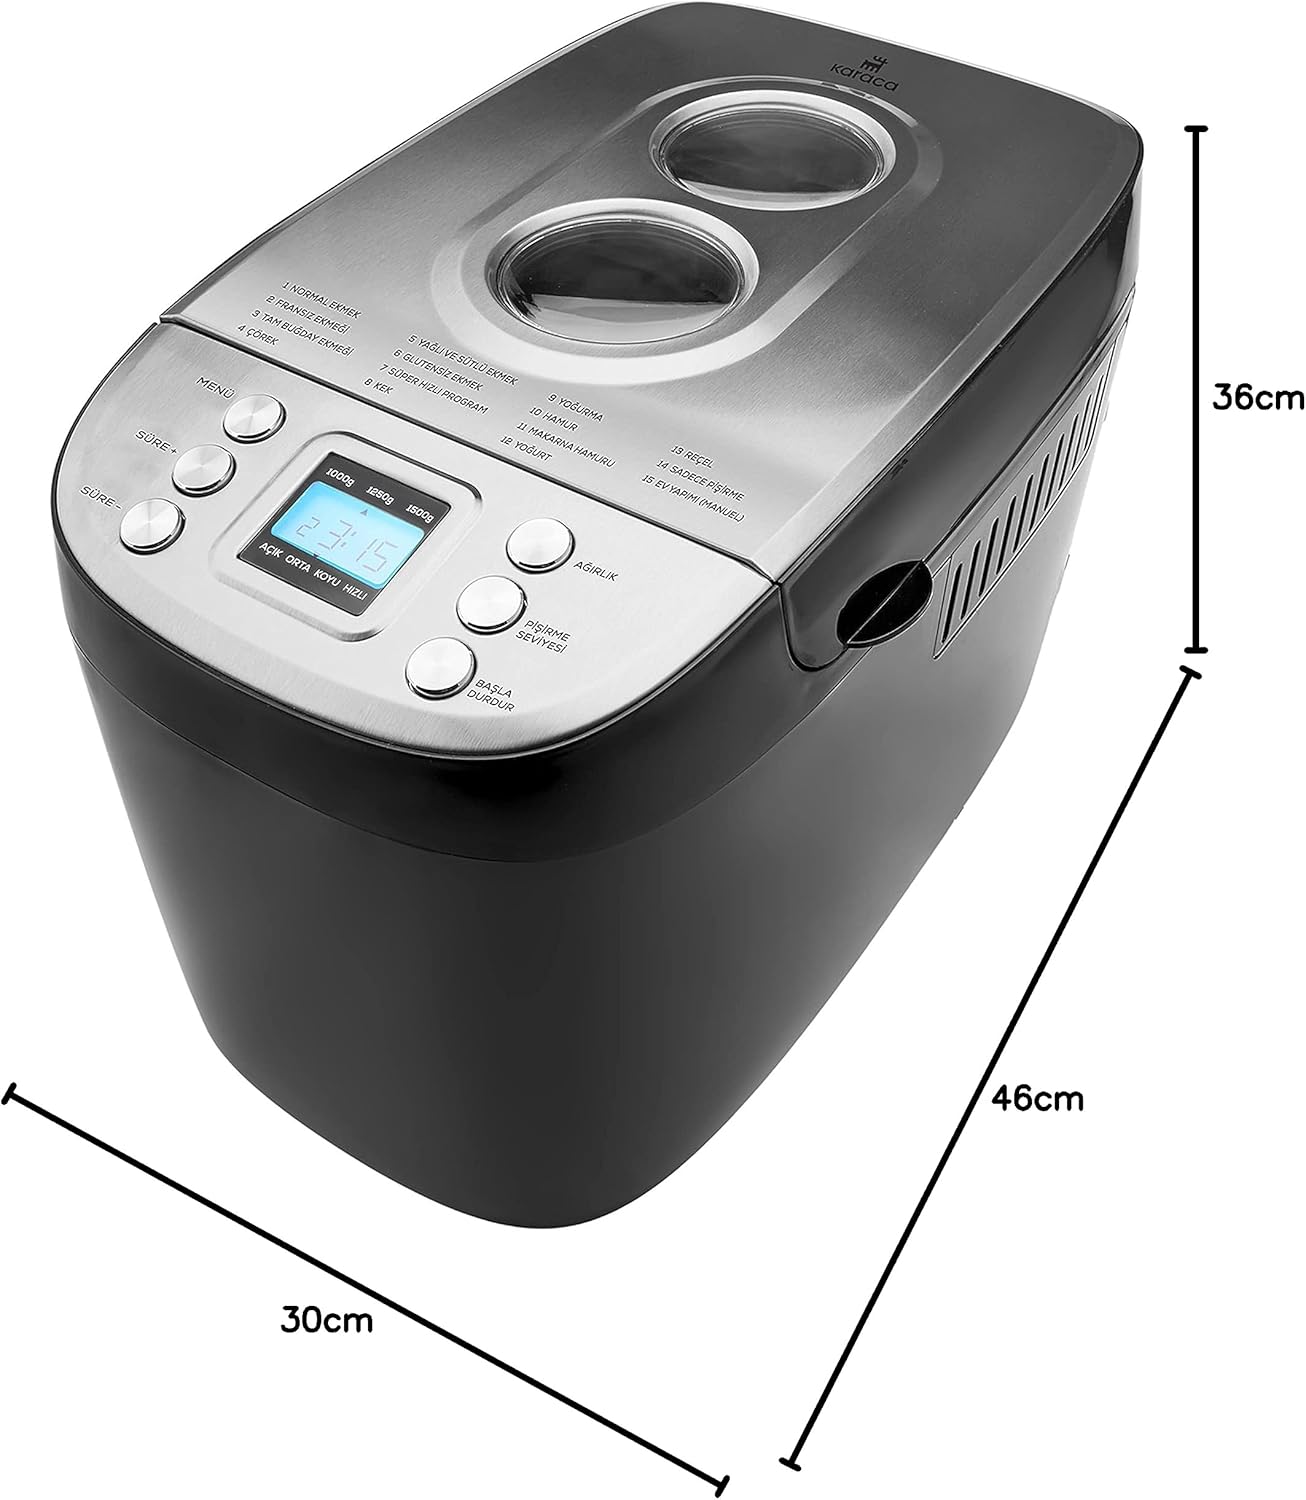
Figura 8.1: Dimensions of the Karaca BakeXL Bread Maker. This image visually represents the depth (30cm), width (36cm), and height (46cm) of the appliance.
9. Garantía y soporte
For warranty information, technical support, or service inquiries, please refer to the warranty card included with your product or visit the official KARACA website. Do not attempt to repair the appliance yourself, as this will void the warranty and may pose safety risks.
Puede encontrar más información y datos de contacto en el KARACA Store on Amazon.


