1. Introducción
This manual provides detailed instructions for the installation, operation, and maintenance of your Thinkbee Wireless Light Switch Kit. Please read this manual thoroughly before installation and use to ensure proper function and safety.
2. Información y advertencias de seguridad
- ADVERTENCIA: Always turn off power at the circuit breaker before installing or servicing the receiver. Failure to do so may result in serious injury or death.
- The receiver requires both live and neutral wires for power. Do not install in a single-pole switch box that lacks a neutral wire.
- It is not recommended to install the switch on a metal surface or the receiver in a metal cover. Metal can block the wireless signal and reduce the remote control distance.
- Ensure all wiring connections are secure and comply with local electrical codes. If you are unsure about wiring, consult a qualified electrician.
- Do not exceed the maximum load capacity of 1000W or 10A for the receiver.
- This product is IP66 waterproof, suitable for damp locations, but avoid submerging it in water.
3. Contenido del paquete
Verifique que todos los artículos estén presentes en su paquete:
- 1x Wireless Switch (Transmitter)
- 1x Mini Receiver
- 2x pegatinas
- 2x Wiring Connectors
- 1x Manual de usuario (este documento)

Image 3.1: Components of the Thinkbee Wireless Light Switch Kit, including the switch and receiver.
4. Especificaciones del producto
| Componente | Especificación |
|---|---|
| Transmitter (Wireless Switch) | |
| Clasificación de impermeabilidad | IP66 |
| Dimensiones | 8.6 x 8.6 x 1.1 cm |
| Temperatura de trabajo | -30 °C ~ +75 °C |
| Modelo de batería | 3V CR2032 (incluido) |
| Receptor | |
| Volumentage | CA 80-275 V |
| Composite Load | 1000 W |
| Carga máxima | 10A |
| Dimensiones | 3.9 x 2.3 x 2.2 cm |
| Modo de control remoto | Radio Frequency |
| Common Attributes | |
| Sensibilidad | -116 dB |
| Radio Frequency | 433.932 MHz |
| Material | Fire protection ABS (refractory PC Chimei) |
| Distancia del control remoto | Outdoor 600M (1969ft), Indoor 40M (130ft) (through-wall) |
| Certificaciones | CE, FCC, RoHS |

Image 4.1: Detailed dimensions and specifications for the wireless switch and receiver.
5. Instrucciones de instalación
5.1. Cableado del receptor
- Apague la energía: Antes de comenzar cualquier trabajo eléctrico, asegúrese de que el suministro de energía al circuito esté cortado en el disyuntor principal.
- Identificar cables: The receiver has input and output wires.
- Input Live Line (Red)
- Input Neutral Line (Blue)
- Output Live Line (Brown)
- Output Neutral Line (Blue)
- Conectar entrada: Connect the Input Live Line (Red) and Input Neutral Line (Blue) of the receiver to the corresponding live and neutral wires from your power source.
- Conectar salida: Connect the Output Live Line (Brown) and Output Neutral Line (Blue) of the receiver to the corresponding live and neutral wires of the light fixture or appliance you wish to control.
- Conexiones seguras: Use the provided wiring connectors or appropriate wire nuts to ensure all connections are secure and insulated.
- Receptor de montaje: The mini receiver is designed to fit into control boxes such as canopy, distribution box, or electrical box. Ensure it is placed in a location where the signal will not be obstructed by metal.
- Restaurar energía: Una vez que todas las conexiones estén seguras y el receptor esté alojado de manera segura, restablezca la energía en el disyuntor.
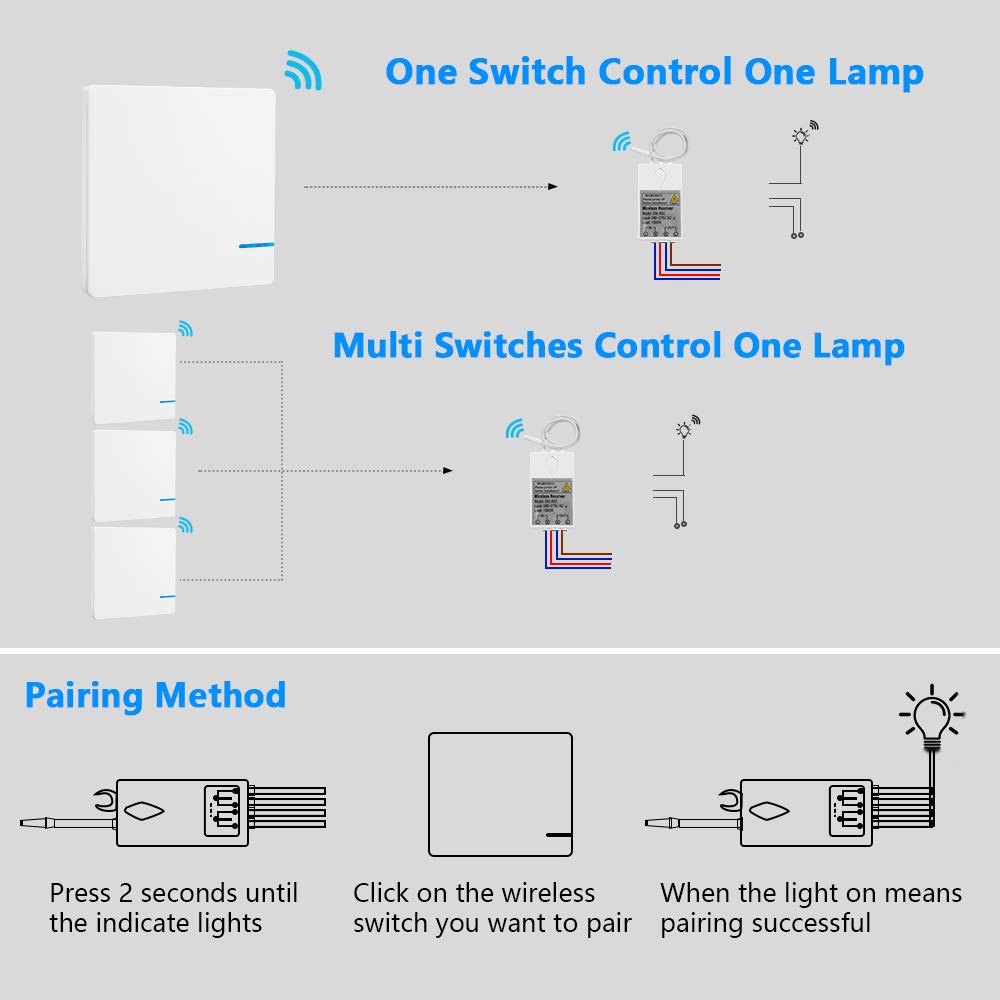
Image 5.1: Wiring diagram for connecting the receiver to a power source and a light.

Image 5.2: Visual comparison of traditional wired switch setup versus the simplified wireless switch installation.
5.2. Wireless Switch Mounting
The wireless switch does not require wiring and can be mounted in various locations:
- Montaje adhesivo: Use the provided self-adhesive stickers to attach the switch to any flat, clean surface. Ensure the surface is dry and free of dust or grease for optimal adhesion.
- Tornillo de montaje: The switch can also be mounted using screws (not included) through designated holes if a more permanent fixture is desired.

Imagen 5.3: Example of the wireless switch mounted on a wall.
6. Instrucciones de funcionamiento
6.1. Emparejamiento del conmutador inalámbrico con el receptor
Follow these steps to pair your wireless switch with the receiver:
- Activate Pairing Mode on Receiver: Press and hold the pairing key on the receiver for approximately 2 seconds until the indicator light on the receiver begins to flash. This indicates the receiver is in pairing mode.
- Activar interruptor: Within 10 seconds of the receiver entering pairing mode, click the wireless switch you wish to pair.
- Confirmación: The light connected to the receiver will turn on, indicating successful pairing.
- Multiple Switches: One receiver can be paired with up to 8 wireless switches. Repeat the pairing process for each additional switch.

Image 6.1: Step-by-step guide for pairing the wireless switch with the receiver.
6.2. Funcionamiento básico
Once paired, simply press the wireless switch to toggle the connected light or appliance ON/OFF.

Image 6.2: Demonstrating the simple operation of the wireless switch.
7. Mantenimiento
7.1. Limpieza
Wipe the surfaces of the wireless switch and receiver with a soft, dry cloth. Do not use abrasive cleaners or solvents.
7.2. Battery Replacement (Wireless Switch)
The wireless switch is powered by a 3V CR2032 lithium battery. The battery has a lifespan of approximately 10 years. When replacement is needed:
- Abra con cuidado el interruptor casing para acceder al compartimento de la batería.
- Retire la batería CR2032 vieja.
- Insert a new 3V CR2032 battery, ensuring correct polarity.
- Snap the switch casinVuelva a colocarlos de forma segura.
8. Solución de problemas
| Problema | Posible causa | Solución |
|---|---|---|
| La luz no se enciende ni se apaga. | No llega energía al receptor. Receiver not paired with switch. Interferencia de señal inalámbrica. Cableado defectuoso. | Check circuit breaker and receiver power connections. Re-pair the switch and receiver (refer to Section 6.1). Ensure receiver is not in a metal enclosure; move switch closer to receiver. Verifique que todas las conexiones del cableado sean correctas y seguras. |
| Reduced remote control distance. | Obstruction by metal surfaces. Distancia excesiva. | Relocate the receiver or switch away from metal. Ensure the distance is within the specified indoor (40m) or outdoor (600m) range. |
| Switch indicator light does not illuminate when pressed. | Low or dead battery in wireless switch. | Reemplace la batería CR2032 (consulte la Sección 7.2). |
9. Garantía y soporte
Thinkbee provides a no-hassle 36-month warranty for this product. For technical support, troubleshooting assistance, or warranty claims, please contact Thinkbee customer service. You can typically find contact information on the product packaging or the official Thinkbee websitio.
Servicio al cliente: Disponible las 24 horas.


