1. Introducción
The HTHOOOOOME 18 Inch Heavy-Duty Cane Bolt Gate Drop Rod is designed to provide secure latching and stability for various gate types. Constructed from heavy-duty solid steel with a black anti-rust coating, this cane bolt offers excellent corrosion resistance and durability for outdoor use. It effectively prevents gates from moving due to wind and can hold them securely in either an open or closed position.

Image 1: HTHOOOOOME 18 Inch Heavy-Duty Cane Bolt Gate Drop Rod installed on a wooden gate.
2. Contenido del paquete
Verifique que todos los componentes estén presentes en el paquete antes de comenzar la instalación:
- 1 x Drop Rod (18 inches)
- 1 x Bolt Retainer
- 2 x Rod Brackets
- 6 x Mounting Screws (7/8 inch length)
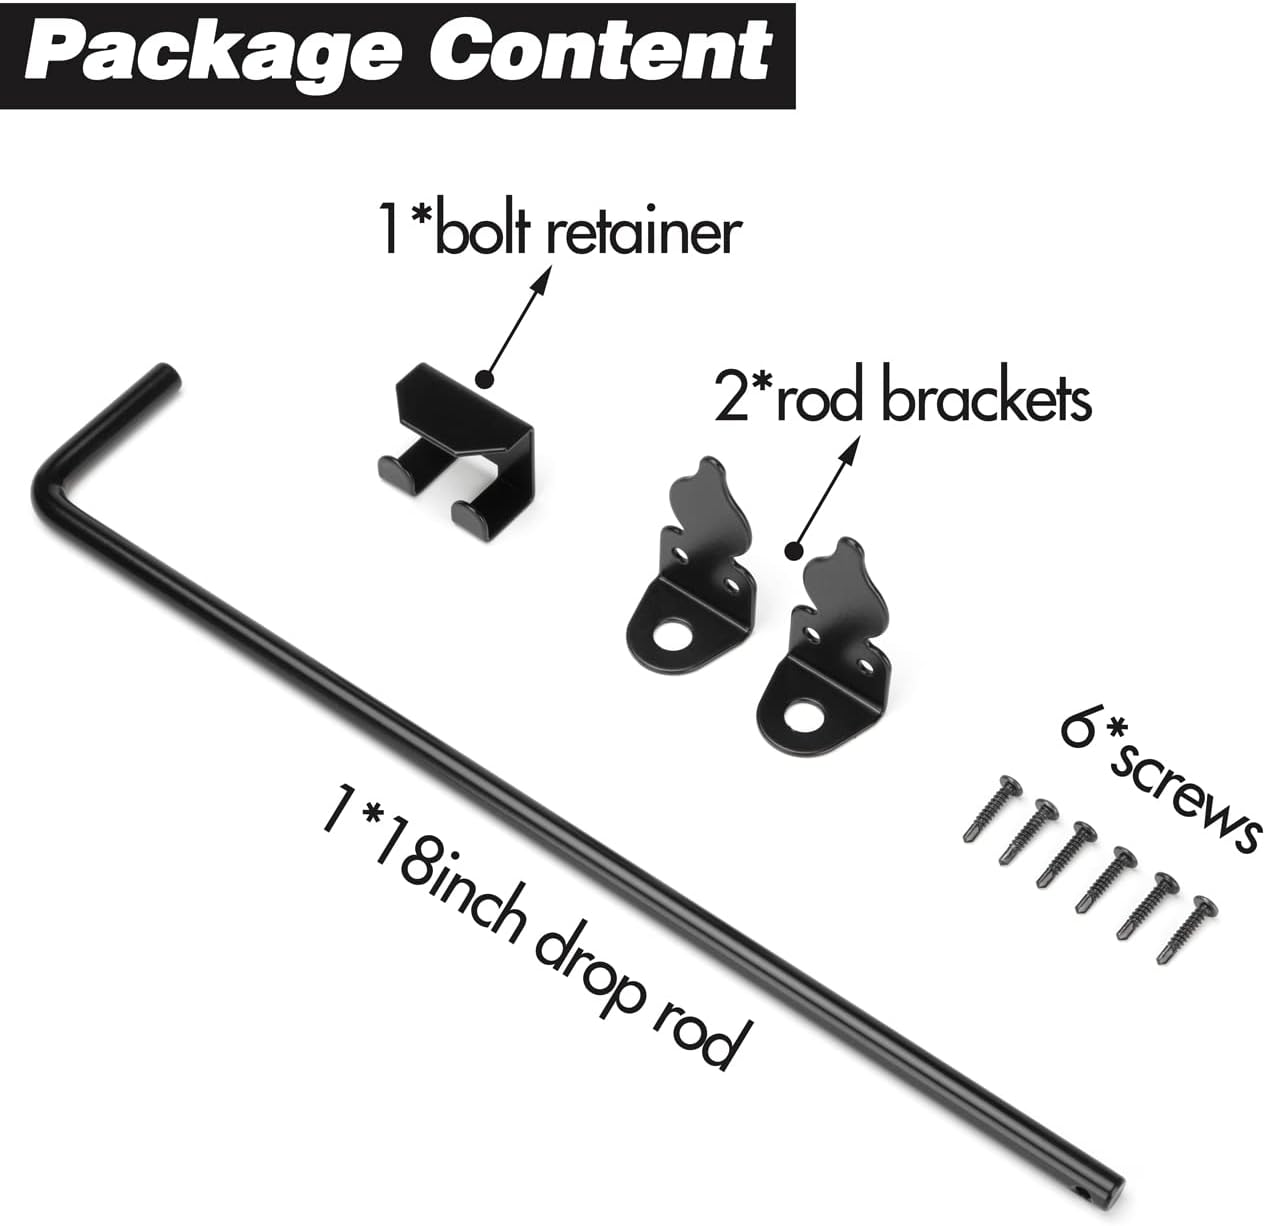
Image 2: Package contents of the cane bolt kit.
3. Especificaciones
| Componente | Dimension / Detail |
| Longitud de la varilla | 18 pulgadas |
| Diámetro de la varilla | 0.5 pulgadas |
| Bolt Retainer (Width x Height) | 2 pulgadas x 1.5 pulgadas |
| Rod Bracket (Width x Height) | 1.38 pulgadas x 3 pulgadas |
| Longitud del tornillo | 7/8 pulgadas |
| Grosor de puerta adecuado | 1-1/2 inches or more |
| Peso del artículo | 1.39 libras |
| Material | Heavy-duty Solid Steel |
| Finalizar | Black Anti-Rust Coating |

Image 3: Product dimensions and specifications.
4. Instrucciones de instalación
Follow these steps for proper installation of the cane bolt gate drop rod:
- Install the Bolt Retainer: Position the bolt retainer at the desired height on the gate frame or post where the cane bolt will be secured when in the open position. Use screws to fix it firmly.
- Install the Upper Rod Bracket: Mount one of the rod brackets directly below the bolt retainer, ensuring it is aligned to allow the drop rod to slide smoothly through it. Secure with screws.
- Determine Lower Rod Bracket Position: Insert the drop rod through the upper rod bracket. Allow the rod to rest on the ground. Mark the position for the lower rod bracket, ensuring the rod can freely move up and down and fully engage with the ground.
- Install the Lower Rod Bracket: Secure the second rod bracket at the marked position using the remaining screws. Ensure both brackets are vertically aligned.
Guía de vídeo de instalación:
Video 1: Step-by-step installation process for the heavy-duty cane bolt on a wooden gate.

Image 4: Cane bolt installed on a wooden fence.
5. Instrucciones de funcionamiento
The cane bolt is designed for convenient operation to secure your gate.
- To Close/Secure the Gate: Turn the bolt handle to release the rod. Slide the drop rod downwards through the rod brackets until its end inserts into the ground. This action locks the gate in place.
- To Open/Hold the Gate: Lift the drop rod upwards, pulling it out of the ground. Turn the bolt handle to engage the rod with the bolt retainer, holding the rod in the raised position. This allows the gate to swing freely.

Image 5: Demonstrating the open and close positions of the cane bolt.

Imagen 6: Detallada view of the cane bolt's open and close mechanism.
6. Mantenimiento
To ensure the longevity and smooth operation of your HTHOOOOOME Cane Bolt Gate Drop Rod, consider the following maintenance tips:
- Limpieza regular: Periodically wipe down the cane bolt and brackets with a damp paño para eliminar la suciedad, el polvo y los residuos.
- Lubricación: Apply a small amount of silicone-based lubricant to the sliding rod and pivot points of the handle annually, or as needed, to maintain smooth operation.
- Inspeccionar por desgaste: Regularly check for any signs of wear, rust, or damage to the rod, brackets, or screws. Address any issues promptly to prevent further deterioration.
- Ground Hole Clearance: Ensure the ground hole where the rod inserts remains clear of obstructions (e.g., dirt, leaves) to allow for full engagement of the bolt.
7. Solución de problemas
If you encounter issues with your cane bolt, consider these common troubleshooting steps:
- Rod is Sticking: If the rod is difficult to slide, check for debris in the rod brackets or the ground hole. Clean thoroughly and apply lubricant if necessary. Ensure the brackets are not bent or misaligned.
- Gate Not Securing: Verify that the rod fully extends into the ground. If the ground hole is too shallow or filled with debris, clear it. Ensure the brackets are securely mounted and not loose.
- Componentes sueltos: Periodically check all mounting screws for tightness. Tighten any loose screws to ensure the cane bolt remains securely attached to the gate.
- Óxido o corrosión: While the product has an anti-rust coating, prolonged exposure to harsh conditions can lead to surface rust. Clean affected areas with a wire brush and apply a rust-inhibiting paint or coating.
8. Escenarios de uso
The HTHOOOOOME 18 Inch Heavy-Duty Cane Bolt is versatile and suitable for a variety of gate applications, including:
- Wooden Fence Gates
- Metal Gates
- Vinyl Gates
- Puertas de hierro
- puertas dobles

Image 7: Cane bolt applied to various gate materials.
9. Calidad del material
This cane bolt is manufactured using high-quality materials and coatings to ensure durability and performance:
- Heavy-Duty Solid Steel: Provides structural integrity and strength.
- Recubrimientos Decorativos: Enhance appearance and provide additional protection.
- Rust and Corrosion Prevention Coatings: Protect metal from oxidation and corrosion, extending service life.
- Wear-Resistant Coatings: Improve surface durability and reduce friction.
- High-Temperature Resistant Coatings: Maintain performance in varying temperature environments.

Image 8: High-quality materials and coatings.
10. Garantía y soporte
For warranty information or technical support, please refer to the product packaging or contact HTHOOOOOME customer service directly. Keep your purchase receipt for any warranty claims.


