Introducción
This instruction manual provides essential information for the safe and effective use of your BTF-LIGHTING 3-Pin 10mm SMD LED Strip Connector Kit. This kit is designed to facilitate solderless connections for 10mm wide, 3-pin LED strips such as WS2812B, WS2811, SK6812, and RGBIC types. Please read this manual thoroughly before installation and retain it for future reference.
Instrucciones de instalación
Follow these steps to correctly install and connect your LED strips using the BTF-LIGHTING connectors.
1. Comprobación de compatibilidad
Ensure your LED strips are 10 mm de ancho y tener 3 pines. These connectors are not compatible with 12mm wide LED strips.

This image illustrates that the connectors are designed for 10mm wide LED strips (top three examples) and are not suitable for 12mm wide LED strips (bottom example).
2. Prepare LED Strip Ends
Carefully cut your LED strip at the designated cut marks. Ensure the copper pads are clean and free from any adhesive or debris. For strips with a waterproof coating, gently peel back a small section of the coating to expose the copper pads.
3. Connectors Overview
The kit includes various connector types for different applications:
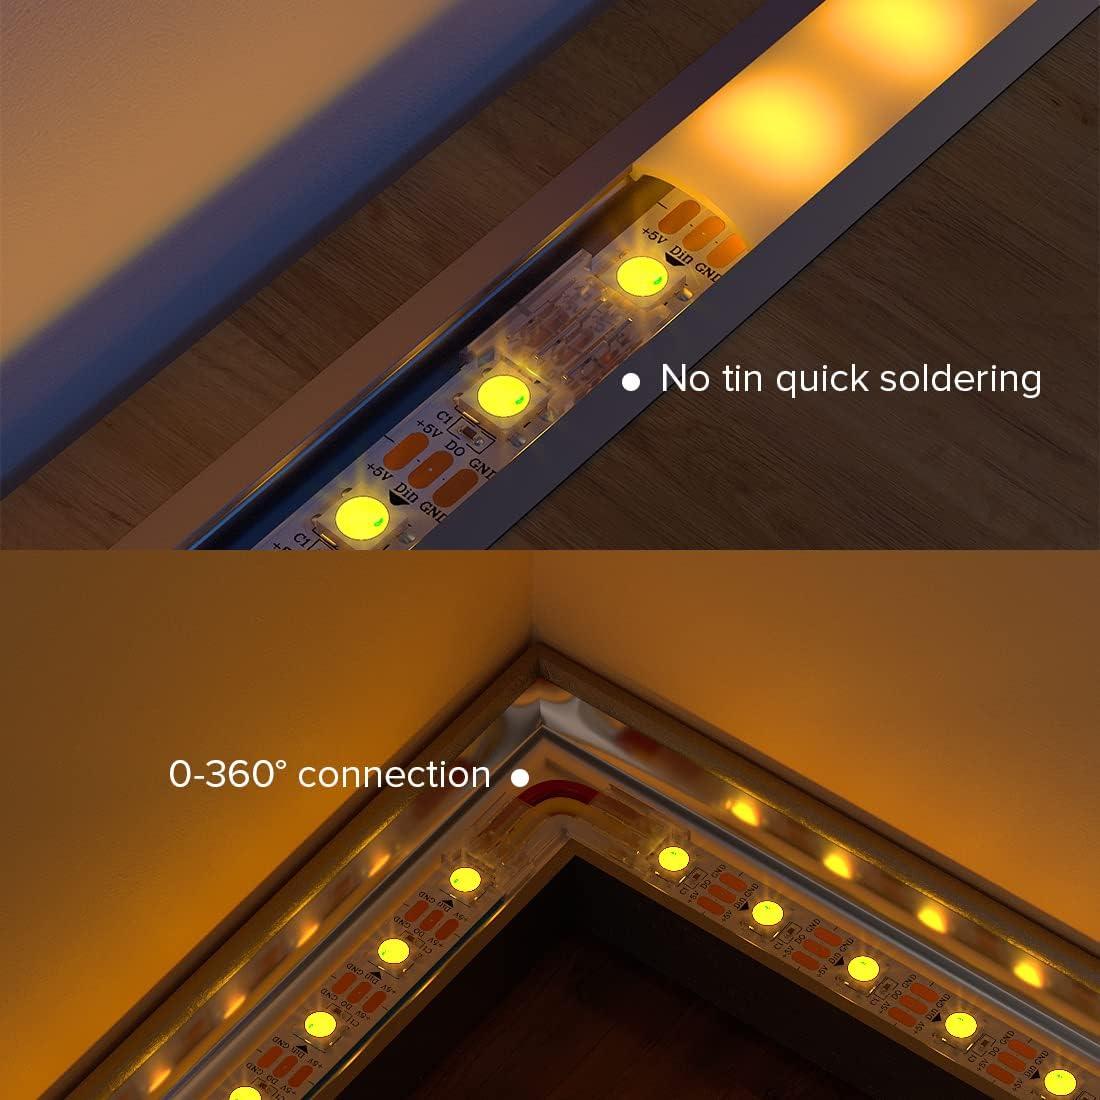
- Angular Connectors: For making 0-360° turns without soldering.
- Gapless Connectors: For direct, straight connections between two LED strip segments.
- Extension Cables (22AWG 15cm): For connecting LED strips to a controller or bridging gaps.

This image demonstrates different connection methods: angular connection for corners, dual-end connection for extending strips, and single-end connection to a controller. It also highlights the importance of fully clamping the patch.
4. Polarity and Pin Alignment
It is critical to align the positive (+5V), data (DIN/DO), and ground (GND) pins correctly. Incorrect polarity will result in a short circuit or non-functional LED strip.

This diagram shows the correct method for connecting LED strips, ensuring positive and ground connections are aligned to prevent short circuits. An incorrect connection example is also provided for comparison.
5. Making a Connection
- Open the connector clip.
- Insert the prepared end of the LED strip into the connector, ensuring the copper pads align with the connector's pins. Pay close attention to the +5V, DIN/DO, and GND markings.
- For cable connections, insert the stripped ends of the 22AWG extension cable into the corresponding terminals.
- Firmly close the connector clip. You may need to use pliers to ensure the metal contacts fully clamp onto the LED strip pads or cable wires for a secure electrical connection.
This image provides detailed dimensions of the connector and illustrates how to properly insert both the LED light strip and the connecting wires into the connector for a secure fit.
Instrucciones de funcionamiento
Once all connections are securely made and verified for correct polarity, connect your LED strip system to a compatible power supply and controller. The connectors themselves do not require specific operation; their function is to provide a stable electrical connection. Ensure the power supply voltage matches the requirements of your LED strip (typically 5V for 3-pin addressable strips).
Mantenimiento
These connectors are designed for durability and require minimal maintenance. To ensure longevity and reliable performance:
- Keep connectors dry and away from moisture.
- Periodically inspect connections for any signs of loosening or corrosion.
- Avoid excessive bending or stress on the connected points, especially with angular connectors.
- Do not attempt to open or modify the connectors once they are clamped, as this may damage the internal contacts.
Solución de problemas
If your LED strip is not functioning correctly after installation, consider the following:
- Sin energía/luces:
- Check all power connections from the supply to the controller and to the LED strip.
- Verify that the power supply is active and providing the correct voltage.
- Ensure all connector clips are fully closed and securely clamped onto the LED strip pads or wires. A loose connection is a common cause of failure.
- Re-check polarity (+5V, DIN/DO, GND) at every connection point. Incorrect polarity can prevent the strip from lighting up or cause damage.
- Flickering Lights or Incorrect Colors:
- This often indicates a poor data signal or insufficient power. Inspect the data (DIN/DO) connections for secure contact.
- Ensure the power supply is adequate for the length and density of your LED strip. Voltage drop can occur over long runs.
- Check for any bent or damaged metal pins within the connectors.
- Sólo se ilumina una parte de la tira:
- Examine the connection point immediately preceding the non-functional section. The issue likely lies with that specific connector or the strip segment itself.
If issues persist, carefully disconnect power and re-examine each connection point, ensuring proper alignment and secure clampEn.
Presupuesto
- Marca: BTF-ILUMINACIÓN
- Número de modelo: 3PIN-10MM-SMD-BB-BX-XC
- Tipo de conector: De hombre a mujer
- Compatibilidad de tiras LED: 10mm wide, 3-pin SMD LED strips (e.g., WS2812B, WS2811, SK6812, RGBIC)
- Cable Gauge (Extension Cables): 22 AWG
- Cable Length (Extension Cables): 15 centímetros
- Método de conexión: Solderless, clamp-tipo
- Eficiencia Energética: For related LED strips, refer to the energy label. View Energy Label (EPREL)
Información de garantía
Warranty information for this product is not explicitly detailed in the provided product data. Please refer to the retailer's return policy or contact BTF-LIGHTING directly for specific warranty terms and conditions.
Atención al cliente
For technical assistance, troubleshooting, or inquiries regarding your BTF-LIGHTING 3-Pin 10mm SMD LED Strip Connector Kit, please contact the manufacturer or your point of purchase. Contact details are typically available on the product packaging or the manufacturer's official websitio.


