Introducción
This manual provides detailed instructions for the setup, operation, and maintenance of your Amazon Basics Projection Alarm Clock. Please read this manual thoroughly before using the product to ensure proper function and to prevent damage.

Image: The Amazon Basics Projection Alarm Clock, showing its digital display and projection lens.
Instrucciones de seguridad
- No exponga la unidad a temperaturas extremas, luz solar directa, polvo o humedad.
- Asegúrese de que el adaptador de corriente sea compatible con su fuente de alimentación local.
- Mantenga la unidad alejada del agua u otros líquidos.
- No intente desmontar ni modificar la unidad. Esto anulará la garantía.
- Limpie la unidad únicamente con un paño suave y seco. No utilice limpiadores líquidos.
- Deseche las baterías adecuadamente de acuerdo con las regulaciones locales.
Contenido del paquete
- Amazon Basics Projection Alarm Clock
- Adaptador de corriente alterna
- Manual de usuario
Características del producto
- Projection of time onto a wall or ceiling.
- FM Radio with automatic/manual scan and up to 15 preset stations.
- USB port for charging mobile phones or tablets.
- 7-inch high-definition LED display with adjustable brightness.
- Dual alarms for separate wake-up times.
- Snooze function with adjustable duration (2 to 60 minutes).
- Sleep timer for automatic radio shut-off (5 to 90 minutes).
- DST button for Daylight Saving Time adjustment.
- Battery backup (requires 2 AAA batteries, not included) to maintain time settings during power outages.

Imagen: Más alláview of key features including sleep timer, radio presets, and snooze function.
Controles y pantalla
Familiarize yourself with the buttons and ports on your alarm clock for optimal use.

Imagen: Lateral view illustrating the location of controls, USB charging port, and projection lens.
- Botón de ajuste de hora: Se utiliza para configurar la hora actual.
- Botones de alarma 1/2: Se utiliza para configurar y activar la Alarma 1 y la Alarma 2.
- Botón de repetición/atenuación: Activates snooze during an alarm; adjusts display brightness when not alarming.
- Radio/Sleep Button: Turns FM radio on/off; sets sleep timer.
- Volume/Tune Dial: Adjusts radio volume and tunes FM frequencies.
- Projection On/Off/Flip Button: Controls the projection feature and flips the projected time.
- Projection Focus Wheel: Adjusts the clarity of the projected time.
- Projection Angle Adjuster: Changes the angle of the projected time.
- Puerto de carga USB: Para cargar dispositivos externos.
- Botón DST: Activa o desactiva el horario de verano.
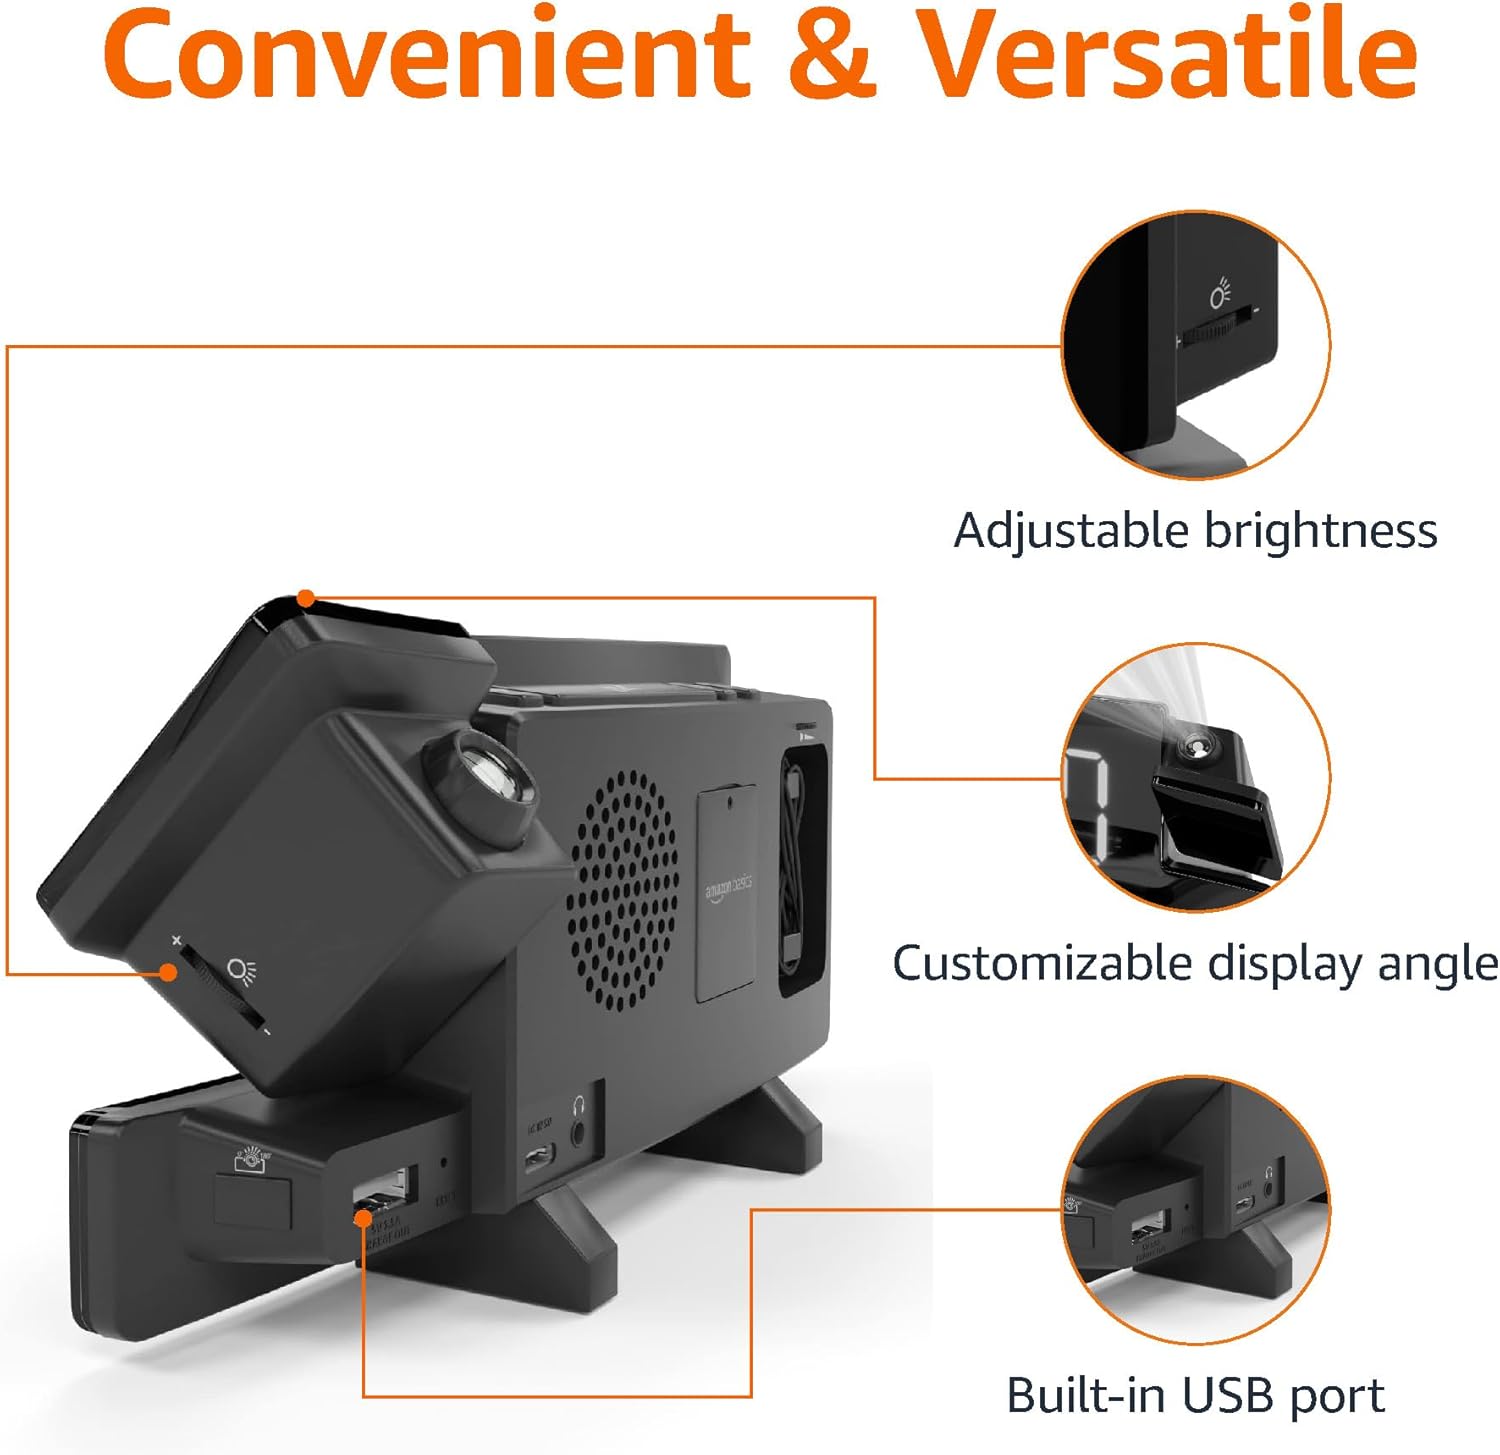
Image: Diagram highlighting the adjustable brightness, customizable projection angle, and USB charging port.
Configuración
1. Conexión de alimentación
Connect the AC power adapter to the DC IN port on the back of the alarm clock and plug it into a standard wall outlet. The display will light up.
2. Instalación de batería de respaldo
For battery backup, open the battery compartment on the bottom of the unit. Insert 2 AAA batteries (not included), ensuring correct polarity (+/-). Close the compartment. The battery backup maintains time settings during power outages but does not power the display or alarm functions.
3. Ajuste de hora inicial
- Mantenga pulsado el Hora establecida botón. Los dígitos de la hora parpadearán.
- Utilice el Volume/Tune Dial para ajustar la hora. prensa Hora establecida De nuevo para confirmar.
- Los dígitos de los minutos parpadearán. Utilice el Volume/Tune Dial para ajustar los minutos. prensa Hora establecida De nuevo para confirmar.
- The time format (12H/24H) will flash. Use the Volume/Tune Dial to select your preferred format. Press Hora establecida para confirmar y salir del modo de configuración de la hora.
4. Horario de verano (DST)
Presione el Horario de verano button to toggle Daylight Saving Time on or off. The DST indicator will appear or disappear on the display.
Instrucciones de funcionamiento
1. Configuración de alarmas (Alarma 1 y Alarma 2)
- Mantenga pulsado el Alarma 1 or Alarma 2 Botón. Los dígitos de la hora de la alarma parpadearán.
- Utilice el Volume/Tune Dial to adjust the alarm hour. Press the respective Alarma Botón nuevamente para confirmar.
- Los dígitos de los minutos de la alarma parpadearán. Utilice el Volume/Tune Dial to adjust the alarm minutes. Press the respective Alarma Botón nuevamente para confirmar.
- The alarm source (FM radio or buzzer) will flash. Use the Volume/Tune Dial to select your preference. Press the respective Alarma Botón para confirmar y activar la alarma. Aparecerá un icono de alarma en la pantalla.
- To deactivate an alarm, press the respective Alarma Presione el botón una vez. El icono de alarma desaparecerá.
2. Using Snooze
Cuando suene una alarma, presione el Posponer / atenuar button to temporarily silence the alarm. The alarm will sound again after the set snooze duration. The default snooze duration is 9 minutes. To adjust the snooze duration, press and hold the Posponer / atenuar botón, luego use el Volume/Tune Dial to select a duration between 2 and 60 minutes. Press Posponer / atenuar De nuevo para confirmar.
3. Operación de radio FM
- Encender/Apagar: Presione el Radio/Sleep Botón para encender o apagar la radio FM.
- Sintonizar estaciones: Utilice el Volume/Tune Dial to manually tune to a desired FM frequency.
- Auto escáner: Mantenga pulsado el Radio/Sleep button to automatically scan and save available FM stations as presets.
- Seleccionar ajustes preestablecidos: Once stations are saved, short press the Radio/Sleep button to cycle through the preset stations.
- Ajustar el volumen: Girar el Volume/Tune Dial para ajustar el volumen de la radio.
4. Temporizador de sueño
Mientras se reproduce la radio FM, presione el botón Radio/Sleep button repeatedly to set the sleep timer. Options typically range from 5 to 90 minutes. The radio will automatically turn off after the selected duration.
5. Función de proyección

Image: The alarm clock projecting the time onto a bedroom ceiling.
- Activar/Desactivar: Presione el Projection On/Off/Flip Botón para activar o desactivar la proyección de tiempo.
- Ajustar ángulo: Manually adjust the projection arm to direct the time onto your desired surface (wall or ceiling).
- Enfocar: Girar el Projection Focus Wheel to achieve a clear image.
- Flip Display: Presione el Projection On/Off/Flip button repeatedly to rotate the projected time 180 degrees, ensuring correct orientation.

Image: The alarm clock on a nightstand, projecting the time onto a wall, demonstrating its use in a bedroom setting.
6 Carga USB
Connect your mobile phone or tablet's USB charging cable to the Puerto de carga USB on the back of the alarm clock. The device will begin charging. This port is for charging only and does not support data transfer.
7. Ajuste de brillo de pantalla
Presione el Posponer / atenuar button (when no alarm is sounding) to cycle through different brightness levels for the main LED display.
Mantenimiento
1. Limpieza
Wipe the unit with a soft, dry, lint-free cloth. Do not use abrasive cleaners, waxes, or solvents as they may damage the surface.
2. Reemplazo de la batería
If the battery backup is not functioning correctly (e.g., time resets after a power outage), replace the 2 AAA batteries in the battery compartment, ensuring correct polarity.
Solución de problemas
| Problema | Posible causa | Solución |
|---|---|---|
| La pantalla está en blanco. | Sin conexión de energía. | Asegúrese de que el adaptador de CA esté enchufado de forma segura a la unidad y a un tomacorriente de pared que funcione. |
| La alarma no suena. | La alarma no está activada o el volumen es demasiado bajo. | Check if the alarm icon is visible on the display. Re-set the alarm if necessary. Increase radio volume if FM is selected as alarm source. |
| El tiempo proyectado es borroso. | Projection focus is not adjusted. | Girar el Projection Focus Wheel hasta que la imagen sea clara. |
| Projected time is not visible. | Projection is off or room is too bright. | Presione el Projection On/Off/Flip button to activate. The projection is best viewed in a dark room. |
| La recepción de radio es mala. | Posición o interferencia de la antena. | Adjust the position of the FM antenna wire. Move the unit away from other electronic devices that may cause interference. |
| La carga USB no funciona. | Problema con el cable o incompatibilidad del dispositivo. | Ensure the USB cable is functional and properly connected. Try a different cable or device. |
Presupuesto
- Modelo: MET8831-EE.UU.
- Entrada de energía: Adaptador de CA (incluido)
- Copia de seguridad de la batería: 2 pilas AAA (no incluidas)
- Mostrar: LED de 7 pulgadas
- Frecuencia de radio: FM
- Salida USB: 5V, 1A (for charging)
- Dimensiones (L x An x Al): 7.1 x 1.6 x 3.7 pulgadas (18.03 x 4.06 x 9.4 cm)
- Peso: Aproximadamente 0.59 libras (267.62 g)

Image: Product dimensions for the Amazon Basics Projection Alarm Clock.
Información de garantía
This product is covered by the Amazon Basics warranty. For detailed information regarding warranty terms and conditions, please refer to the official Amazon Basics websitio o póngase en contacto con el servicio de atención al cliente.
Atención al cliente
For further assistance, troubleshooting, or product inquiries, please contact Amazon Basics customer support through the Amazon website or your purchase platform. Have your product model number (MET8831-US) and purchase details ready.


