1. Introducción
This manual provides detailed instructions for the safe and effective use of your OMMO 16 Lines Green Laser Level. This tool is designed for precise leveling and alignment tasks, featuring two 360° horizontal lines and two 360° vertical lines, providing comprehensive coverage for various applications. Please read this manual thoroughly before operating the device and retain it for future reference.
2. Información de seguridad
ADVERTENCIA: This is a Class II laser product. Avoid direct eye exposure to the laser beam. Staring directly into the laser beam can cause eye injury.
- No mire fijamente el rayo láser.
- No apunte el rayo láser a personas o animales.
- No opere el dispositivo en atmósferas explosivas, como en presencia de líquidos, gases o polvo inflamables.
- Mantenga el dispositivo fuera del alcance de los niños.
- Utilice únicamente baterías y cargadores especificados.
- No intente modificar ni desmontar el nivel láser.
3. Contenido del paquete
Verifique que todos los artículos enumerados a continuación estén incluidos en su paquete:
- 1 x OMMO 16 Lines Green Laser Level
- 2 baterías recargables de iones de litio
- 1 x control remoto
- 1 x Magnetic Wall Bracket
- 1 x base de elevación
- 1 x 1/4" Mounting Screw
- 1 x Adaptador de corriente/cargador
- 1 x Bracket Patch (Metal Plate)
- 1 x Estuche de transporte
- 1 x Manual de usuario (este documento)
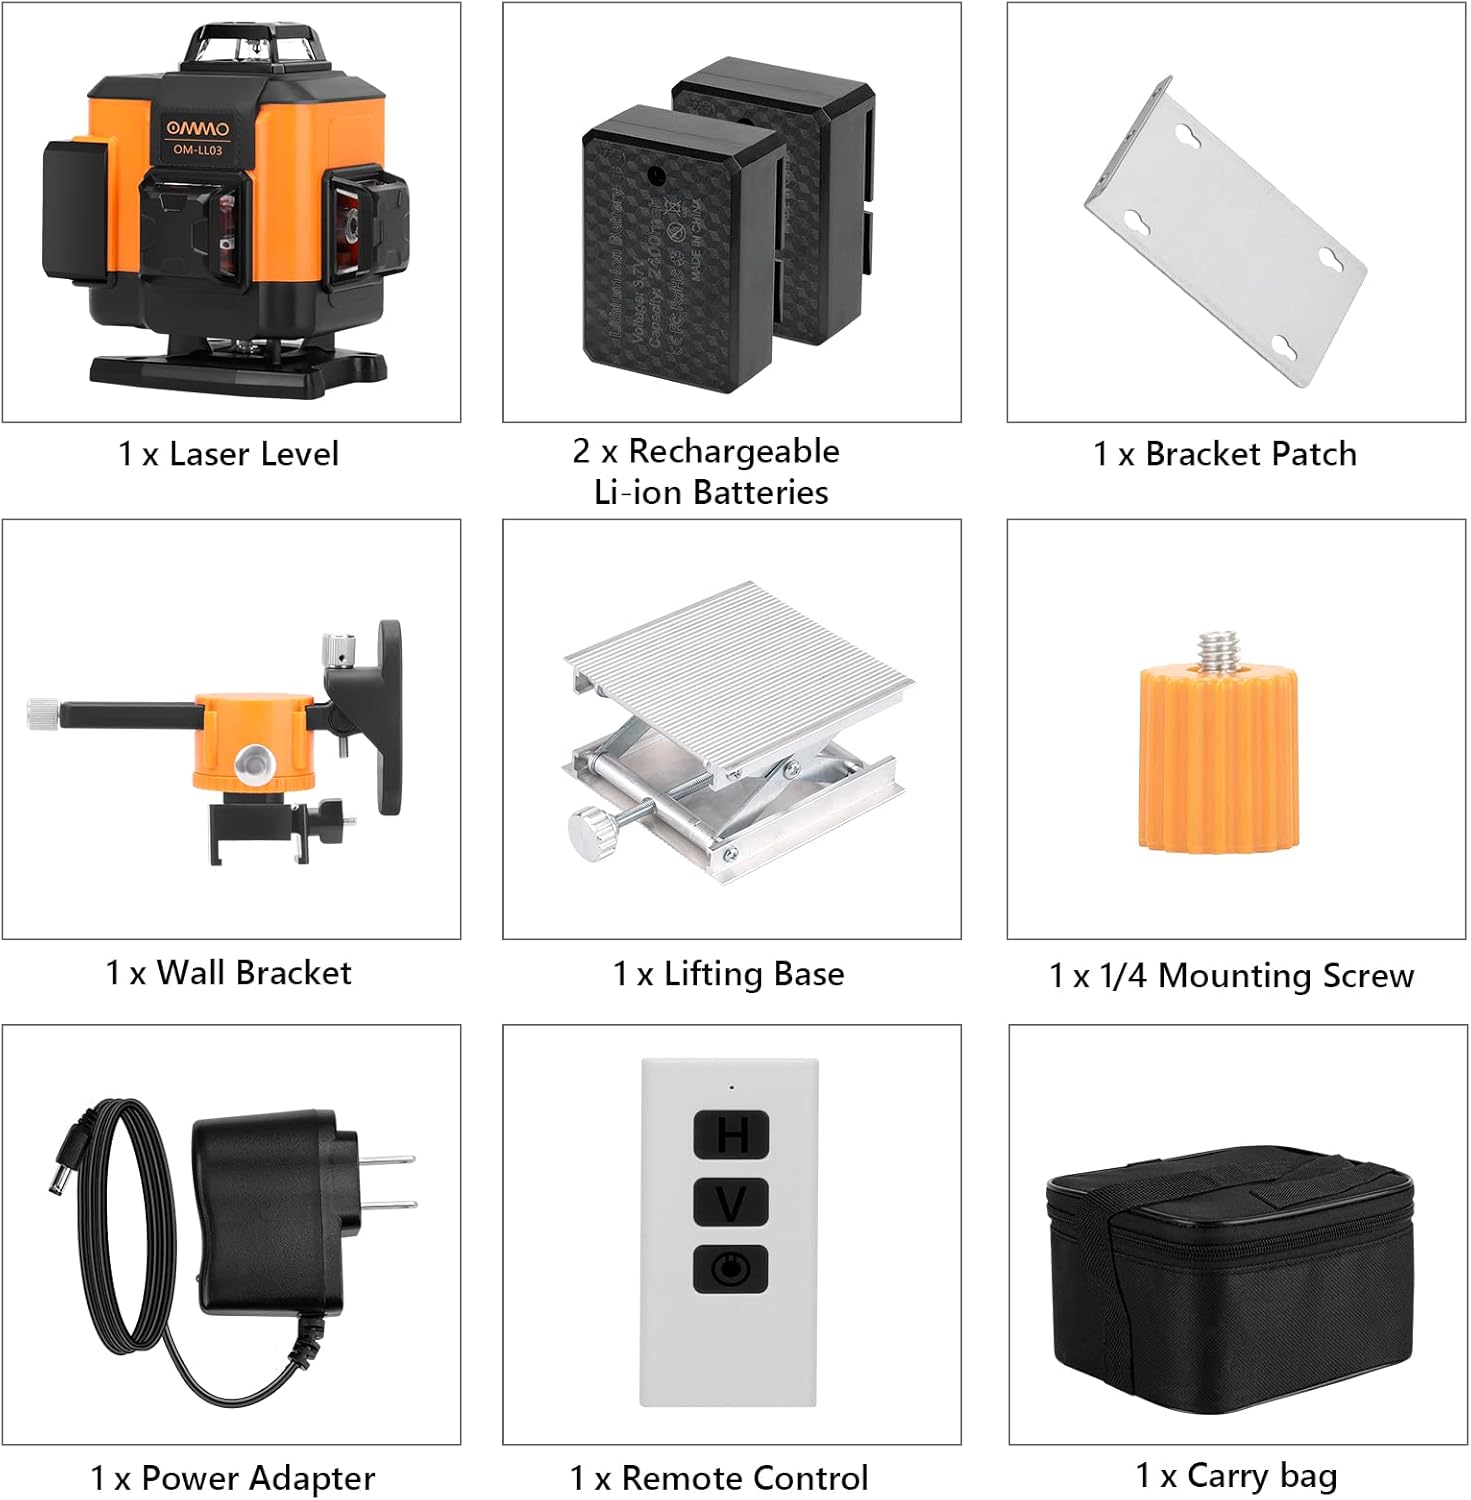
Figure 1: Contents of the OMMO 16 Lines Green Laser Level package, including the laser level, batteries, remote, various mounts, charger, and carrying case.
4. Producto terminadoview
Familiarícese con los componentes de su nivel láser:

Figure 2: Key components of the OMMO 16 Lines Green Laser Level.
- Botón de encendido / apagado: Located on the top panel.
- Horizontal Line Button (H): Activa/desactiva las líneas láser horizontales.
- Vertical Line Button (V): Activa/desactiva las líneas láser verticales.
- Compartimento de la batería: Alberga la batería recargable de iones de litio.
- Rosca de montaje de 1/4": Para fijar a trípodes u otros accesorios de montaje.
- Pendulum Lock Switch: Located on the side, controls self-leveling and manual modes.
5. Configuración
5.1 Instalación y carga de la batería
- Abra la tapa del compartimiento de la batería en el costado del nivel láser.
- Insert the rechargeable Li-ion battery, ensuring correct polarity.
- Cierre bien la tapa del compartimento de la batería.
- To charge, connect the power adapter to the charging port on the device and plug it into a power outlet. The indicator light will show charging status.

Figure 3: Battery installation and charging port location.
5.2 Montaje del nivel láser
The laser level can be mounted using various accessories:
- Montaje de trípode: Attach the laser level to a standard tripod using the 1/4" mounting thread at the bottom.
- Soporte de pared magnético: Use the magnetic wall bracket to attach the device to metal surfaces. The bracket also allows for height and angle adjustments.
- Base de elevación: The included lifting base provides fine height adjustment for precise positioning on flat surfaces.

Figure 4: Different installation methods for the laser level.
6. Instrucciones de funcionamiento
6.1 Modo de autonivelación
- Slide the pendulum lock switch to the "ON" (unlocked) position.
- Presione el botón de encendido/apagado para encender el dispositivo.
- The laser level will automatically self-level within a range of ±3°. If the device is outside this range, the laser lines will flash and an audible alarm will sound, indicating it is not level. Adjust the device's position until it is within the self-leveling range.
- Use the "H" button to activate/deactivate horizontal lines and the "V" button to activate/deactivate vertical lines.

Figure 5: Self-leveling mode operation.
6.2 Modo manual (modo bloqueado)
- Slide the pendulum lock switch to the "OFF" (locked) position.
- Press and hold the Power ON/OFF button for 3 seconds to turn on the device.
- In manual mode, the self-leveling function is disabled, allowing you to project laser lines at any desired angle. The laser lines will not flash or beep in this mode.
- Use the "H" and "V" buttons to control the laser lines.

Figure 6: Manual mode operation for angled projections.
6.3 Uso del control remoto
El control remoto permite una operación conveniente a distancia.
- The remote has buttons corresponding to the laser level's functions (Power ON/OFF, Horizontal Line, Vertical Line).
- Ensure the remote is pointed towards the laser level for optimal signal reception.

Figure 7: Remote control in use for different applications.
7. Mantenimiento
- Limpieza: Limpie el dispositivo con un paño suave, damp Paño. No utilice limpiadores abrasivos ni disolventes.
- Almacenamiento: When not in use, store the laser level in its carrying case in a dry, cool place, away from direct sunlight. Ensure the pendulum lock switch is in the "OFF" (locked) position to protect the pendulum mechanism.
- Cuidado de la batería: Retire las baterías si el dispositivo no se utilizará durante un período prolongado.

Figure 8: The laser level is designed to be dustproof and shockproof (IP54 rated).
8. Solución de problemas
| Problema | Posible causa | Solución |
|---|---|---|
| Laser lines are flashing and beeping in self-leveling mode. | El dispositivo está fuera de su rango de autonivelación de ±3°. | Place the device on a more level surface or adjust its position until it is within the self-leveling range. |
| Las líneas láser son tenues o no visibles. | Low battery; Bright ambient light. | Charge the battery; Use the device in lower light conditions or closer to the working surface. |
| El dispositivo no se enciende. | Battery is dead or incorrectly installed; Pendulum lock switch is in "OFF" position and power button not held for 3s for manual mode. | Charge or reinstall the battery; Ensure pendulum lock is "ON" for self-leveling or hold power button for 3s for manual mode. |
| El control remoto no funciona. | Remote battery is dead; Obstruction between remote and device. | Replace remote battery; Ensure clear line of sight to the laser level. |
9. Especificaciones
| Marca | ommmm |
| Número de modelo | OM0893 |
| Líneas láser | 16 Lines (2x360° Horizontal, 2x360° Vertical) |
| Color láser | Verde |
| Visibility Range | Hasta 150 pies |
| Rango de autonivelación | ±3° |
| Material | Acrilonitrilo butadieno estireno (ABS) |
| Fuente de poder | Funciona con pilas (2 pilas de iones de litio incluidas) |
| Peso del artículo | 3.56 libras |
| Clasificación de protección | IP54 (a prueba de polvo y salpicaduras) |
10. Garantía y soporte
For warranty information or technical support, please refer to the contact details provided with your purchase or visit the official OMMO webSitio. Conserve su recibo de compra como comprobante para reclamaciones de garantía.
OMMO Official Store: Visit OMMO Store on Amazon


