Información importante de seguridad
Before using the Lusper Weight Bench, please read and understand all instructions and safety warnings in this manual. Failure to follow these instructions may result in serious injury or property damage.
- Consulte a un médico antes de comenzar cualquier programa de ejercicios.
- Mantenga a los niños y mascotas alejados del equipo durante su uso.
- Always place the weight bench on a flat, stable surface.
- Inspect the bench for loose parts, damage, or wear before each use. Do not use if damaged.
- Ensure all adjustment pins and fasteners are securely locked in place before beginning your workout.
- Do not exceed the maximum weight capacity of 880 pounds (400 kg). This includes user weight plus any weights being lifted.
- Utilice técnicas de levantamiento adecuadas y siempre utilice un observador cuando levante objetos pesados.
- No modifique el equipo de ninguna manera.
Contenido del paquete
Carefully unpack all components and verify that you have received all items listed below. If any parts are missing or damaged, do not proceed with assembly and contact Lusper customer support.
- Ensamblaje del marco principal
- Almohadilla de respaldo
- Almohadilla del asiento
- Almohadilla del reposacabezas
- Estabilizador delantero
- Estabilizador trasero
- Footrest Rollers (2)
- Adjustment Pins (various)
- Hardware Kit (bolts, washers, nuts, assembly tools)
Configuración y montaje
Assembly typically requires two people and takes approximately 15-30 minutes. Ensure you have adequate space and all components before starting.
- Desempaquetar componentes: Remove all parts from the packaging and lay them out on a clean, flat surface. Verify all parts are present according to the package contents list.
- Coloque los estabilizadores: Secure the Front Stabilizer and Rear Stabilizer to the main frame using the provided bolts, washers, and nuts. Ensure they are tightened securely.
- Install Footrest Rollers: Slide the foam rollers onto the footrest bar and secure them with the end caps or retaining clips.
- Colocar las almohadillas: Mount the Backrest Pad, Seat Pad, and Headrest Pad to their respective positions on the main frame using the pre-drilled holes and hardware. Ensure they are firmly attached.
- Inspección final: Once assembled, double-check all bolts and pins to ensure they are tight and secure. Test all adjustment mechanisms to confirm proper function.

Image: Fully assembled Lusper Weight Bench, ready for use.
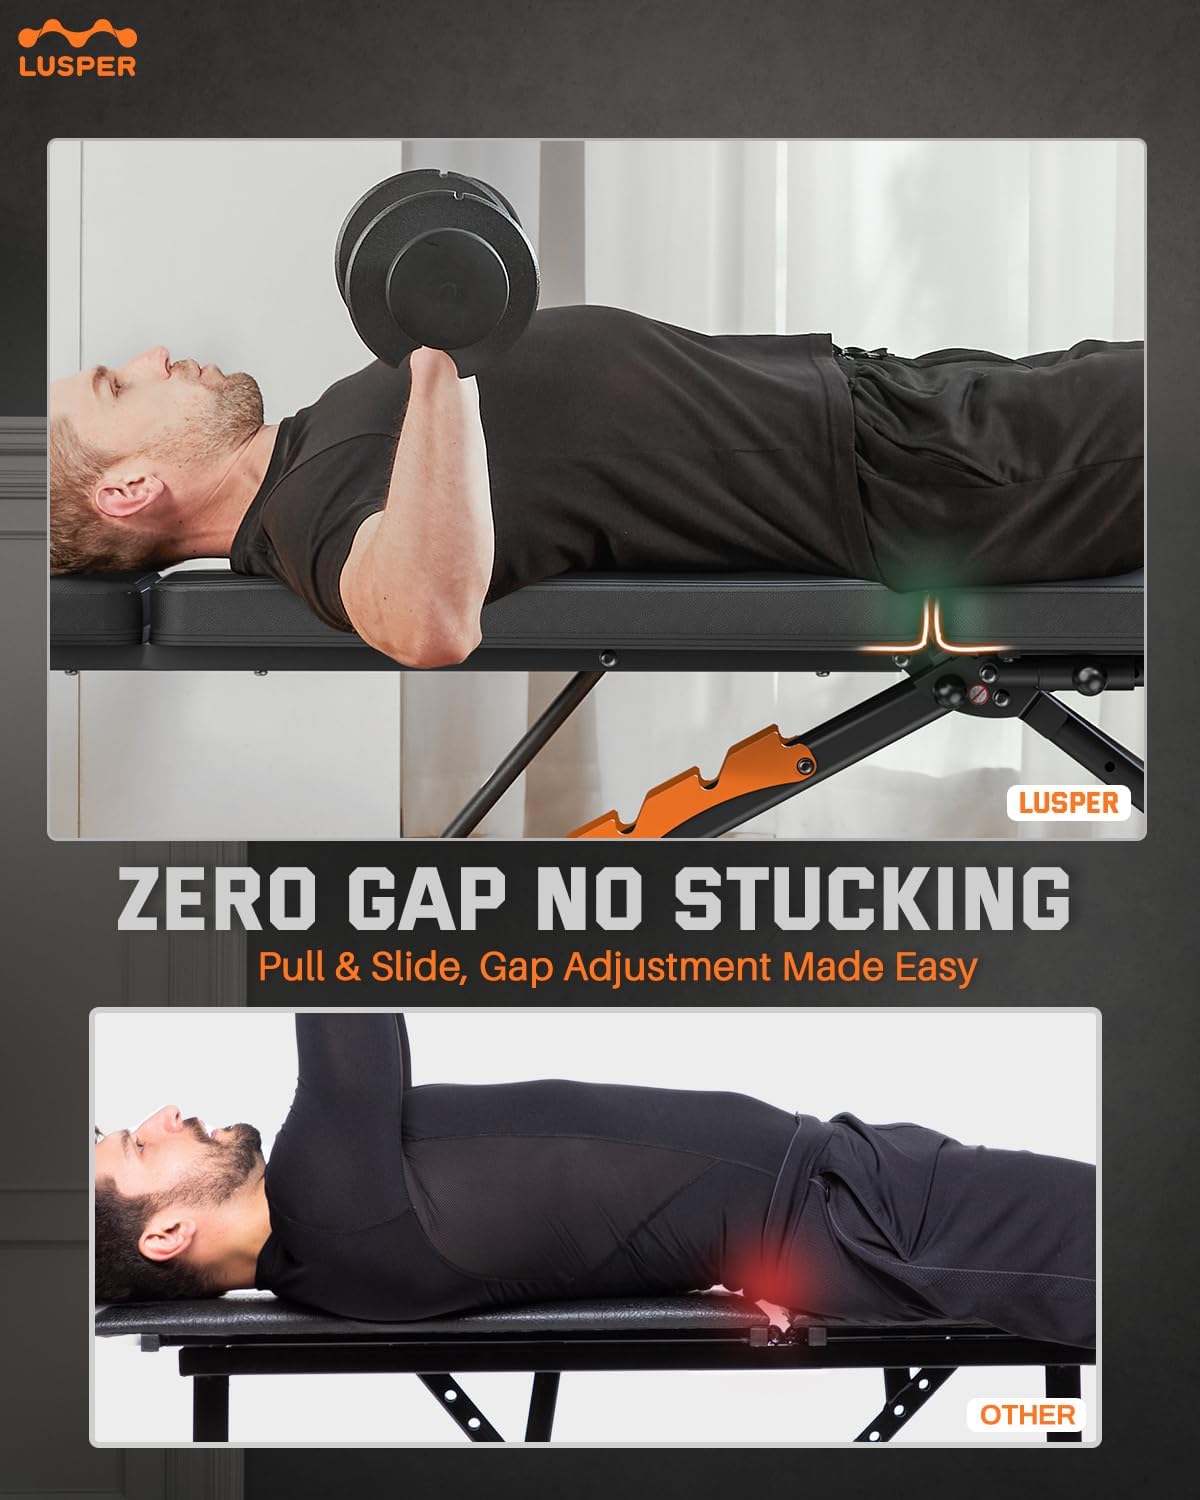
Image: Detail of the stable double-legged frame and wide base design.
Instrucciones de funcionamiento
The Lusper Weight Bench offers multiple adjustment options for various exercises and user comfort.
Adjusting Backrest, Seat, and Headrest
The bench features multiple positions for the backrest, seat, and headrest to accommodate different exercises and user preferences.
- Ajuste del respaldo: Locate the adjustment pin or lever at the base of the backrest. Pull the pin out, adjust the backrest to the desired angle (7 positions available), and release the pin to lock it securely into a hole.
- Ajuste del asiento: Find the seat adjustment mechanism. Pull the pin or lever, move the seat to one of the 4 available positions, and ensure the pin locks into place.
- Ajuste del reposacabezas: The headrest can be adjusted to 2 positions. Locate the adjustment point, set to the desired height, and secure.
- Ajuste del reposapiés: The footrest offers 3 positions. Adjust by pulling the pin and sliding the bar to the desired position, then re-engaging the pin.

Image: Adjustment points for backrest, seat, headrest, and footrest.
Zero-Gap Adjustment
The zero-gap feature allows for seamless transition between the seat and backrest, enhancing comfort and support during exercises.
- To adjust the gap, locate the sliding mechanism between the seat and backrest.
- Pull the adjustment handle and slide the seat forward or backward to eliminate any gap with the backrest.
- Release the handle to lock the seat in the desired position.
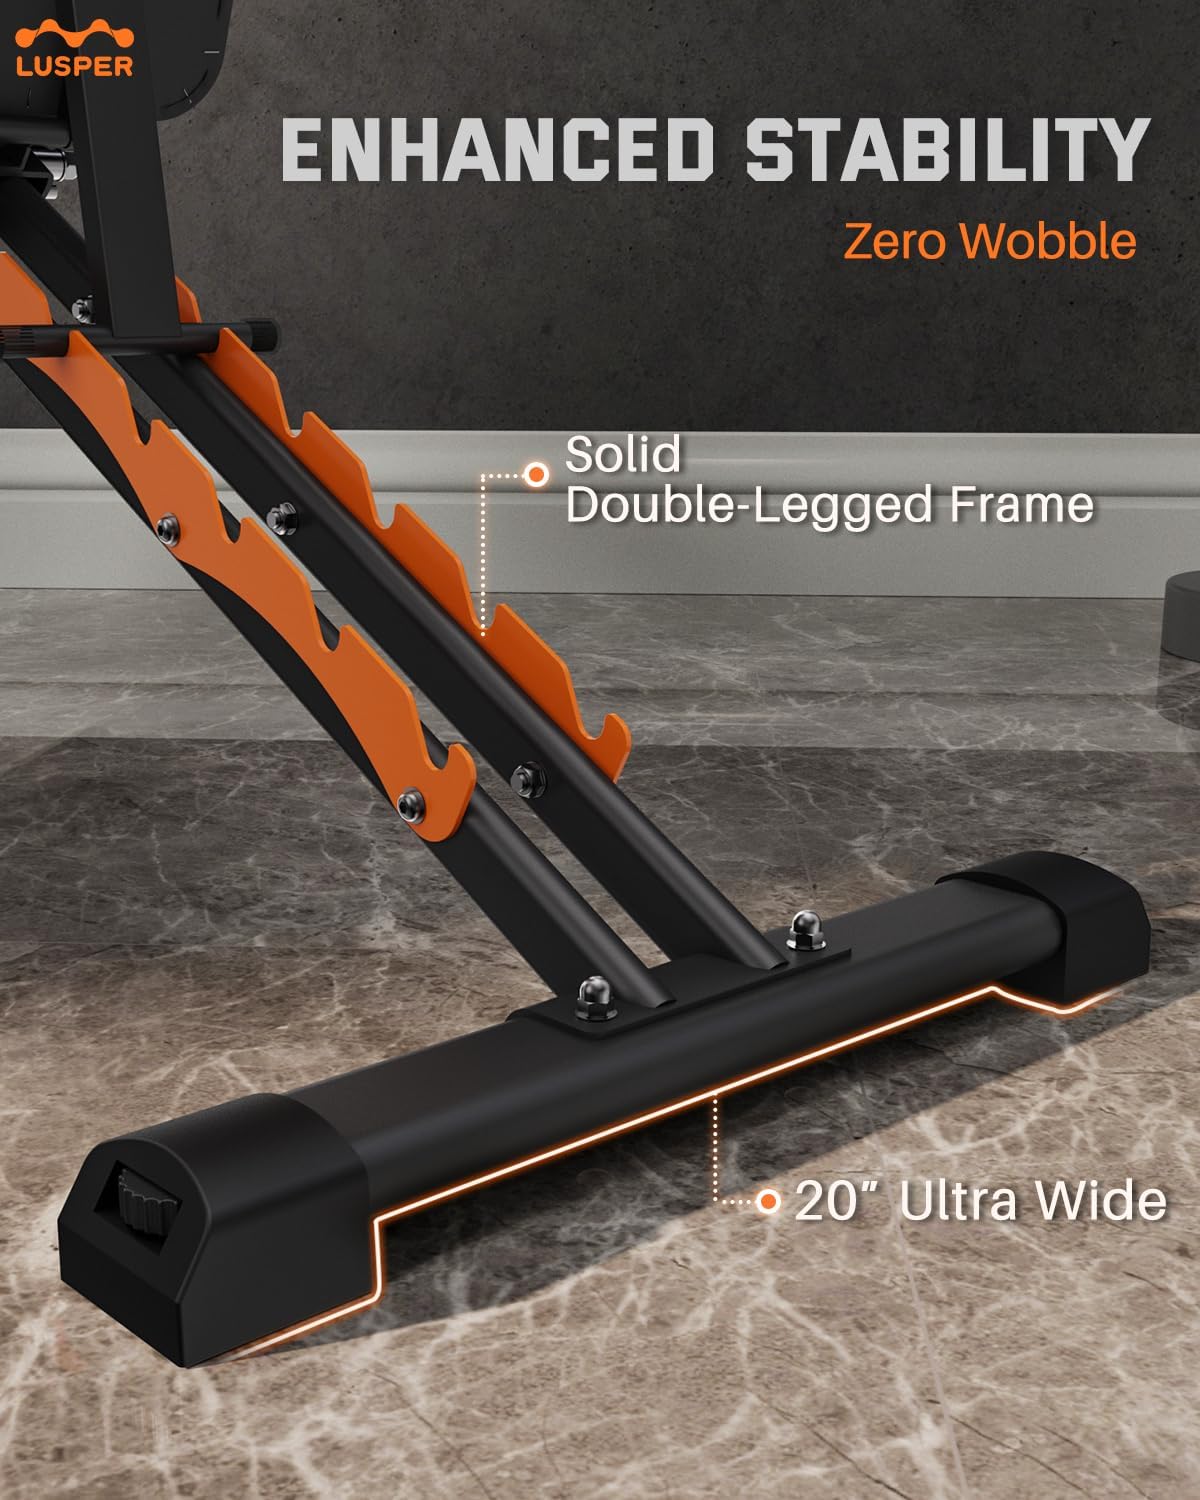
Image: Demonstration of the zero-gap feature for improved comfort.
Plegable para almacenamiento
The Lusper Weight Bench is designed for quick and easy folding, allowing for compact storage.
- Lower Backrest: Adjust the backrest to its lowest (flat) position.
- Fold Main Frame: Locate the folding mechanism (usually a pin or lever) near the base of the bench. Disengage the lock and fold the bench upwards, bringing the front and rear stabilizers closer together.
- Seguro en posición plegada: Ensure the bench is securely locked in its folded position to prevent accidental unfolding.
- Almacenar: The folded bench can be stored vertically to save space.

Image: The weight bench in its folded, space-saving configuration.
Mantenimiento y cuidado
Regular maintenance will ensure the longevity and safe operation of your Lusper Weight Bench.
- Limpieza: Limpie las almohadillas del banco y el marco con un paño húmedo.amp Limpie el paño después de cada uso para eliminar el sudor y la suciedad. Si es necesario, use jabón suave y luego seque. Evite los limpiadores abrasivos.
- Inspección: Periodically inspect all bolts, nuts, and adjustment pins for tightness. Tighten any loose fasteners. Check for any signs of wear, cracks, or damage to the frame, pads, or moving parts.
- Lubricación: Apply a small amount of silicone-based lubricant to moving parts and adjustment mechanisms if they become stiff or squeaky.
- Almacenamiento: Store the bench in a dry, cool environment away from direct sunlight and extreme temperatures.
Solución de problemas
If you encounter any issues with your Lusper Weight Bench, refer to the following common problems and solutions:
- El banco se siente inestable o tambaleante:
Solución: Ensure the bench is on a flat, level surface. Check all assembly bolts and nuts for tightness and re-tighten if necessary. Verify that the front and rear stabilizers are fully extended and locked. - Dificultad para ajustar el respaldo/asiento:
Solución: Ensure the adjustment pin is fully disengaged before attempting to move the component. Check for any obstructions or debris in the adjustment holes. Apply a small amount of lubricant to the moving parts if they are stiff. - Ruidos chirriantes durante el uso:
Solución: Identify the source of the squeak. It is often caused by loose fasteners or friction between moving metal parts. Tighten any loose bolts and apply a small amount of lubricant to pivot points. - Bench does not fold easily:
Solución: Ensure the backrest is in its lowest position. Check that the folding mechanism is fully disengaged. Lubricate the folding pivot points if resistance is felt.
If these solutions do not resolve the issue, please contact Lusper customer support.
Presupuesto
| Característica | Especificación |
|---|---|
| Marca | Lusper |
| Número de modelo | LPUSAM-FWBA-CILS45-BK00-V1 |
| Capacidad máxima de peso | 880 libras (400 kg) |
| Material del marco | Acero aleado |
| Dimensiones del producto (L x An x Al) | 124.97 x 34.29 x 45.97 cm |
| Peso del artículo | 14.51 kg (32 libras) |
| Color | Negro / Naranja |

Image: Visual representation of the 880 LB weight capacity.
Garantía y soporte
Lusper stands behind the quality of its products. For specific warranty details, including coverage period and terms, please refer to the warranty card included with your purchase or visit the official Lusper websitio.
If you require technical assistance, have questions about assembly or operation, or need to make a warranty claim, please contact Lusper customer support through the following channels:
- Websitio: Visit the official Lusper webSitio para preguntas frecuentes e información de contacto.
- Correo electrónico: Consulte el embalaje de su producto o la tarjeta de garantía para obtener la dirección de correo electrónico de atención al cliente.
- Teléfono: Contact numbers may be available on the Lusper webdocumentación del sitio o del producto.
Please have your model number (LPUSAM-FWBA-CILS45-BK00-V1) and proof of purchase ready when contacting support.


