1. Introducción
Thank you for choosing the GLOBE Electric 64000012 30-inch 4-Light Track Lighting fixture. This manual provides essential information for the safe installation, operation, and maintenance of your new lighting system. Please read these instructions thoroughly before beginning installation and retain them for future reference.

Image 1.1: The GLOBE Electric 64000012 30-inch 4-Light Track Lighting fixture.
2. Información importante de seguridad
Para reducir el riesgo de incendio, descarga eléctrica o lesiones personales, siga siempre estas precauciones básicas de seguridad:
- Lee todas las instrucciones: Before installing or using this fixture.
- Seguridad eléctrica: Todas las conexiones eléctricas deben cumplir con los códigos y ordenanzas locales o el Código Eléctrico Nacional (NEC). Consulte a un electricista calificado si no está familiarizado con las conexiones eléctricas correctas.
- Desconectar la energía: Siempre apague el suministro eléctrico en el disyuntor principal o en la caja de fusibles antes de comenzar la instalación o realizar cualquier mantenimiento.
- Toma de tierra: Asegúrese de que el artefacto esté correctamente conectado a tierra para evitar posibles descargas eléctricas.
- Requisitos de la bombilla: Use only GU10/Twist and Click Base MR16 50W bulbs (sold separately). Do not exceed the maximum wattage.
- Calor: Halogen bulbs can become very hot. Allow bulbs to cool before touching.
- Característica regulable: If using a dimmer, ensure it is compatible with GU10 bulbs and installed by a qualified professional.
- Uso exclusivo en interiores: Este accesorio está diseñado para uso en interiores en lugares secos.
3. Contenido del paquete
Verifique que todos los componentes estén presentes antes de comenzar la instalación:
- Track Light Fixture (1)
- Hardware de montaje (1 juego)
- Instruction Sheet (1)

Imagen 3.1: Example of product packaging, showing the track light fixture.
4. Especificaciones del producto
| Característica | Especificación |
|---|---|
| Marca | Globo Eléctrico |
| Nombre del modelo | Pratt |
| Número de pieza | 64000012 |
| Color | Black, Pratt |
| Material | Metal |
| Dimensiones del producto | 4.75" de largo x 30" de ancho x 7.25" de alto (12 cm de largo x 76.2 cm de ancho x 18.32 cm de alto) |
| Fuente de poder | Cableado |
| Tipo de instalación | Montaje en el techo |
| Número de fuentes de luz | 4 |
| Base de la bombilla | GU10 |
| Wat máximotage por bombilla | 50 vatios |
| Volumentage | 120 voltios |
| Características especiales | Dimmable, Matte Black Finish, Pivoting Track Heads |
| Uso en interiores y exteriores | Interior |

Image 4.1: Product dimensions for planning installation.
5. Configuración e instalación
5.1. Antes de empezar
- Asegúrese de que la energía esté apagada en el disyuntor.
- Reúna las herramientas necesarias (destornillador, pelacables, cinta aisladora, escalera).
- Review all local electrical and building codes.
5.2. Pasos de instalación
- Preparar el cableado: Retire con cuidado los cables eléctricos de la caja de salida.
- Conectar cables: Connect the fixture's wires to the house wires (black to black, white to white, ground to ground) using wire connectors. Secure with electrical tape.
- Accesorio de montaje: Attach the mounting bracket to the outlet box. Secure the fixture base to the mounting bracket using the provided screws.
- Instalar bombillas: Insert four GU10/Twist and Click Base MR16 50W bulbs (sold separately) into each track head. A suction cup tool (often included with GU10 bulbs) can assist with installation.
- Restaurar energía: Vuelva a encender la energía en el disyuntor.

Image 5.1: The track lighting fixture installed in a living room setting.

Image 5.2: The track lighting fixture providing illumination over a desk area.
6. Operación
6.1. Funcionamiento básico
Once installed and powered, the fixture operates via your wall switch. If connected to a compatible dimmer switch (sold separately), you can adjust the light intensity to create the desired atmosphere.
6.2. Ajuste de los cabezales de luz
The four cylindrical track heads are designed to pivot, allowing you to direct light precisely where needed. Gently grasp each light head and rotate or tilt it to your preferred angle. This feature is ideal for accent lighting or illuminating specific areas.

Image 6.1: Adjustable heads allow for directional lighting.

Image 6.2: The fixture is fully dimmable with a compatible dimmer switch.
7. Mantenimiento
7.1. Limpieza
Always disconnect power before cleaning. Wipe the fixture with a soft, dry cloth. Do not use abrasive cleaners or solvents, as they may damage the finish.
7.2. Reemplazo de bombilla
Ensure power is OFF and bulbs have cooled completely before attempting replacement. This fixture uses GU10/Twist and Click Base MR16 50W bulbs. To replace, gently push the bulb into the socket and twist counter-clockwise to remove. Insert the new bulb by pushing it in and twisting clockwise until secure. A suction cup tool can be helpful for this process, especially if the bulbs are difficult to grip.
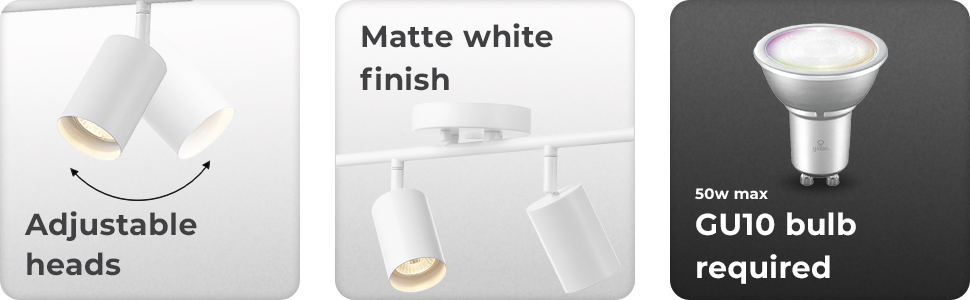
Image 7.1: Reminder of GU10 bulb requirement for the fixture.
8. Solución de problemas
If you experience issues with your track lighting, refer to the table below for common problems and solutions:
| Problema | Posible causa | Solución |
|---|---|---|
| La luz no enciende | No llega energía al artefacto; cableado suelto; bombilla defectuosa | Verifique el disyuntor; verifique las conexiones de los cables; reemplace la bombilla. |
| Las luces parpadean | Bombilla suelta; Interruptor de regulación incompatible; Cableado suelto | Ensure bulbs are seated correctly; Use a compatible dimmer; Check wire connections. |
| Las bombillas se queman rápidamente | Bombilla de agua incorrectatage; Poor ventilation; Voltage fluctuaciones | Use correct 50W GU10 bulbs; Ensure proper air circulation; Consult an electrician for voltagproblemas electrónicos. |
9. Garantía y soporte
9.1. Información de garantía
This product comes with no warranty. Please refer to your retailer's return policy for any issues upon purchase.
9.2. Atención al cliente
For further assistance or inquiries, please contact Globe Electric customer service through their official websitio o el minorista donde se compró el producto.


