1. Introducción
This user manual provides essential information for the safe and efficient operation of your HYCHIKA 3.6V Cordless Electric Rechargeable Screwdriver Drill Set. Please read this manual thoroughly before first use and keep it for future reference.
The HYCHIKA 3.6V Cordless Electric Screwdriver is designed for various screwing and light drilling tasks around the home. It features a maximum torque of 6 N-m, a 6.35 mm quick-change chuck, and a versatile design that allows for both pistol and straight grip configurations.
2. Instrucciones de seguridad
Observe siempre las precauciones básicas de seguridad al utilizar herramientas eléctricas para reducir el riesgo de incendio, descarga eléctrica y lesiones personales.
- Seguridad en el área de trabajo: Mantenga su área de trabajo limpia y bien iluminada. Las áreas desordenadas u oscuras pueden provocar accidentes. No opere herramientas eléctricas en atmósferas explosivas, como en presencia de líquidos, gases o polvo inflamables.
- Seguridad eléctrica: Evite el contacto corporal con superficies conectadas a tierra, como tuberías, radiadores, estufas y refrigeradores. No exponga las herramientas eléctricas a la lluvia ni a la humedad.
- Seguridad personal: Always wear eye protection. Use safety glasses, goggles, or a face shield. Wear hearing protection when operating noisy tools. Dress properly; avoid loose clothing or jewelry.
- Uso y cuidado de herramientas: No fuerce la herramienta eléctrica. Utilice la herramienta eléctrica correcta para su aplicación. Desconecte el enchufe de la fuente de alimentación o retire la batería antes de realizar ajustes, cambiar accesorios o guardar la herramienta eléctrica.
- Uso y cuidado de la batería: Recargue únicamente con el cargador especificado por el fabricante. No utilice las baterías con otras herramientas eléctricas. Cuando no utilice la batería, manténgala alejada de otros objetos metálicos.
3. Contenido del paquete
Verifique que todos los artículos enumerados a continuación estén incluidos en su paquete. Si falta algún artículo o está dañado, comuníquese con atención al cliente.
- 1 x HYCHIKA 3.6V Cordless Screwdriver
- 19 x Destornillador Bits
- Barra de extensión 1 x
- 1 x adaptador de carga
- 1 x Manual de usuario

Figure 3.1: Contents of the HYCHIKA 3.6V Cordless Screwdriver package, including the screwdriver, various bits, and charging adapter.
4. Características y componentes del producto
Familiarize yourself with the different parts of your cordless screwdriver.

Figure 4.1: Key components of the screwdriver, including the magnetic chuck, PUSH button, front LED light, On/Off switch, LED charger indicator, 3.5mm charger port, and forward & reverse button.
- Magnetic Chuck: 1/4 inch (6.35mm) quick-change chuck for easy bit installation and removal.
- Luz LED delantera: Illuminates the work area for improved visibility in dark environments.
- Interruptor de encendido/apagado: Activates and deactivates the screwdriver.
- Forward & Reverse Button: Controls the rotation direction for screwing and unscrewing.
- LED Charger Indicator: Provides status of battery charging.
- 3.5mm Charger Port: Connection point for the charging adapter.
- Presionar el botón: Used to adjust the grip configuration from pistol to straight.
5. Configuración
5.1 Carga de la batería
The screwdriver is powered by a 3.6V 2000 mAh Lithium-Ion battery. Before first use, fully charge the battery.
- Connect the charging adapter to the 3.5mm charger port on the screwdriver.
- Plug the charging adapter into a standard electrical outlet.
- The LED charger indicator will illuminate during charging. Once fully charged, the indicator may change color or turn off depending on the model.
- Desenchufe el cargador una vez completada la carga.

Figure 5.1: The screwdriver connected to its charging adapter, indicating a full charge.
The screwdriver is designed to maintain full power output even when the battery is low, ensuring consistent performance until the battery is depleted.
5.2 Instalación de puntas de destornillador
The screwdriver features a 1/4 inch (6.35mm) magnetic quick-change chuck for easy bit installation.
- Seleccione la punta de destornillador adecuada para su tarea.
- Insert the bit into the magnetic chuck until it is securely seated. The magnetic chuck will hold the bit firmly in place.
- To remove a bit, simply pull it out of the chuck. Bits with grooves are designed for easier removal.

Figure 5.2: Visual guide for inserting a bit into the magnetic chuck and removing it.
6. Instrucciones de funcionamiento
6.1 Adjusting Grip Configuration
The screwdriver can be used in two grip configurations: pistol grip or straight grip, for enhanced versatility and comfort.
- To change the grip, press and hold the "PUSH" button located at the top of the screwdriver.
- While holding the button, rotate the handle ninety degrees to switch between pistol and straight configurations.
- Release the "PUSH" button once the desired configuration is achieved. The handle will lock into place.
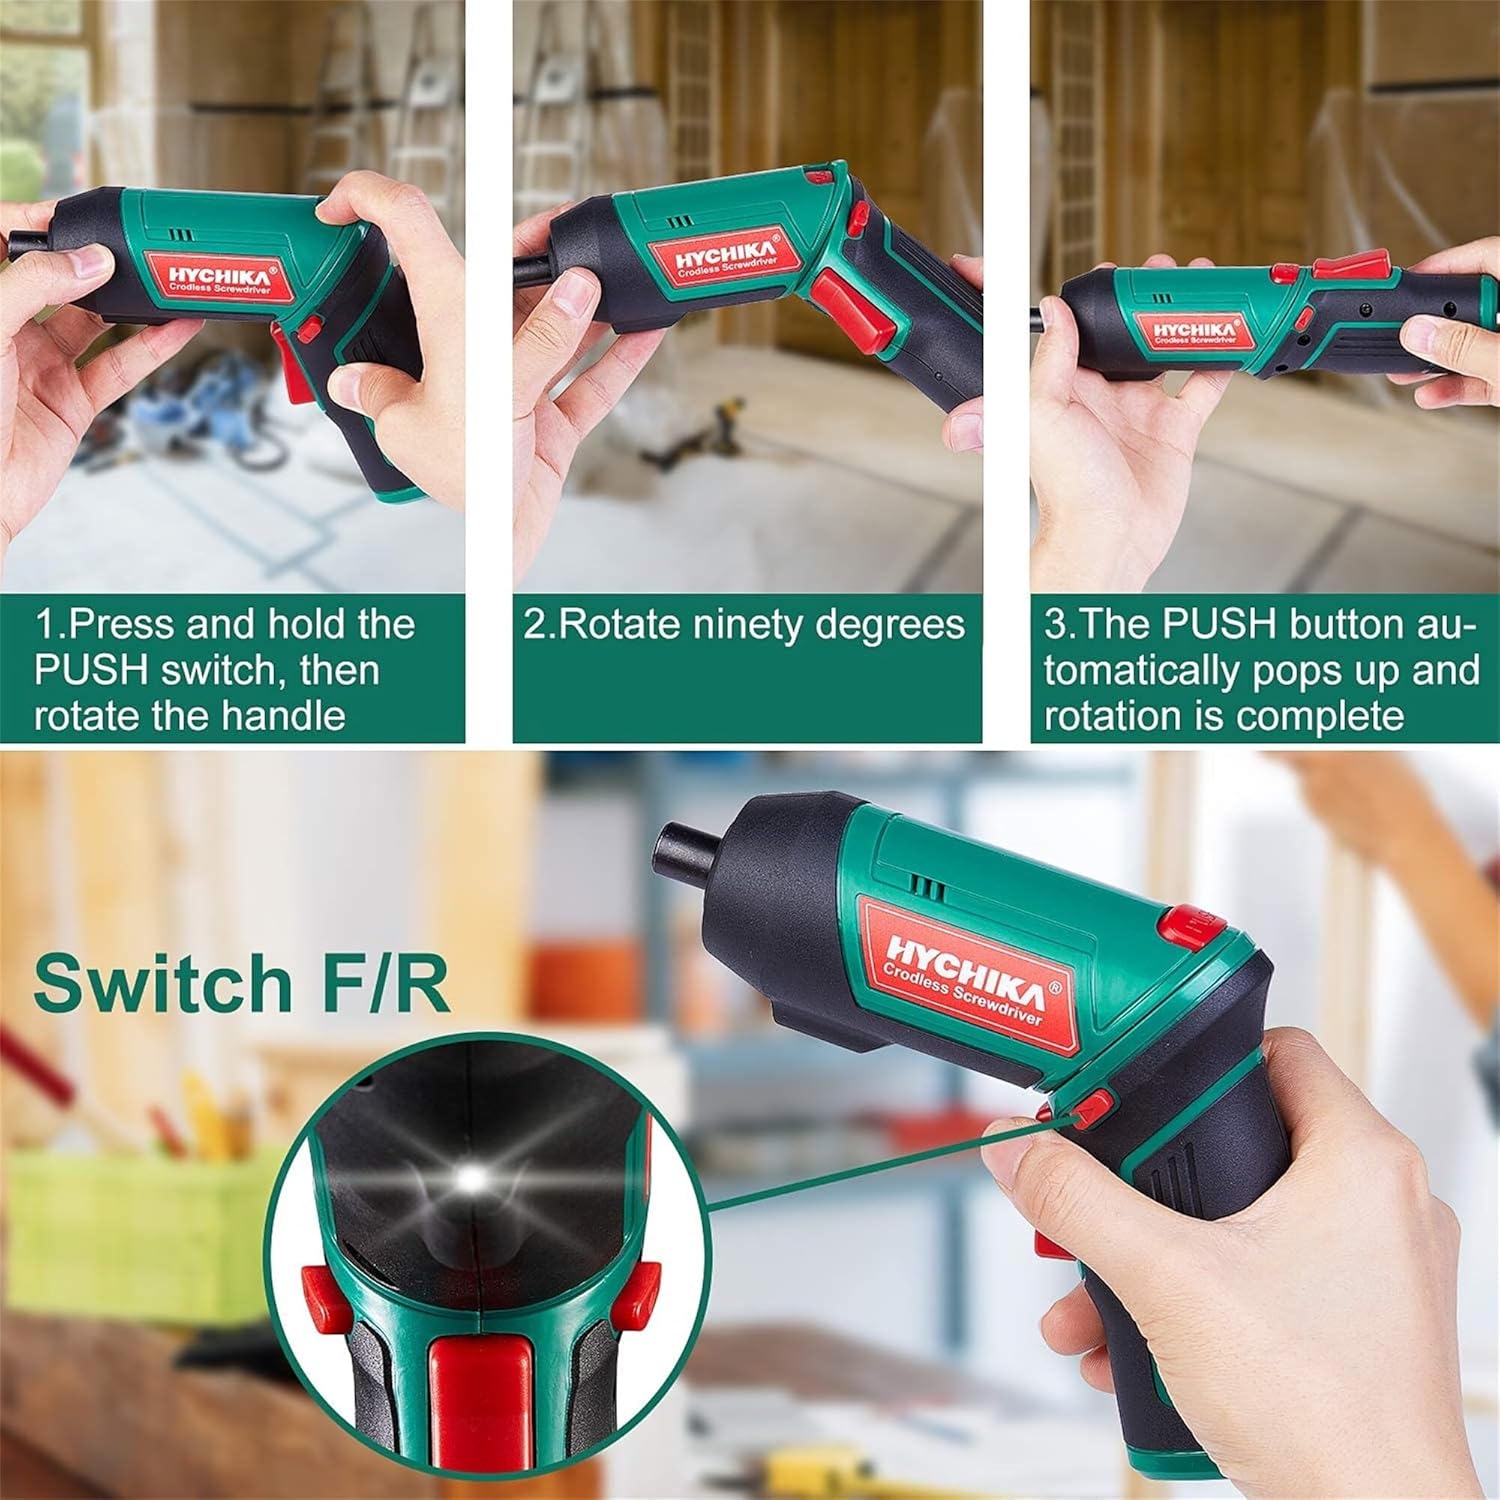
Figure 6.1: Demonstrates the process of transforming the screwdriver's grip by pressing the PUSH button and rotating the handle.
6.2 Operación hacia adelante y hacia atrás
The forward/reverse button controls the direction of rotation for screwing and unscrewing.
- To drive screws (forward rotation), push the forward/reverse button to the left (when viewdesde la parte trasera de la herramienta).
- To remove screws (reverse rotation), push the forward/reverse button to the right.
- When the button is in the center position, the tool is locked, preventing accidental activation.
6.3 Uso de la luz de trabajo LED
The built-in LED light automatically illuminates when the screwdriver is in operation, providing visibility in dimly lit areas.

Figure 6.2: The integrated LED light provides clear illumination for working in dark environments.
7. Mantenimiento
Regular maintenance ensures the longevity and optimal performance of your screwdriver.
- Limpieza: Mantenga las aberturas de ventilación limpias y libres de polvo. Utilice un paño suave y seco.amp paño para limpiar la herramienta casing. No utilice productos químicos agresivos ni limpiadores abrasivos.
- Cuidado de la broca: Clean screwdriver bits after use. Store them in the provided case to prevent loss and damage.
- Almacenamiento de la batería: If storing the tool for an extended period, ensure the battery is partially charged (around 50%) and store it in a cool, dry place. Recharge the battery every 3-6 months to maintain its health.
- Inspección general: Periodically check for any loose screws, damaged cords, or worn parts. Do not use the tool if any damage is observed.
8. Solución de problemas
This section addresses common issues you might encounter with your screwdriver.
| Problema | Posible causa | Solución |
|---|---|---|
| El destornillador no se enciende. | La batería está agotada. Forward/Reverse switch is in the center (locked) position. | Cargue la batería completamente. Empuje el interruptor de avance/retroceso hacia la izquierda o hacia la derecha. |
| El destornillador pierde potencia rápidamente. | La batería no está completamente cargada. Battery life degraded. | Asegúrese de que la batería esté completamente cargada antes de usarla. If battery life is significantly reduced, contact customer support for replacement options. |
| Bits are not held securely in the chuck. | Bit is not fully inserted. Chuck is dirty or damaged. | Push the bit firmly into the chuck until it clicks into place. Clean the chuck area. If damage is visible, contact customer support. |
Si el problema persiste después de intentar estas soluciones, comuníquese con el servicio de atención al cliente.
9. Especificaciones
| Característica | Especificación |
|---|---|
| Marca | Overstock (HYCHIKA) |
| Número de modelo | c131a012-0da9-4306-aeab-b1d9ff5cd4b7 |
| Volumentage | 3.6 voltios |
| Fuente de poder | Funciona con pilas |
| Velocidad | 180 RPM |
| Par de artículo | 6 Newton Meters (6 N-m) |
| Tipo de batería | Iones de litio |
| Capacidad de la batería | 2000 mAh |
| Tamaño de Chuck | 1/4 de pulgada (6.35 mm) |
| Material | Plástico, caucho |
| Color | Verde |
| Código Postal | 616859793583 |
10. Garantía y soporte
Overstock offers lifetime after-sales service for this product. For any questions, concerns, or technical assistance, please contact our customer support team.
Please have your model number (c131a012-0da9-4306-aeab-b1d9ff5cd4b7) and purchase information ready when contacting support.


