1. Introducción
Gracias por la compraasing the SHARP YC-MG252AE-W Microwave Oven with Grill. This appliance combines the convenience of a 900W microwave with the versatility of a 1000W grill, offering 25 liters of capacity for various cooking needs. Featuring 11 power levels, 8 automatic programs, and a defrost function, this oven is designed for efficient and flexible food preparation. Please read this manual carefully before operating your new appliance to ensure safe and optimal use.

Figura 1: Frente view of the SHARP YC-MG252AE-W Microwave Oven with Grill.
2. Instrucciones de seguridad importantes
Al utilizar aparatos eléctricos, siempre se deben seguir precauciones básicas de seguridad para reducir el riesgo de incendio, descarga eléctrica, lesiones a personas o exposición excesiva a energía de microondas.
- No intente operar este horno con la puerta abierta ya que esto puede resultar en una exposición dañina a la energía de microondas.
- No coloque ningún objeto entre la cara frontal del horno y la puerta ni permita que se acumulen suciedad o residuos de limpiador en las superficies de sellado.
- No opere el horno si está dañado. Es particularmente importante que la puerta del horno se cierre correctamente y que no haya daños en: (1) puerta (doblada), (2) bisagras y pestillos (rotos o sueltos), (3) sellos de la puerta y superficies de sellado.
- El horno no debe ser ajustado ni reparado por nadie excepto personal de servicio debidamente calificado.
- Asegúrese de que haya una ventilación adecuada alrededor del aparato. No obstruya ninguna abertura de ventilación.
- Never use metal containers or foil in microwave mode, as this can cause arcing and damage the oven.
- Supervise siempre a los niños cuando el aparato esté en uso.
- Los líquidos y otros alimentos no deben calentarse en recipientes sellados ya que pueden explotar.
3. Contenido del paquete
Carefully unpack your new microwave oven and ensure all items are present and undamaged. If any items are missing or damaged, please contact your retailer.
- SHARP YC-MG252AE-W Microwave Oven Unit
- Plato giratorio de cristal
- Parrilla
- Manual de usuario
4. Producto terminadoview
Familiarize yourself with the main components and control panel of your microwave oven.
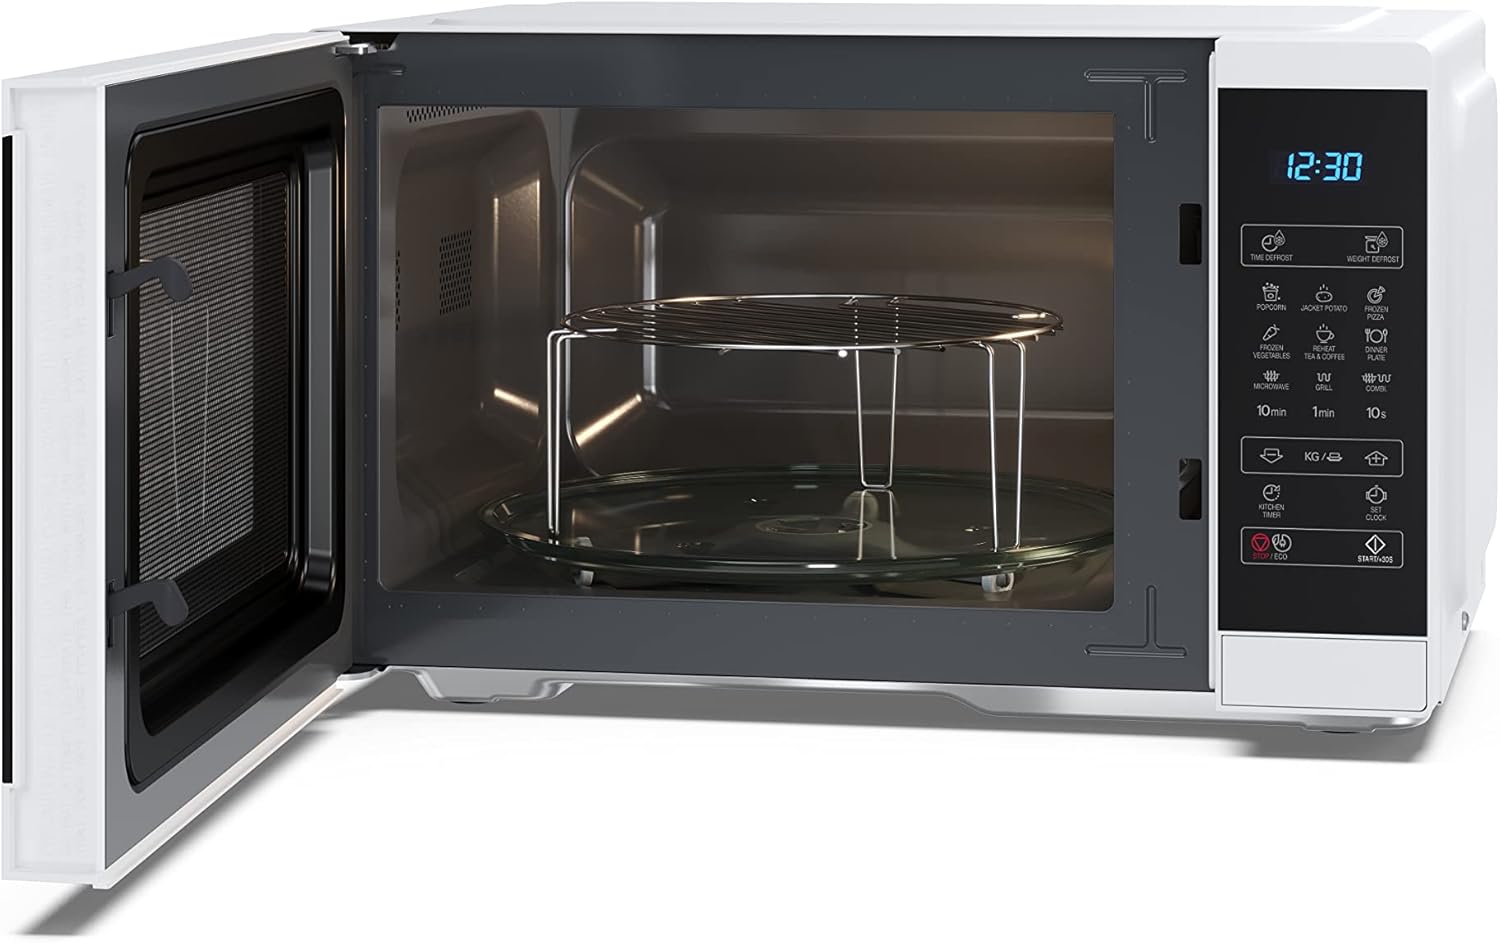
Figura 2: Interior view with turntable and grill rack.

Figura 3: Panel de control y pantalla.
Funciones del panel de control:
- Pantalla digital: Muestra el tiempo, el nivel de potencia y el estado de cocción.
- Descongelación por tiempo / Descongelación por peso: Buttons for defrosting food by time or weight.
- Popcorn / Jacket Potato / Frozen Pizza / Frozen Vegetables / Dinner Plate / Tea & Coffee: One-touch auto cooking programs.
- Microwave / Grill / Combi: Buttons to select cooking modes.
- 10min / 1min / 10s: Buttons for quick time setting.
- KG / g / ↑ / ↓: Buttons for weight input and adjusting settings.
- Kitchen Timer / Clock: Functions for setting a kitchen timer or the current time.
- Start / +30s / ECO: Start cooking, add 30 seconds, or activate ECO mode.
- Detener / Borrar: Detiene la cocción o borra las configuraciones.
5. Configuración
5.1 Desembalaje y colocación
- Retire todo el embalaje y los accesorios. Inspeccione el horno para detectar cualquier daño, como abolladuras o una puerta rota. No lo instale si está dañado.
- Place the oven on a flat, stable surface that is strong enough to hold the oven and the food you will be placing in it.
- Ensure there is adequate ventilation space: at least 20 cm of space above the oven, 10 cm at the rear, and 5 cm on both sides. Do not block the air vents.
5.2 Turntable and Grill Rack Installation
- Coloque el anillo de soporte del plato giratorio en el centro de la cavidad del horno.
- Place the glass turntable securely on the turntable support. Ensure it rotates freely.
- For grill cooking, place the metal grill rack directly on the glass turntable.
5.3 Conexión eléctrica
Plug the power cord into a standard 220V, 50Hz grounded electrical outlet. Do not use extension cords or multiple adapters.
6. Instrucciones de funcionamiento
6.1 Puesta en hora del reloj
- In standby mode, press the 'Clock' button once.
- Use the time buttons (e.g., '10min', '1min', '10s') to set the hour.
- Press 'Clock' again.
- Use the time buttons to set the minutes.
- Press 'Clock' to confirm.
6.2 Cocción en microondas
- Coloque la comida en un recipiente apto para microondas sobre el plato giratorio de vidrio. Cierre la puerta.
- Press the 'Microwave' button repeatedly to select the desired power level (e.g., P100 for 100% power, P80 for 80% power). There are 11 power levels available.
- Use the time buttons ('10min', '1min', '10s') to set the cooking time.
- Press 'Start / +30s' to begin cooking.
6.3 Cocinar a la parrilla
- Place food on the grill rack (placed on the glass turntable). Close the door.
- Presione el botón 'Grill'.
- Use the time buttons to set the grilling time.
- Press 'Start / +30s' to begin grilling.
6.4 Función de descongelación
The oven offers both time defrost and weight defrost options.
- Descongelamiento por peso: Press 'Weight Defrost'. Use the 'KG / g' buttons to input the food weight. The oven will automatically set the defrost time. Press 'Start / +30s'.
- Tiempo de descongelación: Press 'Time Defrost'. Use the time buttons to set the desired defrosting time. Press 'Start / +30s'.
6.5 Programas automáticos
The oven has 8 pre-set auto cooking programs for common foods. Refer to the labels on the control panel for specific programs like Popcorn, Jacket Potato, Frozen Pizza, etc.
- Coloque la comida en el horno.
- Press the desired auto program button (e.g., 'Popcorn').
- If applicable, use the 'KG / g' buttons to select the weight or quantity.
- Press 'Start / +30s' to begin.
6.6 Temporizador de cocina
- In standby mode, press the 'Kitchen Timer' button.
- Use the time buttons to set the desired countdown time.
- Press 'Start / +30s'. The timer will count down without cooking.
6.7 Función ECO
Press the 'ECO' button to activate the energy-saving mode. The display will dim or turn off to conserve power when the oven is not in use.
6.8 Bloqueo de seguridad para niños
Para evitar el uso no intencionado, especialmente por parte de niños:
- Para activar: In standby mode, press and hold the 'Stop / Clear' button for 3 seconds. A lock indicator will appear on the display.
- Para desactivar: Press and hold the 'Stop / Clear' button for 3 seconds again. The lock indicator will disappear.
7. Mantenimiento y limpieza
La limpieza regular ayuda a mantener el rendimiento y la longevidad de su horno microondas.
- Antes de limpiar: Desenchufe siempre el horno de la toma de corriente.
- Interior del horno: Limpie la cavidad después de cada uso con un paño húmedo.amp Paño. Para manchas difíciles, use un detergente suave. No utilice limpiadores abrasivos ni estropajos.
- Exterior del horno: Limpiar el exterior con adamp Paño y jabón suave. Evite que entre agua en las rejillas de ventilación.
- Puertas y sellos de puertas: Limpie la puerta, los sellos de la puerta y las partes adyacentes con frecuencia con adamp Paño para eliminar derrames y salpicaduras.
- Plato giratorio de vidrio y parrilla: Se pueden lavar con agua tibia y jabón o en el lavavajillas. Asegúrese de que estén completamente secos antes de volver a colocarlos en el horno.
8. Solución de problemas
Si encuentra algún problema con su horno microondas, consulte los siguientes problemas y soluciones comunes antes de contactar al servicio técnico.
| Problema | Posible causa | Solución |
|---|---|---|
| El horno no arranca | El cable de alimentación no está enchufado; la puerta no está cerrada correctamente; se ha fundido un fusible o se ha disparado el disyuntor. | Asegúrese de que el enchufe esté firmemente en el tomacorriente; cierre la puerta de forma segura; verifique el fusible del hogar o reinicie el disyuntor. |
| La comida no calienta | Tiempo de cocción/nivel de potencia incorrectos; la puerta no está cerrada correctamente. | Adjust time and power settings; Close door securely. |
| El plato giratorio no gira | Plato giratorio no colocado correctamente; Obstrucción debajo del plato giratorio. | Asegúrese de que el plato giratorio y el anillo de soporte estén colocados correctamente; elimine cualquier obstrucción. |
| Ruido inusual durante el funcionamiento. | El recipiente de alimentos toca las paredes del horno; el plato giratorio no está bien colocado. | Use a smaller container; Re-seat turntable and support ring. |
9. Especificaciones
Technical specifications for the SHARP YC-MG252AE-W Microwave Oven with Grill.
| Característica | Especificación |
|---|---|
| Marca | Afilado |
| Número de modelo | YC-MG252AE-W |
| Capacidad | 25 litros |
| Potencia de microondas | 900 vatios |
| Poder de la parrilla | 1000 vatios |
| Niveles de potencia | 11 |
| Dimensiones del producto (L x An x Al) | 47.2 x 34.5 x 28 cm (18.58 x 13.58 x 11.02 pulgadas) |
| Diámetro del plato giratorio | 31.5 cm (12.4 pulgadas) |
| Color | Blanco |
| Material | Acero inoxidable, Vidrio |
| Características especiales | Defrost, Timer, Turntable, Programmable, Child Safety, LED Lighting, ECO Function |
| Volumentage | 220 voltios |
| Peso | 12.5 kilogramos |

Figura 4: Dimensiones del producto.
10. Garantía y soporte
This SHARP YC-MG252AE-W Microwave Oven with Grill comes with a commitment to quality. Parts availability is guaranteed for 5 years from the date of purchase.
For technical assistance, warranty claims, or to inquire about spare parts, please contact your retailer or the official Sharp customer support in your region. Always have your model number (YC-MG252AE-W) and proof of purchase ready when contacting support.


