1. Introducción
Thank you for choosing the SEAFLO Portable Toilet. This manual provides essential information for the safe and efficient use, maintenance, and troubleshooting of your portable toilet. Please read these instructions carefully before initial use and retain them for future reference. This portable toilet is designed for use in RVs, boats, camping, and other outdoor activities, offering a convenient and hygienic sanitation solution.
2. Producto terminadoview y componentes
The SEAFLO Portable Toilet is a self-contained unit consisting of two main parts: an upper freshwater tank and a lower waste holding tank. Key features include a manual flushing pump, a waste level indicator, an air release button, and a sealing slide valve to prevent odors.

Figura 2.1: Explotó view showing the upper freshwater tank and lower sewage tank with labeled components.
Componentes clave:
- Freshwater Tank: Located at the top, holds water for flushing.
- Manual Flushing Pump: Used to flush water into the bowl.
- Inodoro: The main receptacle.
- Sealing Slide Valve: Separates the bowl from the waste tank, preventing odors.
- Waste Holding Tank: The lower tank for waste collection.
- Waste Level Indicator: Provides a visual indication of the waste tank's fill level.
- Air Release Button: Reduces pressure in the waste tank during emptying to prevent splashing.
- Rotating Emptying Spout: For hygienic and controlled waste disposal.
- Lock Buckles: Securely attach the upper and lower tanks.
3. Configuración
- Tanques separados: Disengage the side lock buckles to separate the upper freshwater tank from the lower waste holding tank.
- Llene el tanque de agua dulce: Unscrew the cap of the freshwater tank and fill it with clean water. You may add a small amount of a non-toxic, biodegradable toilet chemical designed for portable toilets to the freshwater tank to aid in flushing and odor control. Do not overfill. Securely replace the cap.
- Agregar químico al tanque de desechos (opcional): Open the sealing slide valve on the waste tank. Add the recommended amount of a waste tank chemical (e.g., deodorizer/digester) directly into the waste tank, followed by approximately 1 liter (0.26 gallons) of water. Close the slide valve.
- Volver a montar: Align the upper tank with the lower tank and engage the side lock buckles until they click securely into place. Ensure the tanks are firmly connected.
- Colocación: Place the assembled portable toilet on a flat, stable surface.
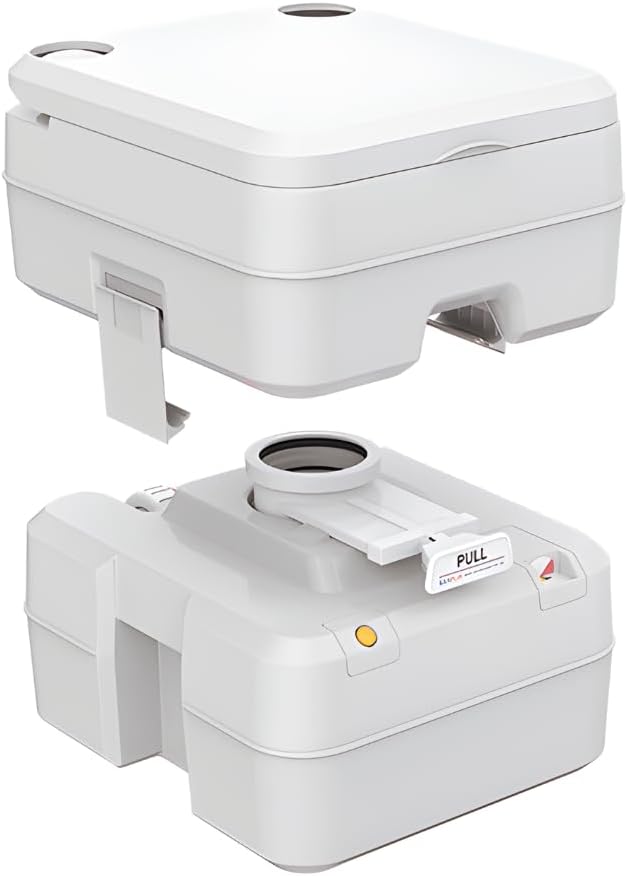
Figura 3.1: The portable toilet with its upper and lower sections separated for filling.
4. Instrucciones de funcionamiento
- Antes de usar: Ensure the sealing slide valve is closed.
- Válvula corrediza abierta: Pull the sealing slide valve handle fully out to open the passage to the waste tank.
- Enrojecimiento: After use, press the manual flushing pump button repeatedly until the bowl is clean. The T-type flush nozzle provides a 360° vortex scouring action for thorough cleaning.
- Cerrar válvula corrediza: Push the sealing slide valve handle fully in to close the passage and prevent odors from escaping.

Figura 4.1: Portable toilet with the waste tank slide valve handle in the open position.

Figura 4.2: Illustration of the T-type flush nozzle's 360° vortex scouring and the ergonomic toilet seat design.
5. Mantenimiento
5.1. Emptying the Waste Tank
- Comprobar nivel: Monitor the waste level indicator. When it shows full, it's time to empty the tank.
- Tanques separados: Ensure the sealing slide valve is closed. Disengage the side lock buckles and separate the upper tank from the lower waste tank.
- Transporte: Carry the waste tank to an approved disposal site (e.g., RV dump station, public toilet).
- Press Air Release Button: Before emptying, press and hold the air release button to equalize pressure inside the tank. This prevents splashing and ensures a smooth flow.
- Tanque vacio: Unscrew the cap from the rotating emptying spout. Position the spout over the disposal site and tilt the tank to empty its contents. The 180° rotating spout allows for hygienic emptying.
- Enjuague: After emptying, rinse the waste tank thoroughly with water. You may add a small amount of clean water and shake the tank to clean the interior. Dispose of the rinse water properly.
- Cerrar el pico: Securely replace the cap on the emptying spout.

Figura 5.1: Waste level indicator and air release button for safe emptying.

Figura 5.2: The 180° rotating emptying spout for controlled waste disposal.
5.2. Limpieza
- Regularly clean the toilet bowl and seat with a mild, non-abrasive cleaner and a soft cloth or sponge.
- Avoid using harsh chemicals or abrasive brushes, as these can damage the plastic surfaces and seals.
- Periodically inspect the sealing slide valve and its rubber seal for any debris or wear. Clean the seal and apply a silicone-based lubricant if necessary to maintain a good seal and smooth operation.
6. Solución de problemas
| Problema | Posible causa | Solución |
|---|---|---|
| Fuga de olores | Slide valve not fully closed; damaged seal; waste tank too full. | Ensure slide valve is fully closed. Inspect and clean the rubber seal; apply silicone lubricant. Empty waste tank. |
| Difficulty flushing | Low water level in freshwater tank; flushing pump clogged. | Refill freshwater tank. Check flushing pump for obstructions. |
| Waste tank difficult to separate | Lock buckles not fully disengaged; debris between tanks. | Ensure both lock buckles are fully released. Check for and remove any debris. |
| Splashing during emptying | Air release button not pressed. | Always press and hold the air release button before and during emptying. |
7. Especificaciones

Figura 7.1: Dimensiones del producto.
| Característica | Detalle |
|---|---|
| Número de modelo | SFPT-20-02 |
| Capacidad del tanque de residuos | 5.3 galones (20 litros) |
| Capacidad del tanque de agua dulce | 3.43 galones (13 litros) |
| Material | High-Density Polypropylene (ABS, Plastic) |
| Color | Blanco |
| Peso del artículo | 9.7 libras (4.4 kg) |
| Dimensiones del producto (L x An x Al) | 15.39 x 13.9 x 15.39 pulgadas (39.1 x 35.3 x 39.1 cm) |
| Tipo de instalación | Montado en el piso |
| Componentes incluidos | 2 separate tanks |
8. Garantía y soporte
SEAFLO products are manufactured to high-quality standards. For specific warranty information or technical support, please refer to the warranty card included with your purchase or visit the official SEAFLO webSitio. Conserve su recibo de compra como comprobante de compra para cualquier reclamación de garantía.


