1. Introducción
Thank you for choosing the WORKPRO 1500W Rotary Hammer Drill. This heavy-duty tool is designed for demanding tasks such as drilling in concrete, wood, and steel, as well as chiseling applications. This manual provides essential information for the safe and efficient operation, maintenance, and troubleshooting of your rotary hammer drill. Please read it thoroughly before first use and keep it for future reference.

Image 1.1: WORKPRO 1500W Rotary Hammer Drill and included accessories.
2. Instrucciones generales de seguridad
Observe siempre las precauciones básicas de seguridad para reducir el riesgo de incendio, descarga eléctrica y lesiones personales. El incumplimiento de estas instrucciones puede provocar lesiones graves.
- Seguridad en el área de trabajo: Mantenga el área de trabajo limpia y bien iluminada. Las áreas desordenadas u oscuras pueden provocar accidentes. No opere herramientas eléctricas en atmósferas explosivas, como en presencia de líquidos, gases o polvo inflamables.
- Seguridad eléctrica: Los enchufes de las herramientas eléctricas deben ser compatibles con la toma de corriente. Nunca modifique el enchufe de ninguna manera. Evite el contacto del cuerpo con superficies conectadas a tierra. No exponga las herramientas eléctricas a la lluvia ni a la humedad.
- Seguridad personal: Always wear eye protection. Use hearing protection when operating the tool for extended periods. Wear a dust mask if drilling in dusty conditions. Dress properly; avoid loose clothing or jewelry.
- Uso y cuidado de herramientas: No fuerce la herramienta eléctrica. Utilice la herramienta eléctrica correcta para su aplicación. Desconecte el enchufe de la fuente de alimentación antes de realizar cualquier ajuste, cambiar accesorios o guardar la herramienta eléctrica.
- Mantenimiento: Mantenga las herramientas eléctricas. Compruebe si hay desalineación o atascamiento de las piezas móviles, rotura de piezas y cualquier otra condición que pueda afectar el funcionamiento de la herramienta eléctrica.
3. Product Components and Included Items
Familiarize yourself with the parts of your WORKPRO Rotary Hammer Drill and the accessories provided.

Image 3.1: Key components of the rotary hammer drill, including SDS-PLUS Chuck, Four Functions Switch, Grease Pot, Shock Absorber, On/Off Switch, Cushioned Handle, Variable Speed Control, 360° Rotatable Handle, and Heat Outlet.
Accesorios incluidos:

Image 3.2: The complete set of accessories includes a carrying case, rotary hammer drill, SDS-plus point flat bit (250mm), SDS-plus point chisel bit (250mm), wrench, grease, SDS-plus drill bits (8mm, 10mm, 12mm), and a dust collector.
- 1 x Heavy-duty Rotary Hammer Drill
- 3 x SDS-plus Drill Bits (8 mm, 10 mm, 12 mm)
- 1 x Round Shank Chisel (Φ14 × 250 mm)
- 1 x Flat Chisel (Φ14 × 250 mm)
- 1 x Grease container
- 1 x Carbon Brush set
- 1 x cubierta antipolvo
- 1 x llave
- 1 x Estuche de transporte
4. Configuración y montaje
4.1 Colocación del mango auxiliar
The 360° rotatable handle provides better control and comfort. Loosen the handle clamp, coloque el mango en el ángulo deseado y apriete el clamp de forma segura.
4.2 Inserting and Removing SDS-plus Bits
The SDS-plus chuck allows for quick and secure bit changes.
- Insertando: Clean the bit shank. Pull back the chuck collar, insert the bit into the chuck until it clicks into place. Release the collar. Pull on the bit to ensure it is securely locked.
- Eliminando: Pull back the chuck collar and pull the bit out.

Image 4.1: Illustration of the auto-lock SDS-plus chuck for secure bit clampEn.
4.3 Attaching the Dust Collector
For cleaner operation and to protect the user, attach the dust collector to the front of the tool when drilling.

Image 4.2: The anti-dust cover protects users and the machine from dust and debris.
5. Instrucciones de funcionamiento
The WORKPRO Rotary Hammer Drill features four operating modes and variable speed control for versatile applications.
Selección de 5.1 modos
Use the four-function switch located on the side of the tool to select the desired operating mode:
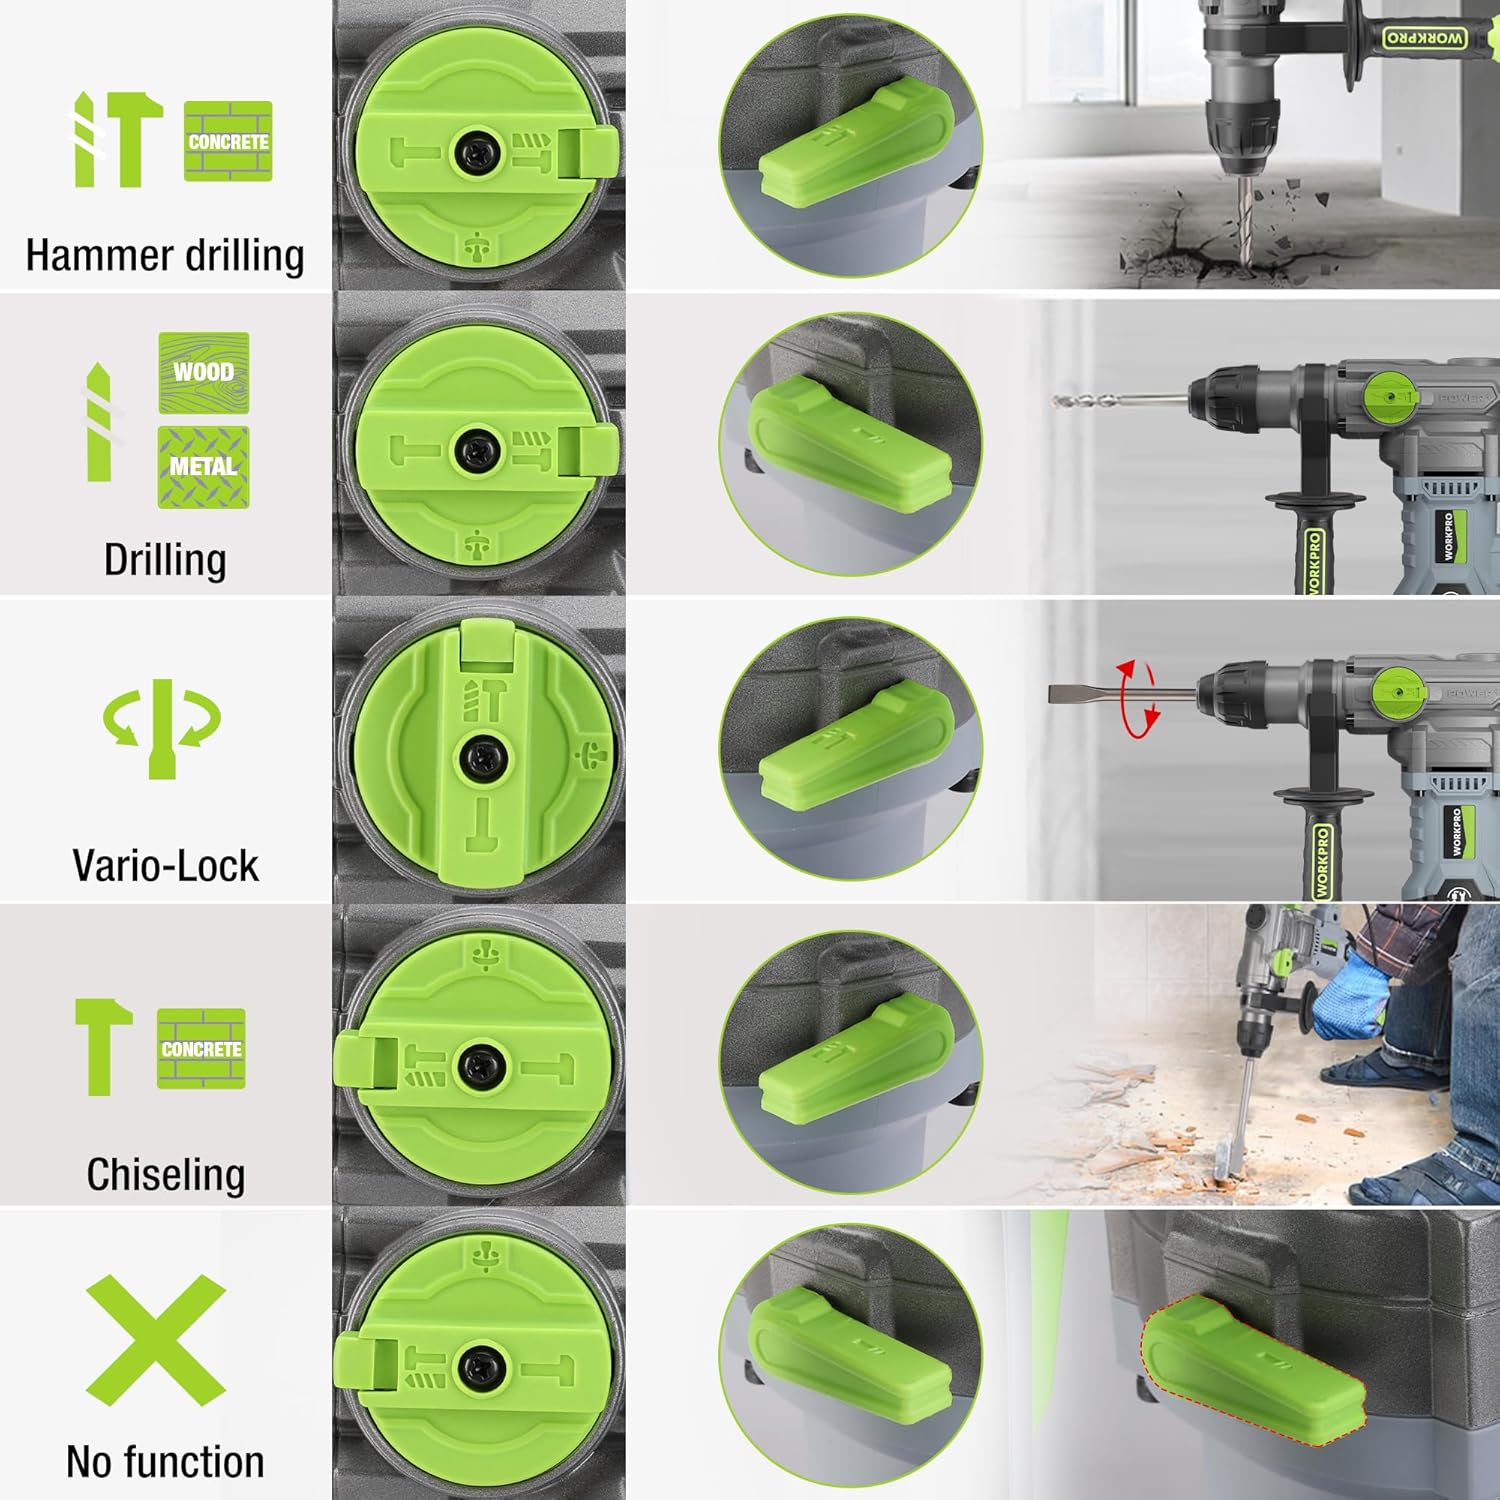
Image 5.1: The four-function switch allows selection between Hammer Drilling, Drilling, Vario-Lock (Chisel Adjust), and Chiseling modes.
- Perforación con martillo: For drilling in concrete and masonry with impact.
- Perforación: Para taladrar en madera, metal y plástico sin impacto.
- Cincelado (solo con martillo): For light chiseling work in concrete and masonry.
- Vario-Lock (Chisel Adjust): Allows you to rotate and lock the chisel in various positions to optimize the working angle.

Image 5.2: Visual representation of the hammer drilling, drilling, hammer, and chisel adjust modes.
5.2 Control de velocidad variable
The variable speed control allows you to adjust the rotation speed (0-930 RPM) and impact frequency (0-4300 BPM) to match the material and application.
- Rotate the speed adjustment dial to increase or decrease the speed.
- Start with a lower speed for precise drilling and increase as needed.
5.3 Drilling Capacities
The tool offers excellent drilling performance across various materials:
- Concreto: Hasta 32 mm
- Madera: Hasta 42 mm
- Acero: Hasta 13 mm

Image 5.3: The 1500W motor provides sufficient power for drilling in steel, wood, and concrete.
5.4 Aplicación ExampLos

Image 5.4: The tool is suitable for various tasks including chiseling concrete, removing tiles, concrete drilling, and floor breaking.
6. Mantenimiento
El mantenimiento regular garantiza la longevidad y el rendimiento óptimo de su herramienta.
6.1 Limpieza
- Desconecte siempre la herramienta de la fuente de alimentación antes de limpiarla.
- Clean the ventilation slots regularly to prevent overheating.
- Limpie la carcasa de la herramienta con un paño suave.amp paño. No utilice productos químicos agresivos ni limpiadores abrasivos.
- The tool features a dust-proof design and anti-dust bottom structure to extend its service life.
6.2 Grease Replenishment
To maintain optimal performance and durability, replenish the grease every 30-40 hours of cumulative use.
- Use the provided wrench to open the grease pot.
- Apply the advanced lubricant (grease) as instructed.
- Securely close the grease pot after replenishment.
Image 6.1: Instructions for grease replenishment using the provided spanner and grease.
6.3 Reemplazo de escobillas de carbón
Carbon brushes are wear parts and should be checked periodically. Replace them when they are worn down to their limit to ensure consistent motor performance.
7. Solución de problemas
Esta sección aborda problemas comunes que podrías encontrar. Si tienes problemas que no aparecen aquí, contacta con atención al cliente.
| Problema | Posible causa | Solución |
|---|---|---|
| La herramienta no arranca | Sin suministro de energía; Interruptor defectuoso; Escobillas de carbón desgastadas | Check power connection; Test switch; Replace carbon brushes |
| Rendimiento de perforación reducido | Dull drill bit; Incorrect mode selected; Insufficient grease | Replace or sharpen drill bit; Select correct mode; Replenish grease |
| Vibración / ruido excesivo | Loose components; Damaged bit; Internal issue | Check all connections; Replace bit; Contact service center |
| Calentamiento excesivo | Ranuras de ventilación bloqueadas; uso intensivo prolongado | Limpie las ranuras de ventilación; deje que la herramienta se enfríe |
8. Especificaciones técnicas
| Característica | Especificación |
|---|---|
| Número de modelo | W125244A |
| Vol de entradatage | 230-240 V |
| Frecuencia | 50 Hz |
| Potencia de entrada nominal | 1500 W |
| Velocidad sin carga | 0-930 rpm ±10% |
| Frecuencia de impacto | 0-4300 bpm ±10% |
| Fuerza de impacto único | 5.5 J |
| Capacidad de perforación (hormigón) | 32 milímetros |
| Capacidad de perforación (madera) | 42 milímetros |
| Capacidad de perforación (acero) | 13 milímetros |
| Tipo de mandril | SDS-plus |
| Dimensiones del producto (L x An x Al) | 38.6 x 10.4 x 26.4 cm |
| Peso | 8.34 kilogramos |
| Fuente de poder | Eléctrico con cable |
| Número de marchas | 6 (velocidad variable) |
9. Información de garantía y soporte
For warranty details, product support, or service inquiries, please refer to the warranty card included with your purchase or contact WORKPRO customer service directly. Keep your proof of purchase for any warranty claims.


