1. Introducción
Thank you for choosing the ARROWMAX SES PRO Electric Precision Screwdriver. This cordless tool is designed for precision tasks, featuring smart motion control and a comprehensive set of 34 magnetic bits. It is ideal for electronics, laptops, glasses, and other delicate applications. This manual provides essential information for safe operation, setup, maintenance, and troubleshooting to ensure optimal performance and longevity of your device.
2. Información de seguridad
Lea atentamente todas las advertencias e instrucciones de seguridad antes de usar este producto. El incumplimiento de estas instrucciones podría provocar descargas eléctricas, incendios o lesiones graves.
- Mantenga el área de trabajo limpia y bien iluminada. Las áreas desordenadas u oscuras son una invitación a los accidentes.
- No utilice herramientas eléctricas en atmósferas explosivas, como en presencia de líquidos, gases o polvos inflamables. Las herramientas eléctricas generan chispas que pueden encender el polvo o los vapores.
- Mantenga a los niños y a las personas que estén cerca de usted alejados mientras utiliza una herramienta eléctrica. Las distracciones pueden hacer que pierda el control.
- Evite el arranque accidental. Asegúrese de que el interruptor esté en la posición de apagado antes de conectar la batería, levantar o transportar la herramienta.
- No se estire demasiado. Mantenga el equilibrio y la posición adecuada en todo momento. Esto permite un mejor control de la herramienta eléctrica en situaciones inesperadas.
- Vístase adecuadamente. No use ropa suelta ni joyas. Mantenga el cabello y la ropa alejados de las piezas móviles. La ropa suelta, las joyas o el cabello largo pueden quedar atrapados en las piezas móviles.
- Utilice equipo de protección personal. Utilice siempre protección para los ojos. El uso de equipo de protección, como mascarilla antipolvo, calzado de seguridad antideslizante, casco de seguridad o protección auditiva en las condiciones adecuadas, reducirá las lesiones personales.
- Guarde las herramientas eléctricas que no utilice fuera del alcance de los niños y no permita que personas que no estén familiarizadas con ellas o con estas instrucciones las utilicen.
- Realice el mantenimiento de las herramientas eléctricas. Compruebe que las piezas móviles no estén desalineadas ni atascadas, que no haya piezas rotas ni ninguna otra condición que pueda afectar al funcionamiento de la herramienta eléctrica. Si está dañada, haga que la reparen antes de usarla.
- Utilice la herramienta eléctrica, los accesorios, las herramientas, etc. de acuerdo con estas instrucciones, teniendo en cuenta las condiciones de trabajo y el trabajo a realizar. El uso de la herramienta eléctrica para operaciones distintas a las previstas puede dar lugar a una situación peligrosa.
- Recargue únicamente con el cargador especificado por el fabricante. Un cargador adecuado para un tipo de batería puede generar riesgo de incendio si se utiliza con otro tipo de batería.
- No use la herramienta si el interruptor no la enciende y apaga. Cualquier herramienta eléctrica que no se pueda controlar con el interruptor es peligrosa y debe repararse.
- Desconecte el paquete de baterías de la herramienta eléctrica antes de realizar ajustes, cambiar accesorios o almacenar herramientas eléctricas. Estas medidas de seguridad preventivas reducen el riesgo de poner en marcha accidentalmente la herramienta eléctrica.
3. Contenido del paquete
The ARROWMAX SES PRO Electric Precision Screwdriver package typically includes the following items:
- 1 x ARROWMAX SES PRO Electric Precision Screwdriver
- 1 x Magnetic Storage Case
- 34 x Magnetic Precision Bits (S2 Steel, 4mm)
- 1 x cable de carga USB-A a USB-C

Image: The ARROWMAX SES PRO Electric Precision Screwdriver, its magnetic bit case, and the included 34 precision bits.
4. Producto terminadoview y componentes
Familiarize yourself with the main components of your ARROWMAX SES PRO screwdriver:

Image: Labeled diagram of the ARROWMAX SES PRO screwdriver's key components.
- Puerto de carga tipo C: Located at the top for recharging the internal battery.
- Pantalla de estado LED: An OLED screen showing battery level, torque setting, and operational status.
- Botón de encendido: Used to turn the device on/off and adjust torque settings.
- Cuerpo de aleación de aluminio: Construcción duradera y ligera.
- Luces LED: Ilumina el área de trabajo para una mejor visibilidad.
- Bit Installation Port: Where precision bits are inserted.
5. Configuración
5.1 Carga del destornillador
- Locate the USB-C charging port at the top of the screwdriver.
- Connect the provided USB-A to USB-C charging cable to the screwdriver and a compatible USB-A power adapter (not included).
- The LED Status Display will indicate the charging progress. A full charge allows for tightening approximately 900 screws.
- Nota importante: This electric screwdriver only supports USB-A to USB-C charging and is not compatible with USB-C PD (Power Delivery) chargers.

Imagen: Más alláview of charging port, battery, torque adjustment, and OLED display.
5.2 Installing Precision Bits
- Select the appropriate precision bit from the magnetic storage case. The case features a pop-up design for easy access.
- Insert the bit firmly into the Bit Installation Port at the tip of the screwdriver. The magnetic holder will secure the bit in place.
- Para quitar una pieza, simplemente sáquela.
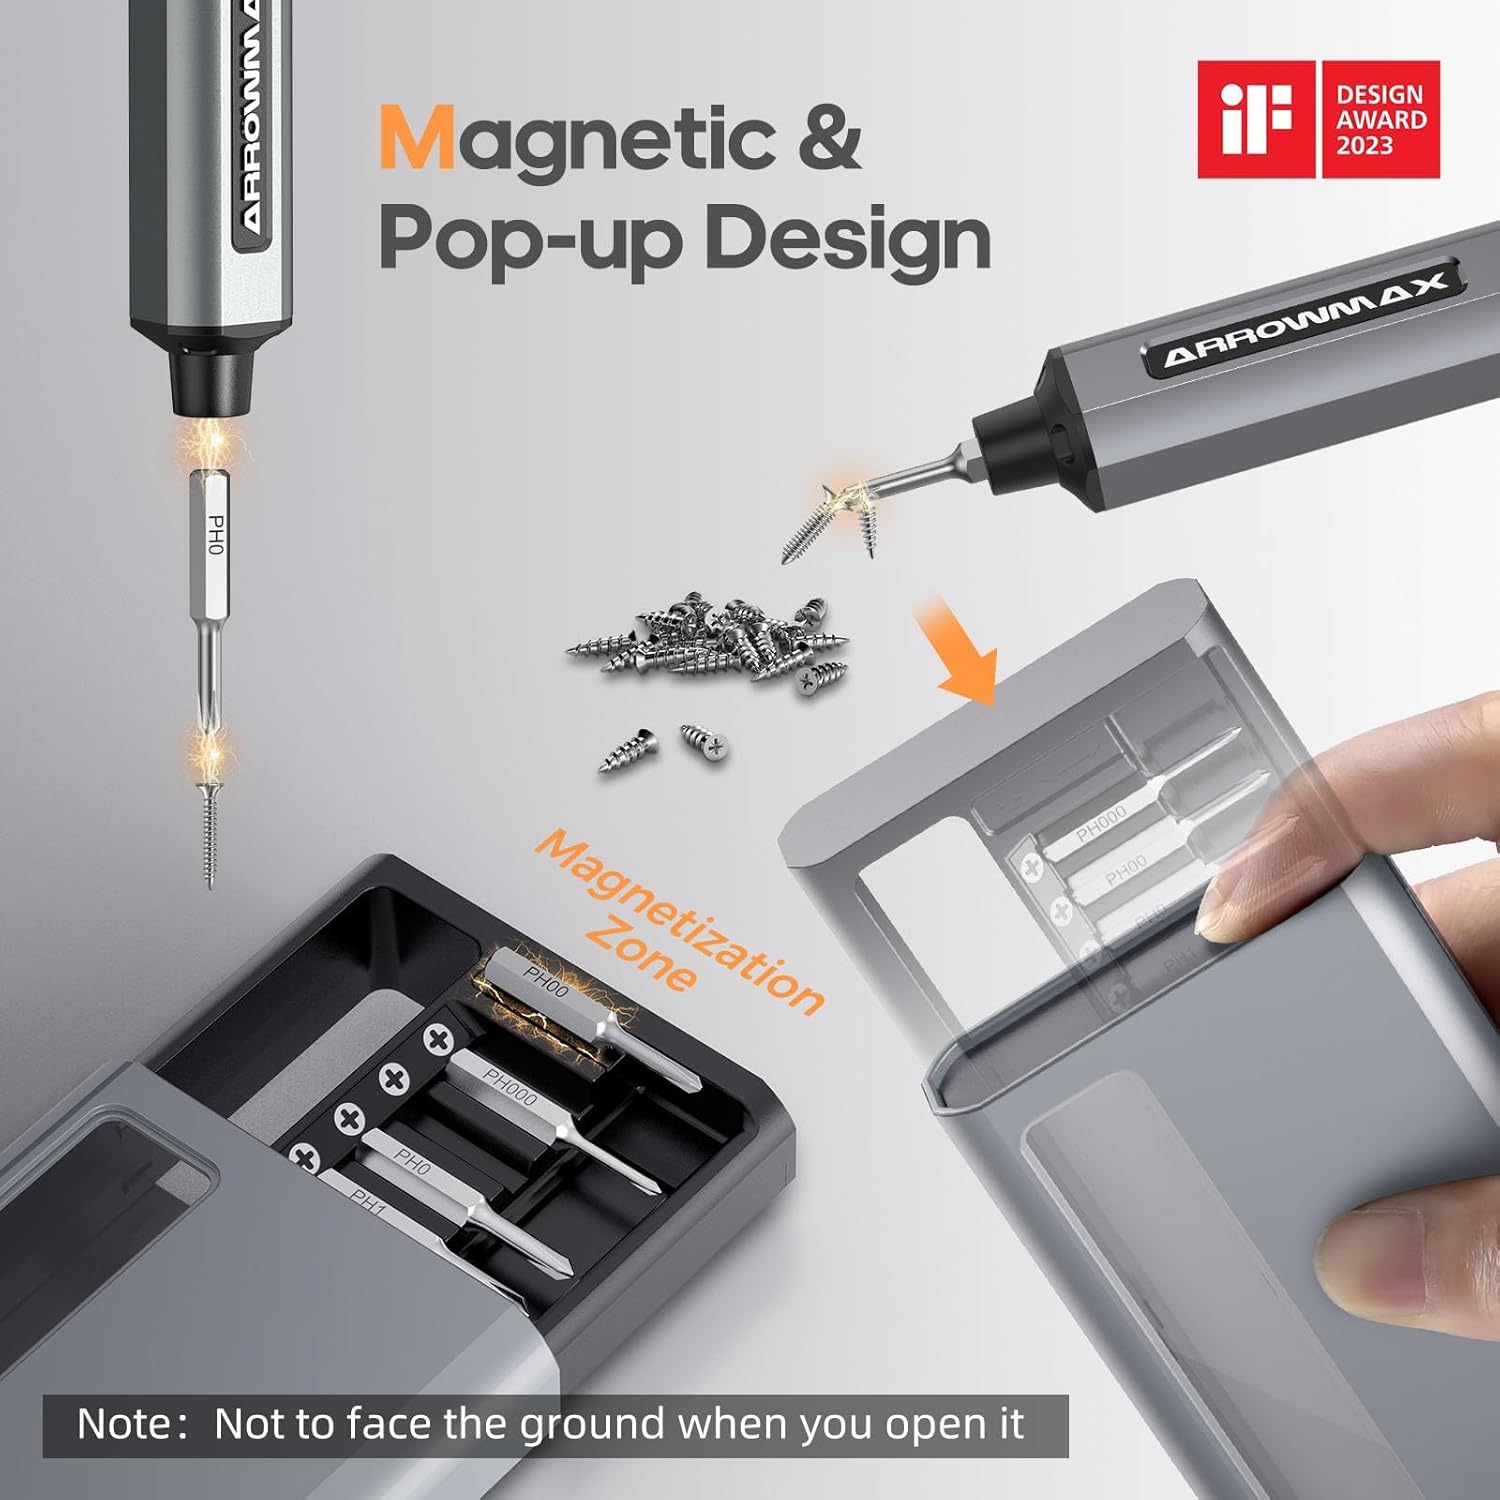
Image: Magnetic pop-up bit case design and bit magnetization zone.
6. Instrucciones de funcionamiento
6.1 Encendido / Apagado
Press and hold the Power Button for a few seconds to turn the screwdriver on or off. The OLED screen will illuminate upon activation.
6.2 Ajuste de la configuración de torque
The SES PRO offers 5 adjustable torque levels, including an auto-sensing mode, to suit various tasks. The electric torque ranges from 0.049 N.m to 0.30-0.35 N.m, with a manual torque of 3 N.m.
- With the screwdriver powered on, press the Power Button three times continuously to cycle through the torque settings.
- The OLED screen will display the current torque level (e.g., 1, 2, 3, 4, A for Auto-Sensing).
- Select a lower torque for delicate items like glasses or small electronics, and higher torque for more robust applications.
- For screws that are too tight for the electric motor, the screwdriver can be used in manual mode by applying direct force.
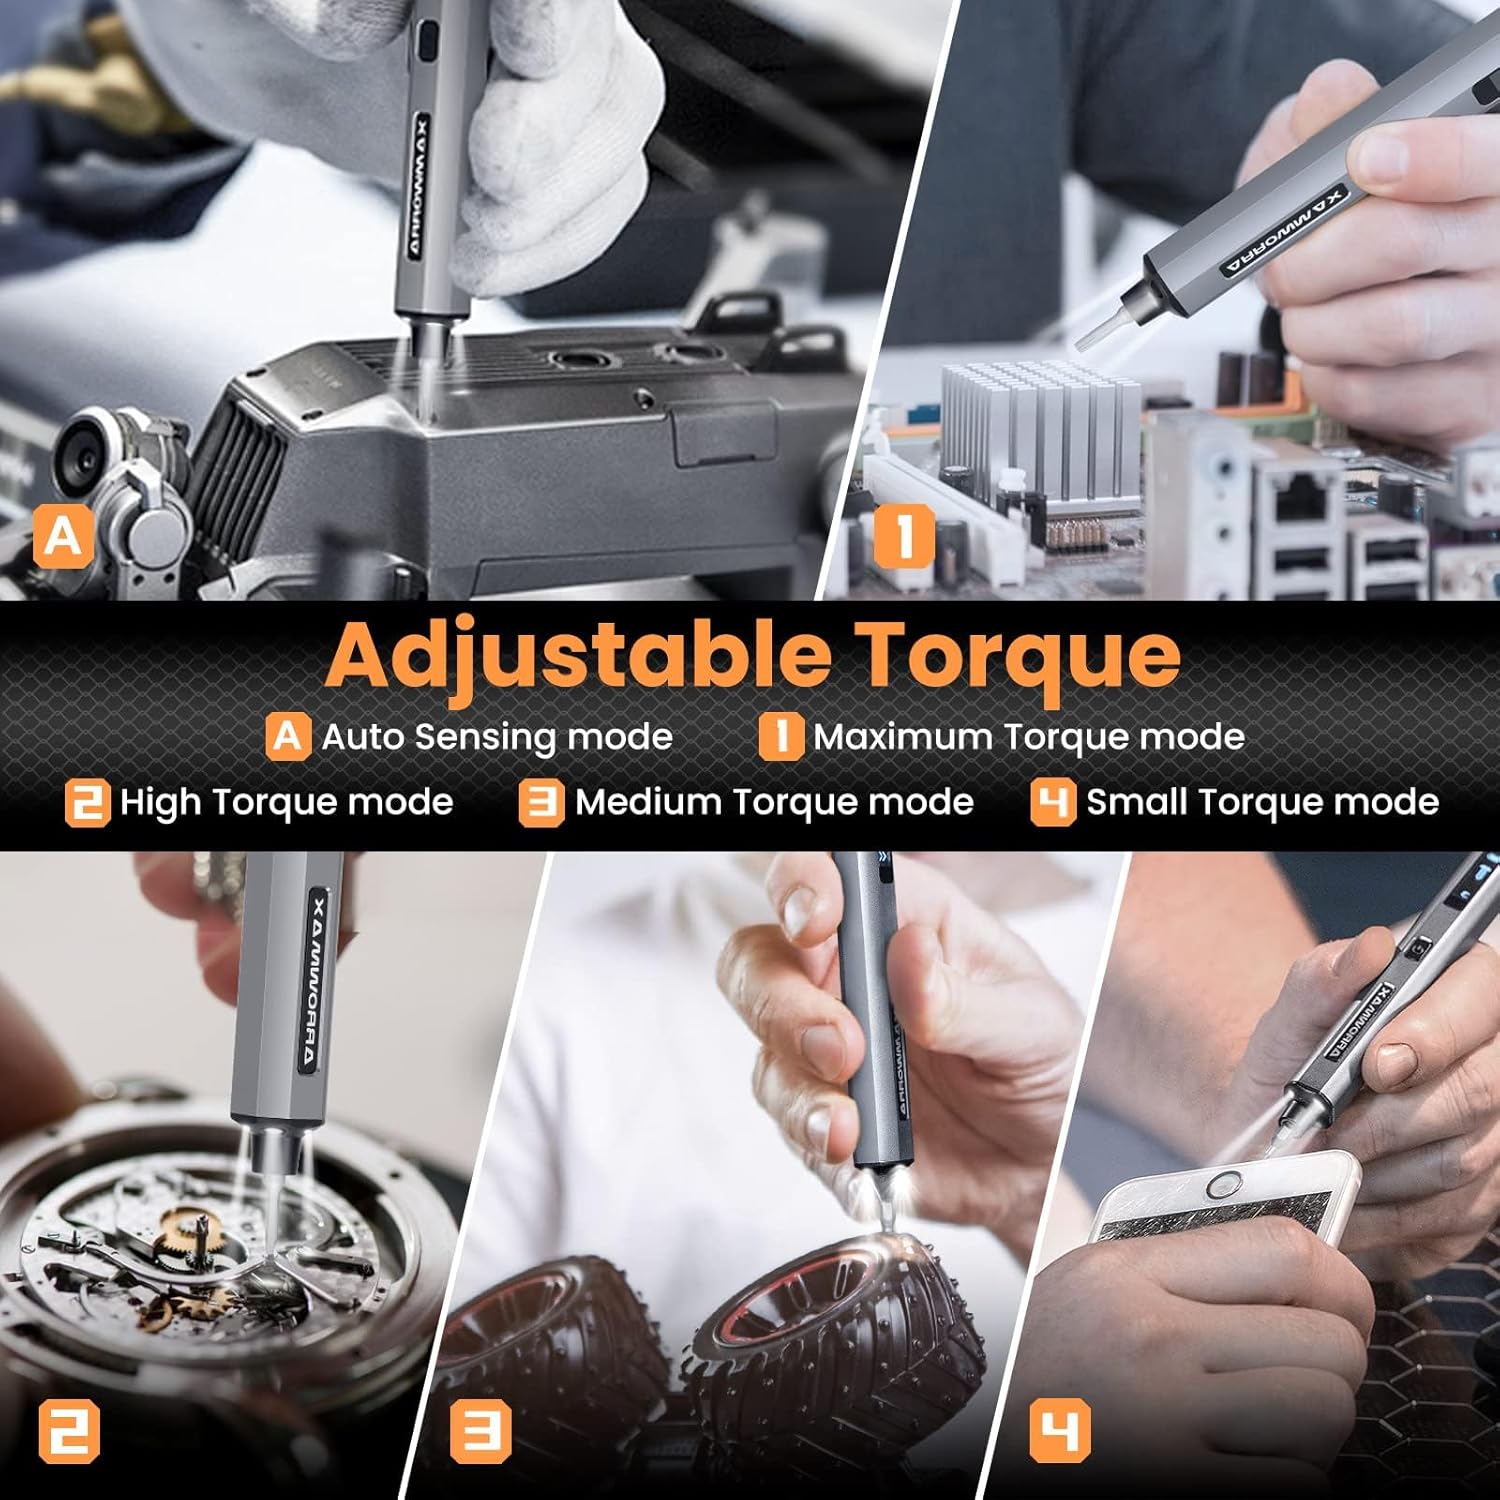
Image: Adjustable torque settings for various applications.
6.3 Body Sensory Dual-Mode (Forward/Reverse)
The SES PRO features a body sensory dual-mode for intuitive control of rotation direction.
- To drive a screw in (tighten), gently rotate your wrist in a clockwise direction while holding the screwdriver.
- To remove a screw (loosen), gently rotate your wrist in a counter-clockwise direction.
- The screwdriver's internal gyroscope detects your wrist movement and activates the motor accordingly.
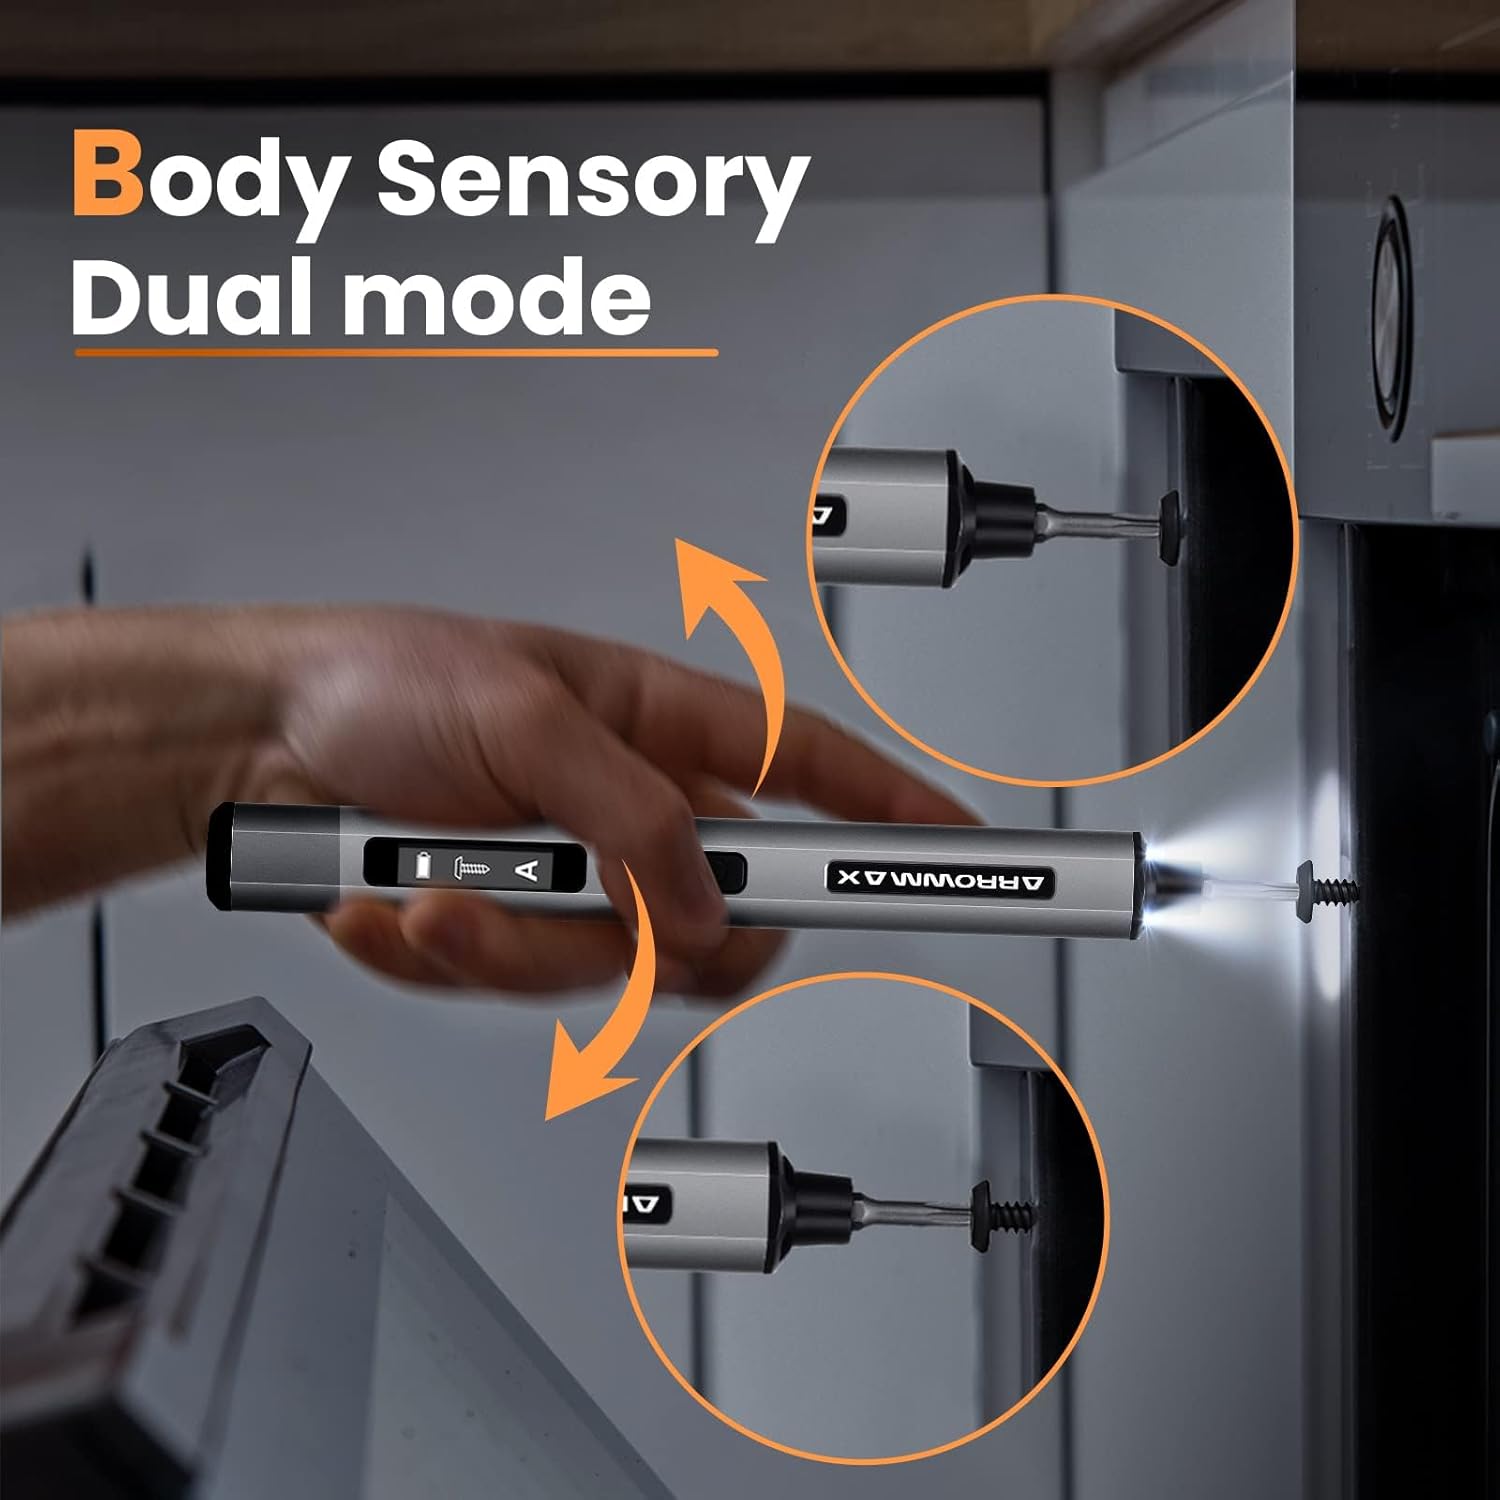
Image: Body sensory dual-mode in action for forward and reverse operation.
6.4 Luces de trabajo LED
The integrated LED lights at the tip of the screwdriver automatically illuminate when the motor is active, providing clear visibility of your work area.
7. Mantenimiento
7.1 Limpieza
- Limpie el cuerpo del destornillador con un paño suave y seco. No utilice limpiadores abrasivos ni disolventes.
- Ensure the bit installation port is free of debris.
7.2 Cuidado de la batería
- Para prolongar la vida útil de la batería, evite descargarla por completo con frecuencia.
- Guarde el destornillador en un lugar fresco y seco cuando no esté en uso.
- Recargue la batería periódicamente si la almacenará durante períodos prolongados para evitar una descarga profunda.

Image: The SES PRO's long-lasting battery capacity.
7.3 Cuidado de bits
- Keep the precision bits clean and free of rust.
- Store bits securely in the magnetic case to prevent loss and damage.
8. Solución de problemas
If you encounter issues with your ARROWMAX SES PRO screwdriver, refer to the following common problems and solutions:
| Problema | Posible causa | Solución |
|---|---|---|
| Screwdriver does not turn on or respond. | Batería baja; el dispositivo está apagado. | Charge the screwdriver using the provided USB-A to USB-C cable. Ensure the power button is pressed to turn it on. |
| El destornillador no se carga. | Incorrect charger type; faulty cable/adapter. | Ensure you are using a USB-A to USB-C cable and a standard USB-A power adapter. USB-C PD chargers are not supported. Try a different cable or adapter. |
| Motor lacks power or cannot loosen/tighten screws. | Low battery; incorrect torque setting; screw is too tight for electric mode. | Charge the screwdriver. Increase the torque setting. For very tight screws, manually loosen or tighten them first, then use the electric mode. |
| Directional control (forward/reverse) is inconsistent. | Improper wrist movement; gyroscope calibration issue. | Ensure clear and deliberate wrist movements. If issues persist, try restarting the device. |
| Bits fall out or are not held securely. | Bit installation port is dirty; bit is not fully inserted. | Clean the bit installation port. Ensure the bit is pushed in firmly until it clicks or feels secure. |
9. Especificaciones
Key technical specifications for the ARROWMAX SES PRO Electric Precision Screwdriver:
| Característica | Especificación |
|---|---|
| Marca | FLECHAMAX |
| Modelo | SES PRO (AM-199913-G) |
| Velocidad | 200 RPM |
| Fuente de poder | Funciona con pilas |
| Volumentage | 3.7 voltios (CC) |
| Par eléctrico | 0.049 N.m - 0.30-0.35 N.m (Adjustable) |
| Par manual | 3 Nm |
| Tipo de batería | Iones de litio (500 mAh) |
| Puerto de carga | USB-C (USB-A to USB-C charging only) |
| Peso del artículo | 13.7 onzas |
| Dimensiones del paquete | 7.48 x 3.43 x 1.73 pulgadas |
| Características especiales | OLED Screen, Smart Motion Control, Ergonomic Design, LED Lights |
10. Garantía y soporte
The manufacturer's warranty information for this product is not explicitly provided in the available data. For details regarding warranty coverage, duration, and terms, please refer to the documentation included with your purchase or contact the retailer where the product was acquired.
For technical support, product inquiries, or assistance with troubleshooting that is not covered in this manual, please visit the official ARROWMAX website or contact their customer service department. Contact information can typically be found on the product packaging or the manufacturer's official online channels.


