Introducción
This manual provides essential information for the proper setup, operation, and maintenance of your AODSK AD-X1 Digital Piano and ALP-22 Adjustable Piano Bench. Please read these instructions carefully before use to ensure optimal performance and longevity of your instruments.

Figure 1: Assembled AODSK AD-X1 Digital Piano and ALP-22 Adjustable Piano Bench.
Configuración y montaje
Carefully unpack all components and ensure all parts are present before beginning assembly. Refer to the included hardware package for specific fasteners.
1. Digital Piano Assembly (AD-X1)
- Attach the four legs to the underside of the digital piano body using the provided screws. Ensure they are securely fastened.
- Inserte el atril en la ranura designada en el panel superior del piano digital.
- Connect the sustain pedal or triple pedal unit to the appropriate port on the rear panel of the piano.

Figure 2: Digital Piano dimensions. Length: 53.15 inches, Depth: 12.2 inches, Height: 24.8 inches (without music rest).
2. Piano Bench Assembly (ALP-22)
- Attach the four legs to the base of the piano bench using the provided hardware.
- Ensure the height adjustment mechanism is properly aligned and functional.
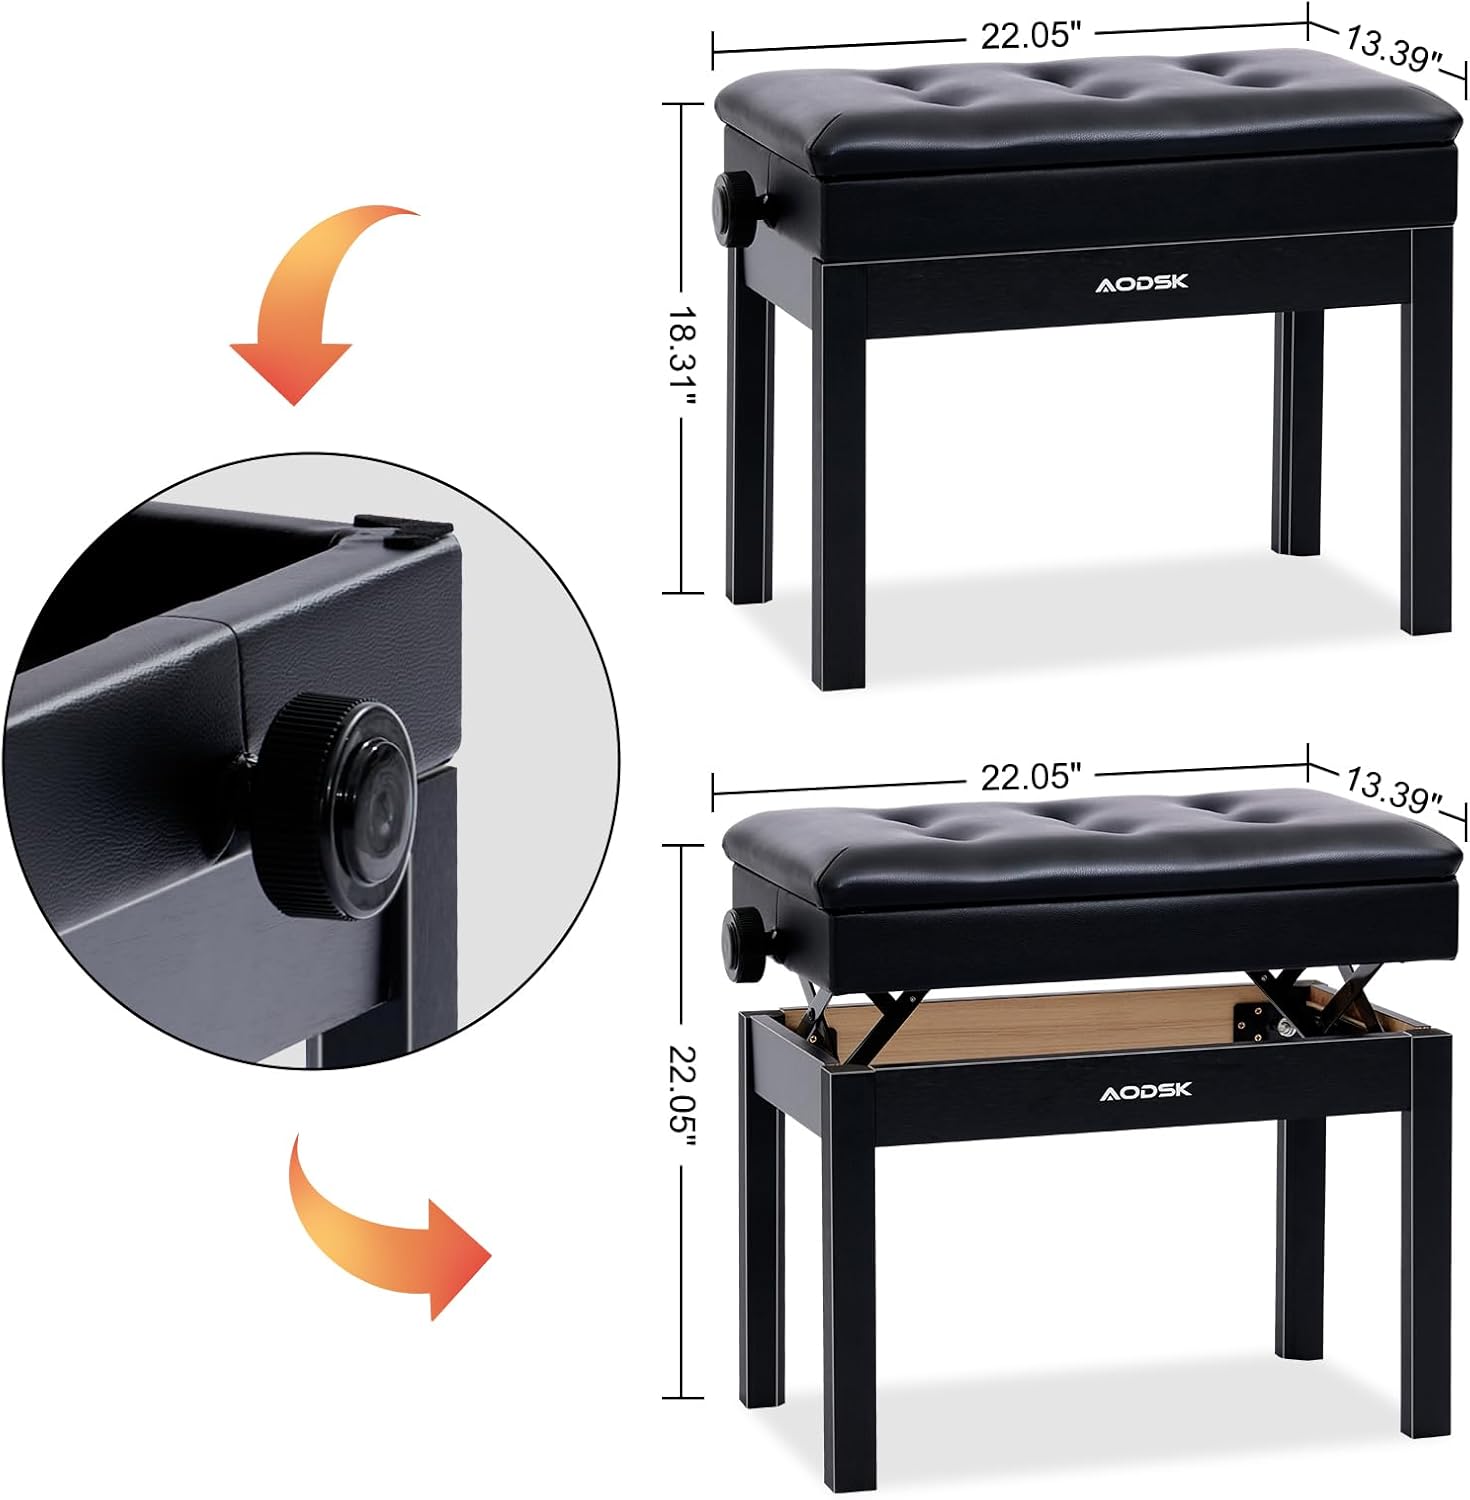
Figure 3: Piano Bench dimensions. Length: 22.05 inches, Width: 13.39 inches. Adjustable height range: 18.31 to 22.05 inches.
Operating the Digital Piano (AD-X1)
1. Encendido y apagado
- Connect the power adapter to the DC IN port (3) on the rear panel and plug it into a standard electrical outlet.
- Presione el FUERZA Botón en el panel de control para encender o apagar el piano.
2. Funciones del panel de control
The control panel provides access to various features and settings:

Figure 4: Digital Piano control panel with buttons for DEMO, RHYTHM, VOLUME, TONE, RECORD, SPLIT, TOUCH, RE-PLAY, CHORD, SYNC, METRONOME, START/STOP, POWER, and DATA WHEEL.
- MANIFESTACIÓN: Plays built-in demonstration songs (80 available).
- RITMO: Selects from 128 available rhythms.
- VOLUMEN: Ajusta el nivel general de salida del sonido.
- TONO: Selects from 128 available instrument timbres.
- REGISTRO: Inicia la grabación de tu actuación.
- DIVIDIR: Divides the keyboard into two sections for different voices.
- TOCAR: Adjusts touch sensitivity of the keys.
- RE-PLAY: Reproduce actuaciones grabadas.
- ACORDE: Activates chord recognition mode.
- SINCRONIZACIÓN: Synchronizes rhythm playback.
- METRÓNOMO: Activates the metronome function for practice.
- INICIO / PARO: Starts or stops rhythm/demo playback.
- DATA WHEEL: Se utiliza para navegar por los menús y ajustar valores.
3. Headphone Mode
To practice privately, connect headphones to the Headphone Jack (1) on the rear panel. The internal speakers will automatically mute.

Figure 5: Headphone jack for private practice.
4. Conectividad
The rear panel offers various connection options:
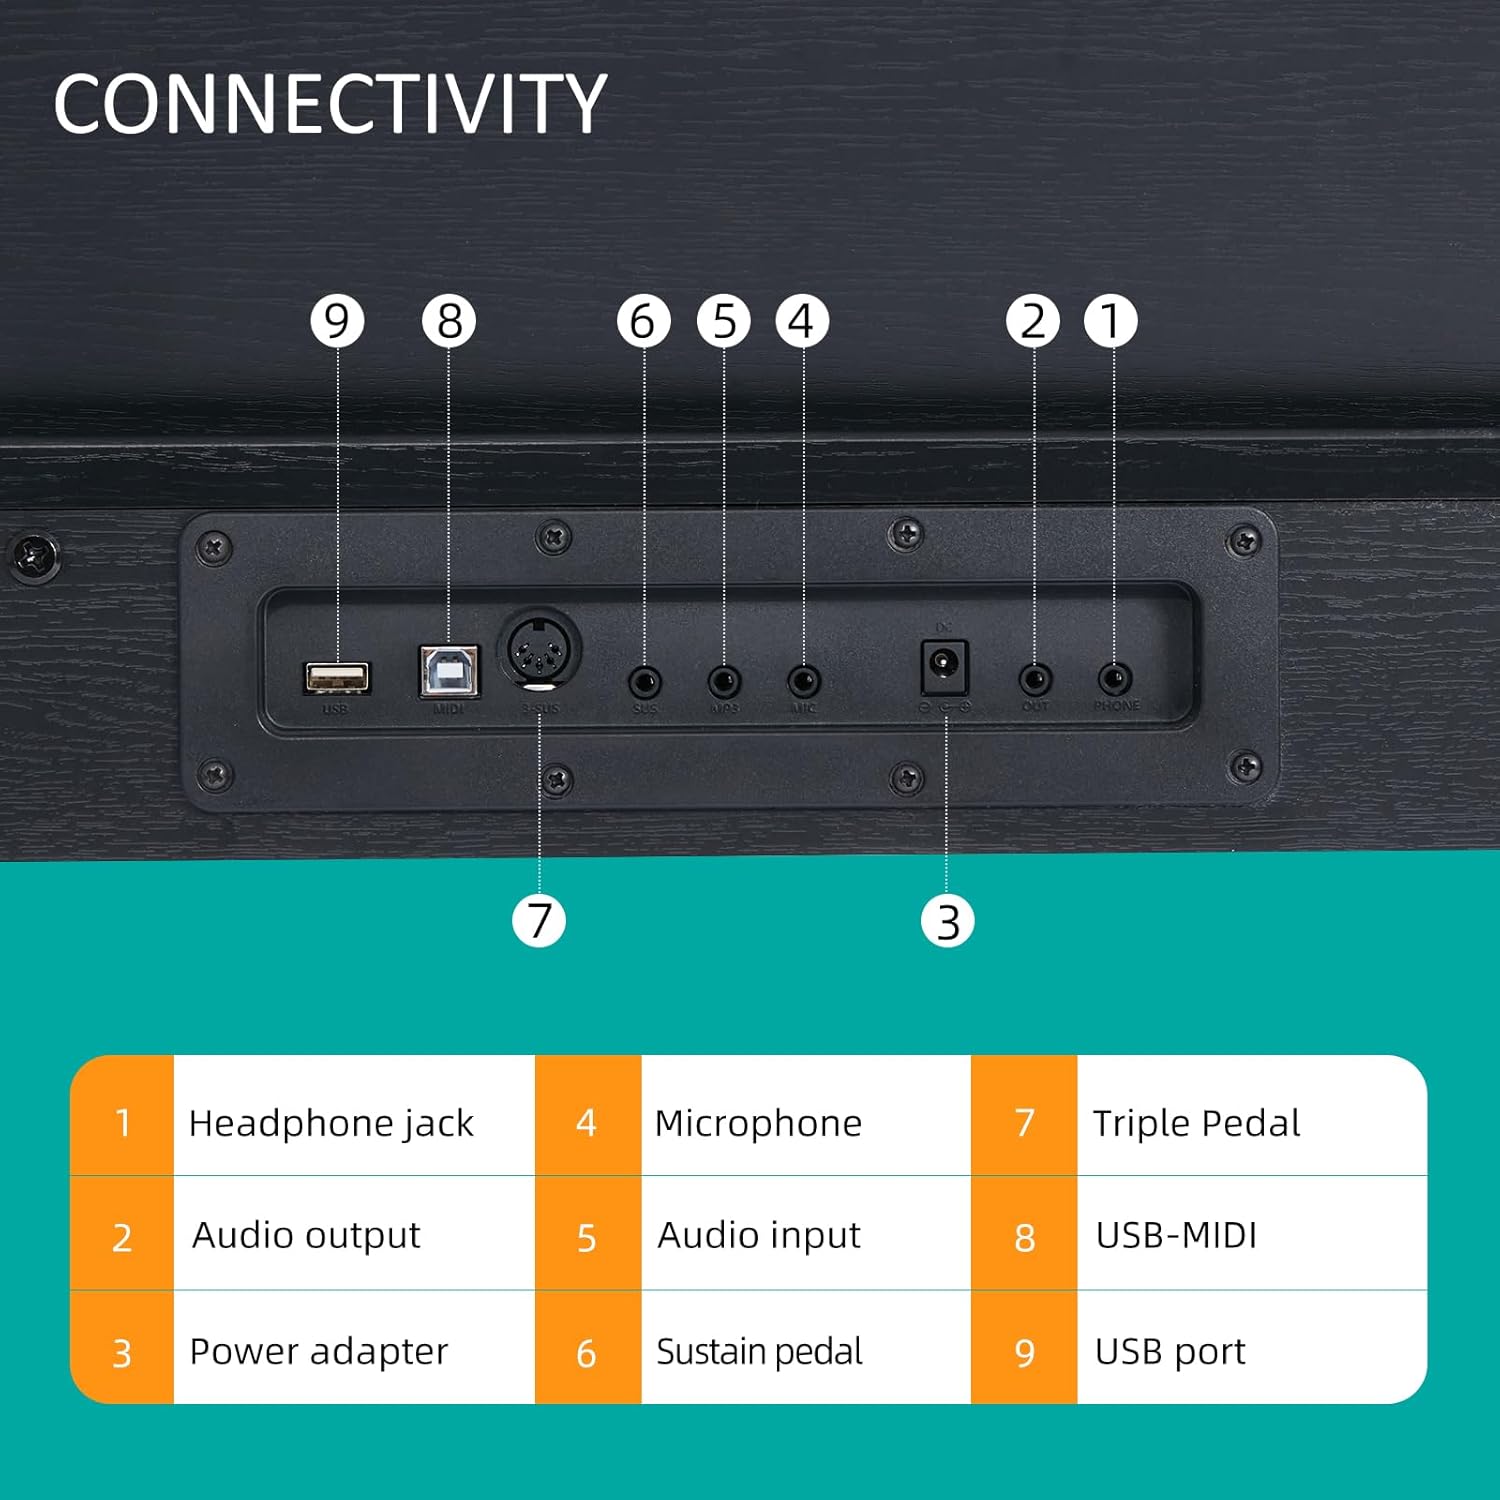
Figure 6: Connectivity panel with labeled ports.
- 1. Conector para auriculares: Para conectar auriculares (3.5 mm).
- 2. Salida de audio: Para conectar a dispositivos externos ampsistemas de legitimación o dispositivos de grabación.
- 3. Adaptador de corriente: DC IN port for the power supply.
- 4. Micrófono: Entrada para micrófono.
- 5. Entrada de audio: Para conectar fuentes de audio externas.
- 6. Pedal de sustain: Input for a single sustain pedal.
- 7. Triple Pedal: Input for the included triple pedal unit.
- 8. USB-MIDI: For connecting to a computer or MIDI devices.
- 9. Puerto USB: Para conectar dispositivos de almacenamiento USB u otros periféricos.
Operating the Piano Bench (ALP-22)
1. Ajuste de altura
The ALP-22 piano bench features an adjustable height mechanism. Locate the knob on the side of the bench. Rotate the knob to raise or lower the seat to your desired height. The adjustable range is from 18.31 inches to 22.05 inches.

Figure 7: Adjusting the piano bench height using the side knob.
2. Compartimento de almacenamiento
The padded seat of the ALP-22 bench can be lifted to reveal a storage compartment. This space is suitable for storing sheet music, books, and small accessories.

Figure 8: Storage compartment beneath the piano bench seat.
Mantenimiento
1. Limpieza
- Wipe the surfaces of the digital piano and bench with a soft, dry cloth.
- Para suciedad difícil, ligeramente dampLave el paño con agua y un limpiador suave, no abrasivo. Evite productos químicos o disolventes agresivos.
- Do not allow liquids to enter the piano's internal components.
2. Almacenamiento
- Store the instruments in a dry environment, away from direct sunlight and extreme temperature fluctuations.
- Avoid placing heavy objects on the piano or bench.
Solución de problemas
- Sin sonido:
- Asegúrese de que el adaptador de corriente esté bien conectado y que el piano esté encendido.
- Verifique el nivel de volumen.
- Si hay auriculares enchufados, desconéctelos para habilitar la salida del altavoz.
- Verify external audio connections if using an ampmás duradero.
- Las teclas no responden:
- Reinicie el piano.
- Asegúrese de que no haya objetos extraños alojados entre las teclas.
- Pedal Not Functioning:
- Check that the pedal cable is securely connected to the correct port on the piano's rear panel.
Presupuesto
AODSK AD-X1 Digital Piano
| Característica | Especificación |
|---|---|
| Nombre del modelo | AD-X1 |
| Número de llaves | 88 Standard Keys (A2-C5 range) |
| Max Polyphony | 128 |
| Timbres | 128 |
| ritmos | 128 |
| Canciones de demostración | 80 |
| Conectividad | 3.5mm Headphone Jack, Audio Output, Microphone Input, Audio Input, Sustain Pedal Input, Triple Pedal Input, USB-MIDI, USB Port |
| Fuente de poder | Eléctrico con cable |
| Tipo de acabado | Mate |
| Nivel de habilidad | Principiante |
AODSK ALP-22 Adjustable Piano Bench
| Característica | Especificación |
|---|---|
| Nombre del modelo | ALP-22 |
| Rango de altura ajustable | 18.31'' - 22.05'' |
| Material del asiento | Padded, High-elastic sponge |
| Almacenamiento | Integrated compartment under seat |
Garantía y soporte
For warranty information or technical support, please refer to the documentation included with your purchase or contact AODSK customer service directly. Keep your purchase receipt as proof of purchase.


