Introducción
This manual provides detailed instructions for the assembly, operation, and maintenance of your VINGLI Wooden Wishing Well Outdoor Planter (Model: 22" w/ 2 Reinforced Rods). Please read this manual thoroughly before assembly and use to ensure proper function and longevity of your product.
The VINGLI Wooden Wishing Well is designed as an outdoor planter and decorative garden accent, featuring durable fir wood construction, reinforced rods for stability, and an adjustable hanging bucket.
Información de seguridad
- Monte siempre el producto sobre una superficie plana y estable.
- Asegúrese de que todos los tornillos y sujetadores estén bien apretados antes de usar.
- Mantenga las piezas pequeñas fuera del alcance de los niños durante el montaje para evitar peligro de asfixia.
- Wear appropriate safety gear, such as gloves, during assembly to protect hands from splinters or wood stain.
- Do not overload the hanging bucket or the main planter base to prevent structural damage.
- Periodically check the product for loose parts or damage and address them promptly.
- Position the wishing well in a location where it will not obstruct pathways or pose a tripping hazard.
Lista de piezas
Before beginning assembly, ensure all parts listed below are present. If any parts are missing or damaged, please contact customer support.
| Parte | Descripción | Cantidad |
|---|---|---|
| A | Main Planter Base Panels | (Varies, typically pre-assembled sections) |
| B | Postes de soporte verticales | 2 |
| C | Montaje de techo | 1 |
| D | Hanging Bucket | 1 |
| E | Rope and Handle Mechanism | 1 juego |
| F | Hardware Pack (Screws, bolts, etc.) | 1 paquete |
Note: The main planter base and roof may come partially pre-assembled.
Configuración y montaje
Tools required: Phillips head screwdriver (power drill recommended), gloves.
Step 1: Assemble the Planter Base
Carefully unpack the main planter base panels. If not pre-assembled, connect the panels to form the octagonal base using the provided screws. Ensure the reinforced rods are correctly aligned and secured for stability.

Image: Close-up of the reinforced rods and 4-layer crossing fir boards in the planter base, highlighting sturdy construction.
Step 2: Attach Vertical Support Posts
Attach the two vertical support posts (B) to the assembled planter base (A). Align the pre-drilled holes and secure them with screws from the hardware pack (F). Ensure the posts are upright and stable.
Step 3: Install the Roof Assembly
Place the roof assembly (C) onto the top of the vertical support posts (B). Align the holes and secure the roof using the appropriate screws. Ensure the roof is centered and firmly attached.
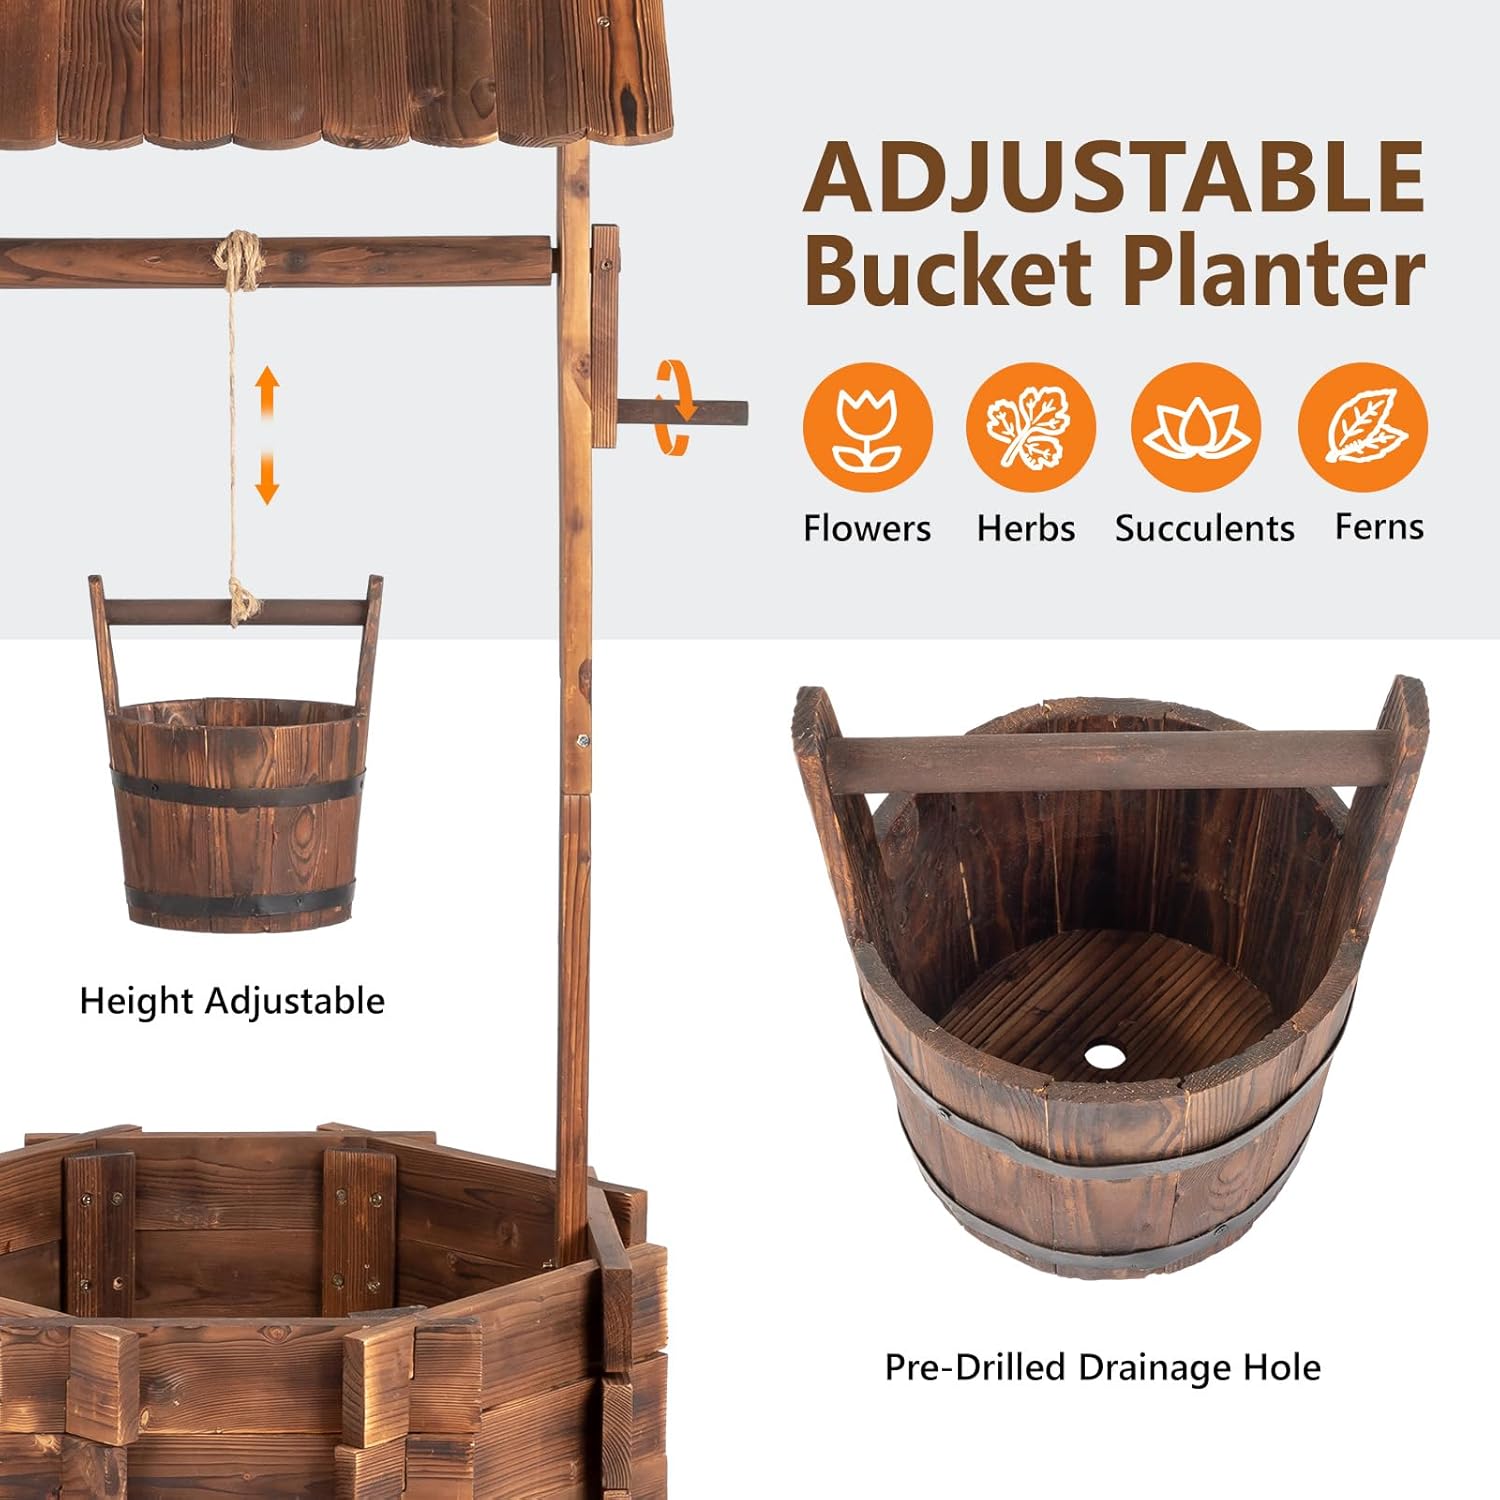
Image: Detail of the protective roof, illustrating its design and construction.
Step 4: Attach the Hanging Bucket and Rope Mechanism
Thread the rope through the pulley system on the roof structure. Attach one end of the rope to the hanging bucket (D) and the other end to the handle mechanism (E). Ensure the bucket can be smoothly raised and lowered.

Image: Close-up of the adjustable bucket planter, showing its height adjustment feature and pre-drilled drainage hole.
Video de la Asamblea
Video: A detailed assembly guide for the VINGLI Wooden Wishing Well, demonstrating each step of the construction process.
Instrucciones de funcionamiento
Using the Main Planter Base
The main planter base has a diameter of 16.5 inches, providing ample space for multiple plants. Fill the base with appropriate drainage material (e.g., gravel, mulch) followed by soil. Plant your desired flowers, herbs, or succulents.

Image: The main planter base filled with soil, ready for planting, demonstrating its capacity.
Adjusting the Hanging Bucket
The hanging bucket can be used as an additional planter for smaller plants. It features a pre-drilled drainage hole. Use the rope and handle mechanism to adjust the bucket's height to your preference. To secure the bucket at a specific height, wrap the rope around the handle or tie it off securely.

Image: The VINGLI wishing well in a garden setting, illustrating its use as a decorative cover for outdoor elements such as a well pump, septic tank, or water pipe.
Mantenimiento
- Limpieza: Limpie las superficies de madera con un paño.amp Paño según sea necesario. Evite productos químicos agresivos que puedan dañar el acabado de la madera.
- Protección contra la intemperie: While constructed from durable fir wood, applying a weather-resistant sealant annually can extend the product's lifespan and protect it from sun and rain.
- Inspección: Revise periódicamente todos los tornillos y conexiones para asegurarse de que estén bien apretados. Vuelva a apretarlos si es necesario.
- Drenaje: Ensure the drainage hole in the hanging bucket remains clear to prevent water accumulation.
Solución de problemas
| Problema | Posible causa | Solución |
|---|---|---|
| El producto se siente inestable después del ensamblaje. | Screws not fully tightened; uneven assembly surface. | Ensure all screws are securely tightened. Assemble on a flat, level surface. Gently coax parts into alignment during assembly. |
| Hanging bucket does not move smoothly. | Rope tangled or improperly threaded; friction in pulley system. | Check rope for tangles and re-thread if necessary. Ensure the rope is correctly seated in the pulley. |
| Wood color fading or showing wear. | Exposure to sun and weather without protection. | Apply a clear, weather-resistant wood sealant or stain to protect the wood. |
Presupuesto
- Modelo: 22" w/ 2 Reinforced Rods
- Material: Madera de abeto
- Color: Marrón
- Dimensiones del producto: 22" de profundidad x 21.6" de ancho x 45" de alto (55.9 cm de profundidad x 54.9 cm de ancho x 114.3 cm de alto)
- Planter Base Diameter: Aproximadamente 16.5 pulgadas
- Peso del artículo: 22.7 libras (10.3 kg)
- Características especiales: Drainage Hole (in bucket), Weather Resistant (with proper maintenance)
- Estilo: País
- Uso en interiores y exteriores: Exterior
- Tipo de montaje: Piso de pie
- Componentes incluidos: Instruction manual, Hardware

Image: Diagram illustrating the overall dimensions of the wishing well, including height, width, and depth measurements.
Garantía y soporte
For warranty information or customer support, please refer to the purchase documentation or contact VINGLI customer service directly. Keep your purchase receipt for any warranty claims.
Información del contacto: Please visit the official VINGLI websitio o consulte el embalaje de su producto para obtener los datos de contacto más actualizados.


