1. Introducción
1.1 producto másview
Thank you for choosing the Sharp ES-NIH814BWA-EN Integrated Washing Machine. This appliance is designed to provide efficient and reliable laundry care for your home. With an 8kg capacity and a 1400 rpm spin speed, it offers powerful cleaning performance while integrating seamlessly into your kitchen or utility space.

Figura 1.1: Frente view of the Sharp ES-NIH814BWA-EN Integrated Washing Machine, showing its sleek design and integrated panel.
1.2 Información de seguridad
Before operating your washing machine, please read all safety instructions carefully. Keep this manual for future reference. Improper installation, maintenance, or use can cause serious injury or damage. Always disconnect the appliance from the power supply before cleaning or maintenance.
- Asegúrese de que el aparato esté correctamente conectado a tierra.
- No permita que los niños jueguen con el aparato.
- Do not open the detergent dispenser during the wash cycle.
- No toque el aparato con las manos mojadas.
- Mantenga los materiales de embalaje fuera del alcance de los niños.
2. Configuración e instalación
2.1 Desembalaje
Carefully remove all packaging materials. Check for any transport damage. Remove all transit bolts from the rear of the machine before installation. These bolts are essential for safe transport but must be removed for operation to prevent vibration and damage.
2.2 Ubicación y nivelación
Place the washing machine on a firm, level floor. Adjust the adjustable feet to ensure the machine is perfectly level and stable. This prevents excessive vibration and noise during operation.
2.3 Conexión de agua
Connect the water inlet hose to a cold water tap with a 3/4-inch thread. Ensure all connections are tight to prevent leaks. The drain hose should be securely placed into a standpipe or connected to a suitable drain system, ensuring it is not kinked.

Figura 2.1: Posterior view de la lavadora, ilustrando las conexiones de entrada de agua y manguera de drenaje.
2.4 Conexión eléctrica
Conecte el cable de alimentación a una toma de corriente con conexión a tierra. Asegúrese de que el voltagAsegúrese de que la corriente y la frecuencia coincidan con las especificaciones de la placa de características del aparato. No utilice cables alargadores ni adaptadores múltiples.
2.5 Primer uso
Before the first wash, run an empty cycle with a small amount of detergent at 60°C to clean the drum and remove any manufacturing residues.
3. Instrucciones de funcionamiento
3.1 Panel de control terminadoview
The control panel consists of a program selection dial, a digital display, and function buttons for customizing your wash cycle.
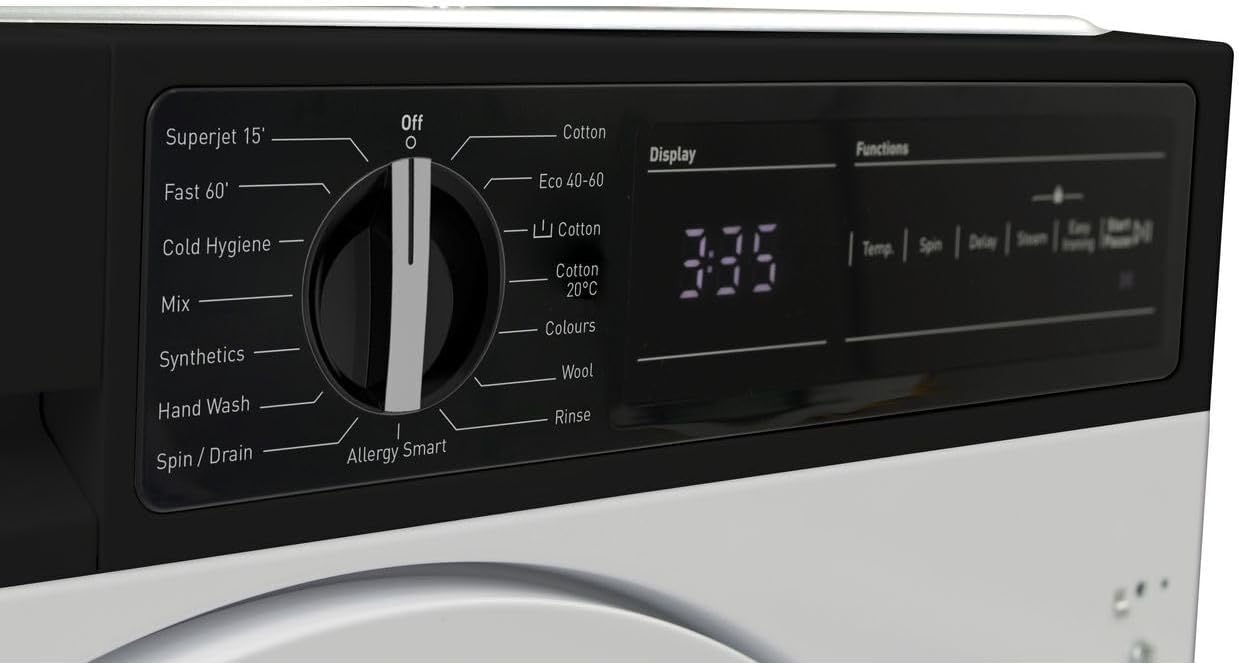
Figura 3.1: detallada view of the program selection dial and digital display.

Figure 3.2: Close-up of the digital display showing time remaining and function buttons for Temp, Spin, Delay, Steam, and Easy Ironing.
3.2 Carga de la ropa
Open the washing machine door and load your laundry. Do not overload the machine; leave enough space for clothes to tumble freely. Close the door firmly until it clicks.

Figure 3.3: The washing machine door open, revealing the drum for loading laundry.

Figura 3.4: Un interior view of the stainless steel drum, designed for effective washing.
3.3 Adición de detergente y aditivos
Pull out the detergent dispenser drawer. Add the appropriate amount of detergent to the main wash compartment and fabric softener to its designated compartment. Refer to your detergent packaging for dosage recommendations.

Figure 3.5: The detergent dispenser drawer, showing compartments for detergent and fabric softener.
3.4 Selección de un programa de lavado
Turn the program selection dial to choose your desired wash program. Available programs include:
- Superjet 15':Lavado rápido para prendas ligeramente sucias.
- Fast 60': A faster cycle for everyday loads.
- Cold Hygiene: For hygienic washing at lower temperatures.
- Mezcla: For mixed fabric loads.
- Sintéticos: For synthetic fabrics.
- Lavado a mano: Gentle cycle for delicate items.
- Girar / Drenar: To spin and drain water from laundry.
- Alergia inteligente: Designed to remove allergens.
- Algodón: Standard program for cotton items.
- Ecológico 40-60: Energy-efficient program for cottons and mixed items at 40-60°C.
- Algodón 20°C: Low-temperature cotton wash.
- Bandera: For colored garments to preserve vibrancy.
- Lana: Gentle program for woolens.
- Enjuagar: To rinse laundry without washing.
3.5 Ajuste de la configuración
Después de seleccionar un programa, puede personalizar la configuración utilizando los botones de función:
- Temperatura: Adjust wash temperature.
- Girar: Change spin speed.
- Demora: Set a delayed start time.
- Vapor: Add a steam function for better hygiene or wrinkle reduction.
- Fácil de planchar: Reduces creasing para facilitar el planchado.
3.6 Inicio de un ciclo de lavado
Presione el Inicio/Pausa Botón para iniciar el ciclo de lavado seleccionado. La pantalla mostrará el tiempo restante.
3.7 Finalización de un ciclo de lavado
Once the cycle is complete, the machine will signal. The door will unlock after a short delay. Remove your laundry promptly.
4. Mantenimiento y cuidado
El mantenimiento regular garantiza un rendimiento óptimo y prolonga la vida útil de su lavadora.
4.1 Limpieza del dispensador de detergente
Retire y limpie periódicamente el cajón dispensador de detergente bajo agua corriente para evitar la acumulación de residuos de detergente.
4.2 Limpieza del tambor
Run a maintenance wash (e.g., a hot cycle with a washing machine cleaner or vinegar) monthly to clean the drum and remove any odors or residue.
4.3 Limpieza del filtro
Locate the drain pump filter, usually at the bottom front of the machine. Open the cover, drain any residual water, and carefully remove and clean the filter. This should be done regularly to prevent blockages.
4.4 Limpieza del exterior
Limpie las superficies exteriores con un paño suave, damp Paño. No utilice limpiadores abrasivos ni disolventes.
5. Solución de problemas
Si tiene problemas con su lavadora, consulte los siguientes problemas y soluciones comunes antes de comunicarse con el servicio de atención al cliente.
| Problema | Posible causa | Solución |
|---|---|---|
| La máquina no arranca | Sin energía; Puerta no cerrada; Programa no seleccionado; Inicio/Pausa no presionado. | Verifique la fuente de alimentación; Asegúrese de que la puerta esté cerrada; Seleccione un programa; Presione Inicio/Pausa. |
| No hay ingesta de agua | Grifo de agua cerrado; manguera de entrada doblada; presión de agua demasiado baja. | Abra el grifo de agua; enderece la manguera; verifique la presión del agua de la casa. |
| El agua no drena | Drain hose kinked; Drain pump filter blocked. | Enderece la manguera de drenaje; limpie el filtro de la bomba de drenaje. |
| Vibración / ruido excesivo | Pernos de transporte no retirados; Máquina no nivelada; Carga desigual. | Remove transit bolts; Adjust feet to level machine; Redistribute laundry. |
| Residuos de detergente en el dispensador | Too much detergent; Low water pressure; Dispenser blocked. | Reduce detergent amount; Check water pressure; Clean dispenser. |
6. Especificaciones técnicas
| Característica | Especificación |
|---|---|
| Marca | Afilado |
| Modelo | ES-NIH814BWA-EN |
| Capacidad | 8 kilogramos |
| Velocidad máxima de rotación | 1400 RPM |
| Tipo de instalación | Integrado |
| Consola de control | Buttons, Dial, Digital Display |
| Ubicación de acceso | Carga frontal |
| Material (Tambor) | Acero inoxidable |
| Volumentage | 2.2E+2 voltios (CA) |
| Color | Blanco |
7. Garantía y atención al cliente
Your Sharp ES-NIH814BWA-EN Washing Machine comes with a manufacturer's warranty. Please refer to the separate warranty card provided with your appliance for specific terms and conditions, including warranty period and coverage.
For technical assistance, spare parts, or to schedule a service appointment, please contact Sharp customer support. Contact details can typically be found on the Sharp official websitio o en la documentación de su garantía.
When contacting support, please have your model number (ES-NIH814BWA-EN) and serial number ready. The serial number is usually located on a sticker inside the door frame or on the back of the appliance.


