Introducción
The SONICAKE A-Factory is a versatile acoustic guitar effects pedal designed to enhance your instrument's tone with an analog preamp and digital reverb. It features a built-in notch filter for feedback suppression, high impedance input, and a balanced XLR output, making it suitable for various performance and recording setups. This manual provides detailed instructions for setup, operation, maintenance, and troubleshooting to ensure optimal performance of your A-Factory pedal.

Imagen: Frente view of the SONICAKE A-Factory pedal, showcasing sus controles y pedales.
Características principales
- Preamplificador analógicoamp and Digital Reverb: Combines essential acoustic guitar tone shaping with lush digital reverb effects.
- Built-in Notch Filter and MUTE: Features adjustable gain and frequency range to quickly eliminate whistling feedback, along with a MUTE function for silent tuning or instrument changes.
- High Impedance Input and XLR Balanced Output: Ensures signal integrity from your instrument and provides professional connectivity to mixers or PA systems.
- Specially Designed Buffer Bypass Circuit: Maintains the pristine quality of your instrument's signal when the effect is bypassed.
- 9V Center Negative Power Supply: Compatible with standard pedal power supplies (not included).
Controles y conexiones

Image: Labeled diagram of the A-Factory pedal's controls and connections.
Perillas de control:
- TRIPLICAR: Ajusta el contenido de alta frecuencia de tu tono.
- VOLUMEN: Controla el volumen de salida general del pedal.
- N.FREQ (Notch Frequency): Sets the frequency point for the notch filter to target and reduce.
- MUESCA: Adjusts the depth of the notch filter, used to eliminate feedback.
- GND LIFT (Ground Lift Switch): Helps eliminate hum caused by ground loops.
- R.DECAY (Reverb Decay): Controla la longitud de la cola de reverberación.
- R.MIX (Reverb Mix): Adjusts the blend of the dry signal with the reverb effect.
- BAJO: Ajusta el contenido de baja frecuencia de tu tono.
- MEDIO: Adjusts the mid-range frequency content of your tone.
Interruptores de pie:
- Interruptor de pie REVERB: Toggles the digital reverb effect on or off. Hold down to activate the MUTE function.
- PREAMP Pedal: Toggles the analog preamp sección activada o desactivada.
Tomas de entrada / salida:
- INPUT (1/4-inch): Connect your acoustic instrument here.
- SALIDA (1/4 pulgada): Conéctate con tu amplificador o siguiente pedal en la cadena de señal.
- XLR OUT (Balanced XLR Output): Provides a balanced signal for direct connection to a mixer or audio interface.
- 9 V CC: Entrada de alimentación para una fuente de alimentación de centro negativo de 9 V CC.

Imagen: Primer plano views of the pedal's input, output, and power connections, highlighting its robust aluminum-alloy casing.
Configuración
- Conexión de energía: Connect a standard 9V DC center-negative power supply (not included) to the DC 9V input jack on the pedal. Ensure the power supply meets the specified voltagRequisitos de e y polaridad.
- Conexión del instrumento: Plug your acoustic guitar or instrument into the 1/4-inch INPUT jack on the pedal using a standard instrument cable.
- Conexión de salida:
- Para conectar a una guitarra amplifier or other effects pedals, use a 1/4-inch instrument cable from the OUTPUT jack.
- For direct connection to a mixer, PA system, or audio interface, use an XLR cable from the XLR OUT jack.
- Ajustes iniciales: Before powering on, set all control knobs to their middle (12 o'clock) position. Ensure both footswitches are disengaged (LEDs off).
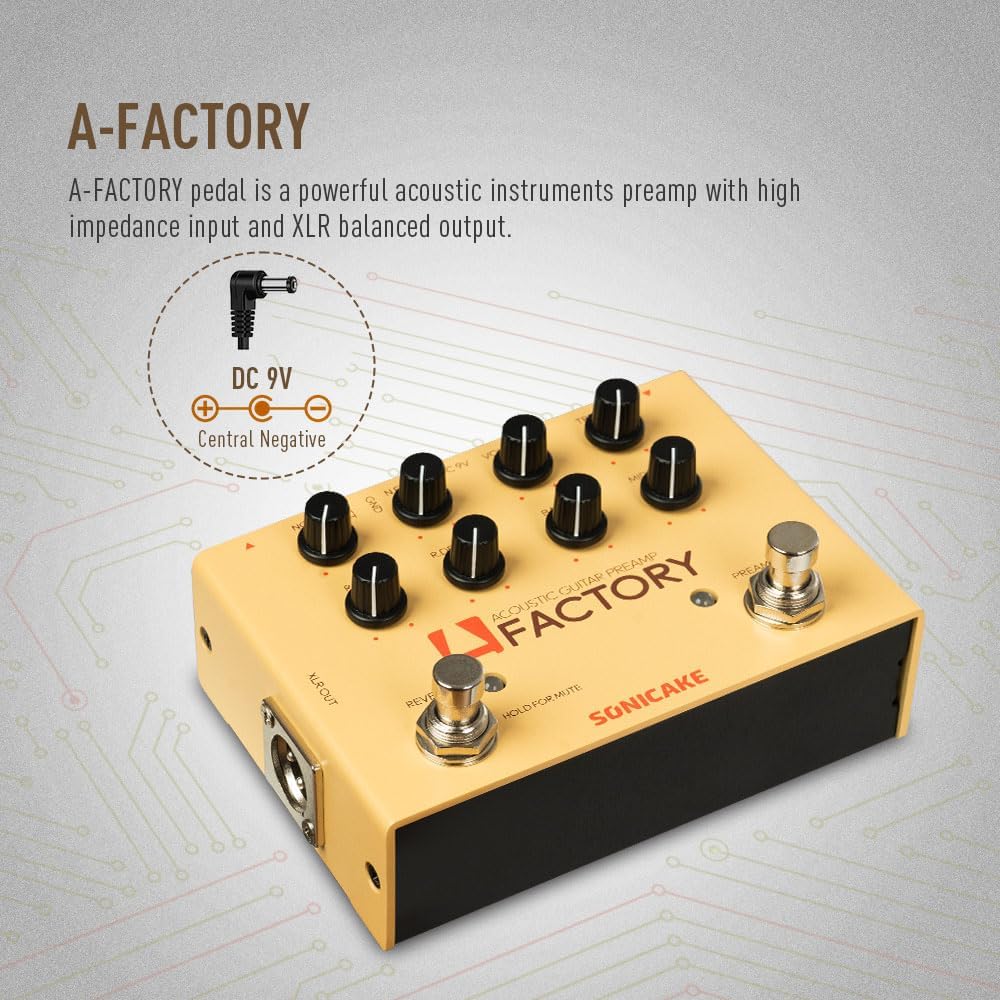
Image: The A-Factory pedal illustrating the 9V DC center-negative power input requirement.
Instrucciones de funcionamiento
Engaging the Preamp:
Toque el PREAMP footswitch to activate the analog preamp section. The corresponding LED will illuminate, indicating the preamp is active. This provides tone shaping capabilities via the BASS, MIDDLE, and TREBLE controls.
Using the Reverb and Mute Function:
Toque el REVERBERACIÓN footswitch to engage or disengage the digital reverb effect. The LED will light up when the reverb is active. To activate the MUTE function, press and hold the REVERB footswitch for approximately 2 seconds. This will silence the output, useful for silent tuning or instrument changes. Press and hold again to unmute.

Image: Diagram illustrating how to tap the Reverb footswitch for reverb on/off and hold for the Mute function.
Adjusting Tone (EQ):
Utilice el BASS, MEDIO, y TRIPLICAR knobs to sculpt your acoustic guitar's tone. Adjust these to suit your instrument, playing style, and the acoustic environment.
Utilizing the Notch Filter:
The notch filter is crucial for feedback suppression. If you experience feedback, slowly turn the NOTCH knob while playing. If the feedback persists, adjust the N.FREQ knob to sweep through frequencies until the feedback is minimized or eliminated. The Elevador de tierra switch can also help reduce hum or noise from ground loops, especially when using the XLR output.

Image: Diagram detailing the Notch Filter controls (NOTCH and N.FREQ) and their function in eliminating feedback.
Controlling Reverb Effect:
El R.MIX knob controls the amount of reverb blended with your dry signal. Turn clockwise for more reverb. The R.DECAY knob adjusts the length of the reverb tail; clockwise increases the decay time.
Setting Overall Volume:
El VOLUMEN knob controls the master output level of the pedal. Adjust this to achieve the desired loudness without clipping your ampEntrada de amplificador o mezclador.
Mantenimiento
- Limpieza: Use a soft, dry cloth to clean the pedal's surface. Avoid using abrasive cleaners, solvents, or waxes, as they may damage the finish or internal components.
- Almacenamiento: Cuando no lo utilice durante períodos prolongados, desconecte la fuente de alimentación y guarde el pedal en un lugar fresco y seco, alejado de la luz solar directa y de temperaturas extremas.
- Fuente de alimentación: Always use a regulated 9V DC center-negative power supply to prevent damage to the unit. Unplug the power supply when not in use.
- Conexiones: Periodically check all cable connections for wear and tear. Ensure cables are securely plugged in to prevent signal loss or intermittent issues.
Solución de problemas
| Problema | Posible causa | Solución |
|---|---|---|
| No hay sonido del pedal. | Incorrect power supply, loose cables, pedal bypassed, MUTE engaged. | Verify 9V DC center-negative power supply. Check all cable connections. Ensure PREAMP and REVERB are engaged (LEDs on). Disengage MUTE by holding REVERB footswitch. |
| Zumbido o ruido excesivo. | Bucle de tierra, cables defectuosos, interferencias. | Engage the GND LIFT switch. Try different cables. Ensure power supply is isolated and regulated. Move pedal away from power sources or other electronics. |
| Feedback (howling) when playing. | Microphonic feedback from instrument, high volume. | Adjust the NOTCH and N.FREQ knobs to find and eliminate the problematic frequency. Reduce overall VOLUME. Move further from the amplifier/PA speakers. |
| El efecto de reverberación es demasiado sutil o demasiado fuerte. | R.MIX or R.DECAY settings. | Adjust the R.MIX knob to control the blend of the reverb effect. Adjust the R.DECAY knob to control the length of the reverb tail. |
Presupuesto
- Modelo: QDS-04 (A Factory)
- Peso del artículo: 13.7 onzas (0.39 kilogramos)
- Dimensiones del producto: 4.72" de largo x 1.42" de ancho x 3.43" de alto (12 x 3.6 x 8.7 cm)
- Fuente de energía: Eléctrico con cable
- Volumentage: 9 voltios CC (centro negativo)
- Formato de señal: Analog (Preamp), Digital (Reverb)
- Interfaz de hardware: Audio de 1/4 de pulgada, XLR
- Tipo de conector: 1/4" TS Input/Output, XLR Output
Garantía y soporte
SONICAKE products are designed for reliability and performance. For warranty information, technical support, or service inquiries, please refer to the official SONICAKE webSitio web o contacte directamente con el servicio de atención al cliente. Conserve su recibo de compra como comprobante para cualquier reclamación de garantía.


