1. Introducción
Thank you for choosing the COLAMY H6 Heavy-Duty Ergonomic Mesh Office Chair. This manual provides detailed instructions for assembly, operation, maintenance, and troubleshooting to ensure you get the most out of your new chair. Please read this manual thoroughly before assembly and use, and retain it for future reference.
2. Información de seguridad
- Capacidad de peso: This chair is designed to support a maximum weight of 450 pounds (approximately 204 kg). Do not exceed this weight limit to prevent damage or injury.
- Montaje adecuado: Ensure all parts are correctly assembled and tightened according to the instructions. Periodically check all bolts and screws to ensure they remain secure.
- Uso previsto: This chair is intended for office and personal use. Do not stand on the chair or use it as a step stool.
- Niños: Mantenga a los niños alejados de la silla durante el montaje. Las piezas pequeñas pueden suponer un peligro de asfixia.
- Movimiento: Avoid sudden movements or leaning excessively to one side, which could cause the chair to tip over.
3. Contenido del paquete
Antes de comenzar el montaje, verifique que todos los componentes estén presentes y sin daños. Si alguna pieza falta o está dañada, póngase en contacto con atención al cliente.
- Respaldo
- Cojín de asiento
- Apoyabrazos (2)
- Cilindro elevador de gas
- Base con ruedas
- Placa de mecanismo
- Kit de hardware (tornillos, arandelas, llave Allen)
- Manual de usuario
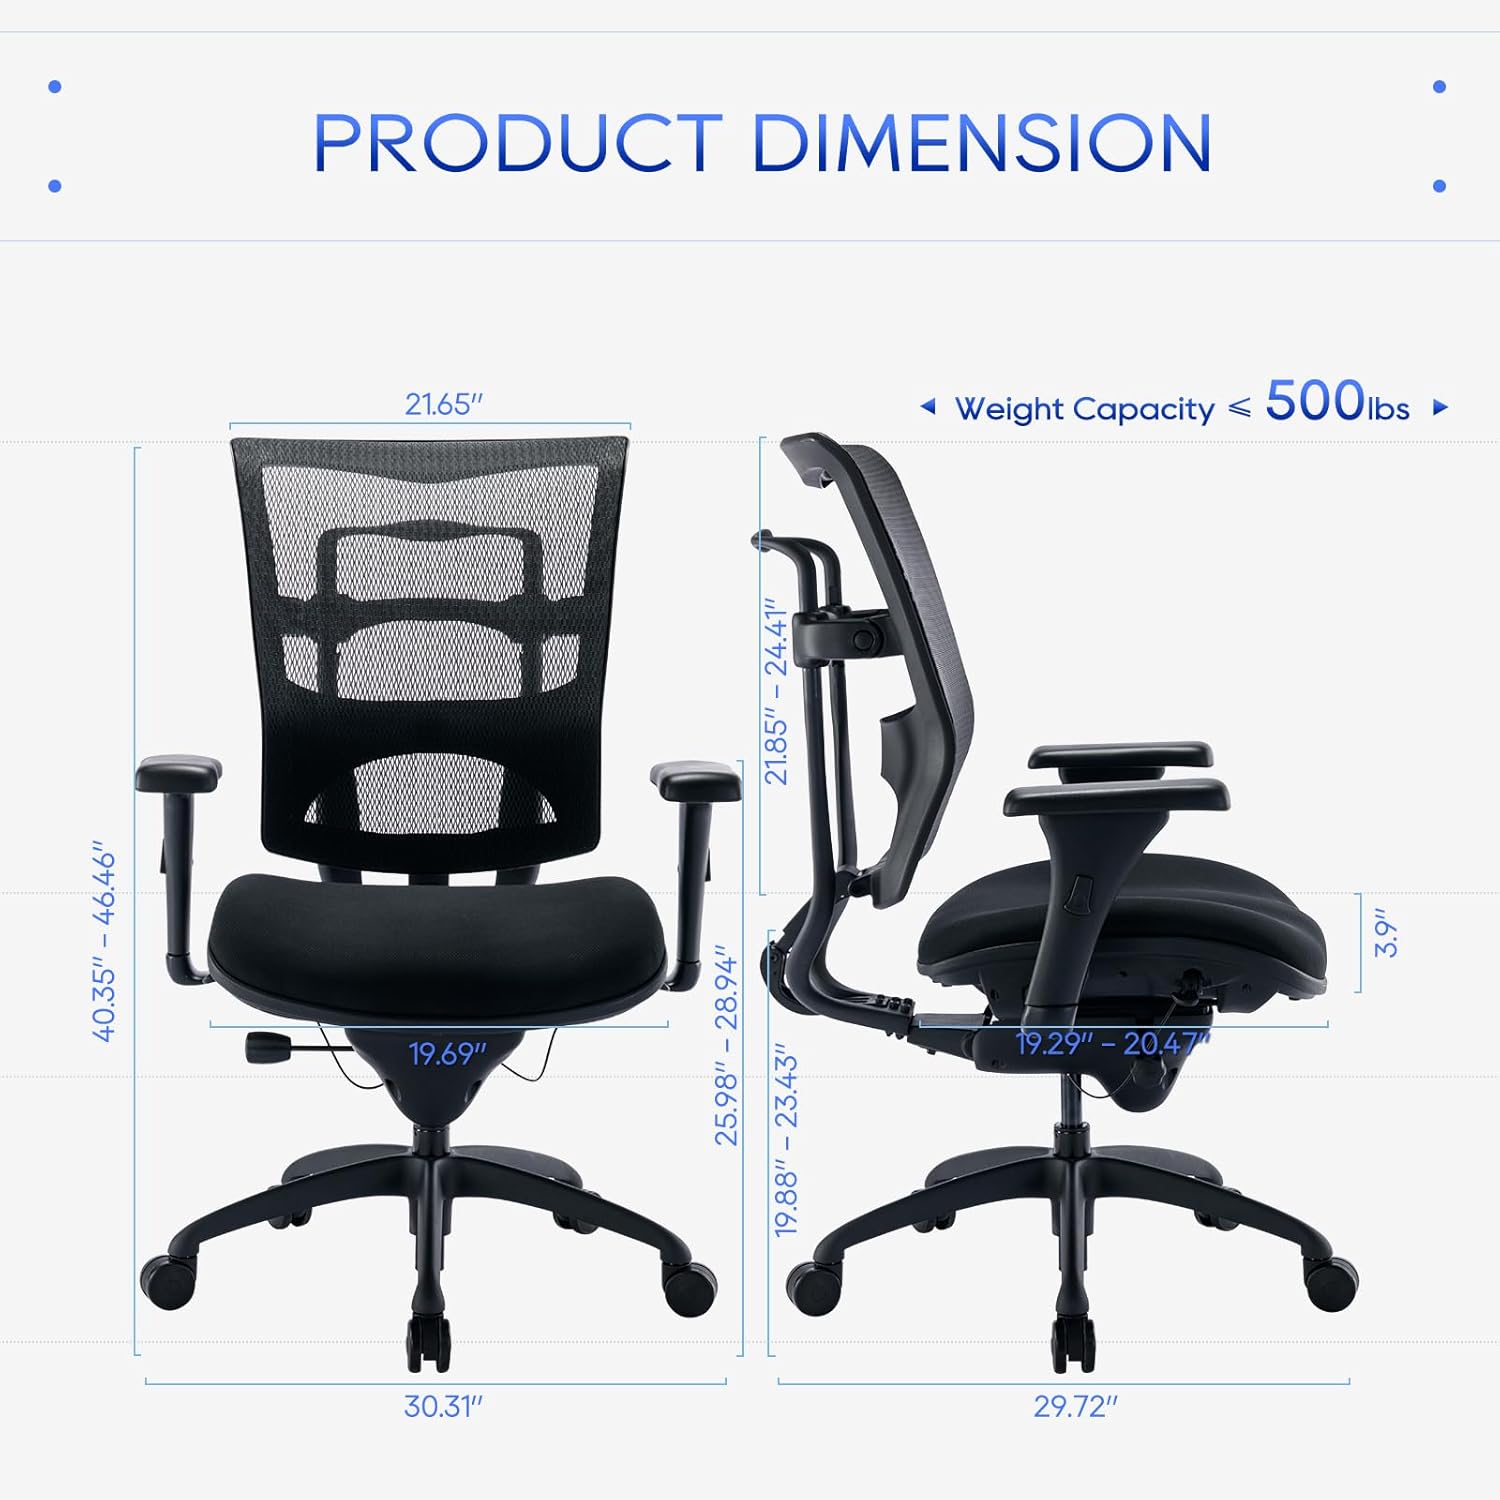
Figura 3.1: Dimensiones y componentes del productoview. This image illustrates the overall size and key parts of the chair, including the backrest, seat, armrests, and base.
4. Configuración (Instrucciones de montaje)
El montaje es sencillo y suele tardar entre 10 y 15 minutos. Siga estos pasos cuidadosamente:
- Fije las ruedas a la base: Insert the casters into the holes at the ends of the chair base until they click securely into place.
- Insertar elevador de gas: Coloque el cilindro de elevación de gas en el orificio central de la base de la silla.
- Fije la placa del mecanismo al asiento: Alinee la placa del mecanismo con los orificios para tornillos en la parte inferior del cojín del asiento. Asegúrese de que la parte delantera del mecanismo esté orientada hacia la parte delantera del asiento. Asegure con los tornillos usando la llave Allen incluida.
- Fije los apoyabrazos al asiento: Fije los reposabrazos a los lados del cojín del asiento con los tornillos correspondientes. Asegúrese de que estén bien fijados.
- Fije el respaldo al asiento/mecanismo: Connect the backrest to the seat and/or mechanism plate using the appropriate screws. Ensure all connections are tight.
- Conecte el conjunto del asiento al elevador de gas: Coloque con cuidado el asiento ensamblado sobre el cilindro de elevación de gas, asegurándose de que esté centrado y estable.
Once assembled, sit on the chair to firmly seat the gas lift into the base and mechanism.
5. Instrucciones de funcionamiento (Ajustes)
The COLAMY H6 chair offers multiple adjustments for personalized comfort:
- Ajuste de altura del asiento: Locate the lever on the right side under the seat. To raise the seat, lift the lever while taking your weight off the chair. To lower the seat, lift the lever while seated. Release the lever to lock the height.
- Ajuste de la profundidad del asiento: This chair features a wire-controlled sliding seat. Locate the control on the left side under the seat. Pull the control to slide the seat forward or backward by up to 2 inches. Release the control to lock the seat depth.
- Backrest Height Adjustment & Lumbar Support: The backrest height can be adjusted by 2.5 inches. While seated, grasp the backrest and lift it upwards to adjust. The synchronous lumbar support will adjust with the backrest height.
- Recline and Lock Function: Use the wire control on the right side under the seat. Pull the control to unlock the recline function. Lean back to your desired angle (95°, 100°, or 120°) and release the control to lock it in place.
- Ajuste de tensión de inclinación: La perilla redonda ubicada debajo de la parte delantera del asiento controla la tensión de la inclinación. Gírela en sentido horario para aumentar la tensión (dificultando la reclinación) o en sentido antihorario para disminuirla (facilitándola).
- Ajuste de altura del reposabrazos: Press the button on the side of each armrest and slide the armrest up or down to your preferred height. Release the button to lock.
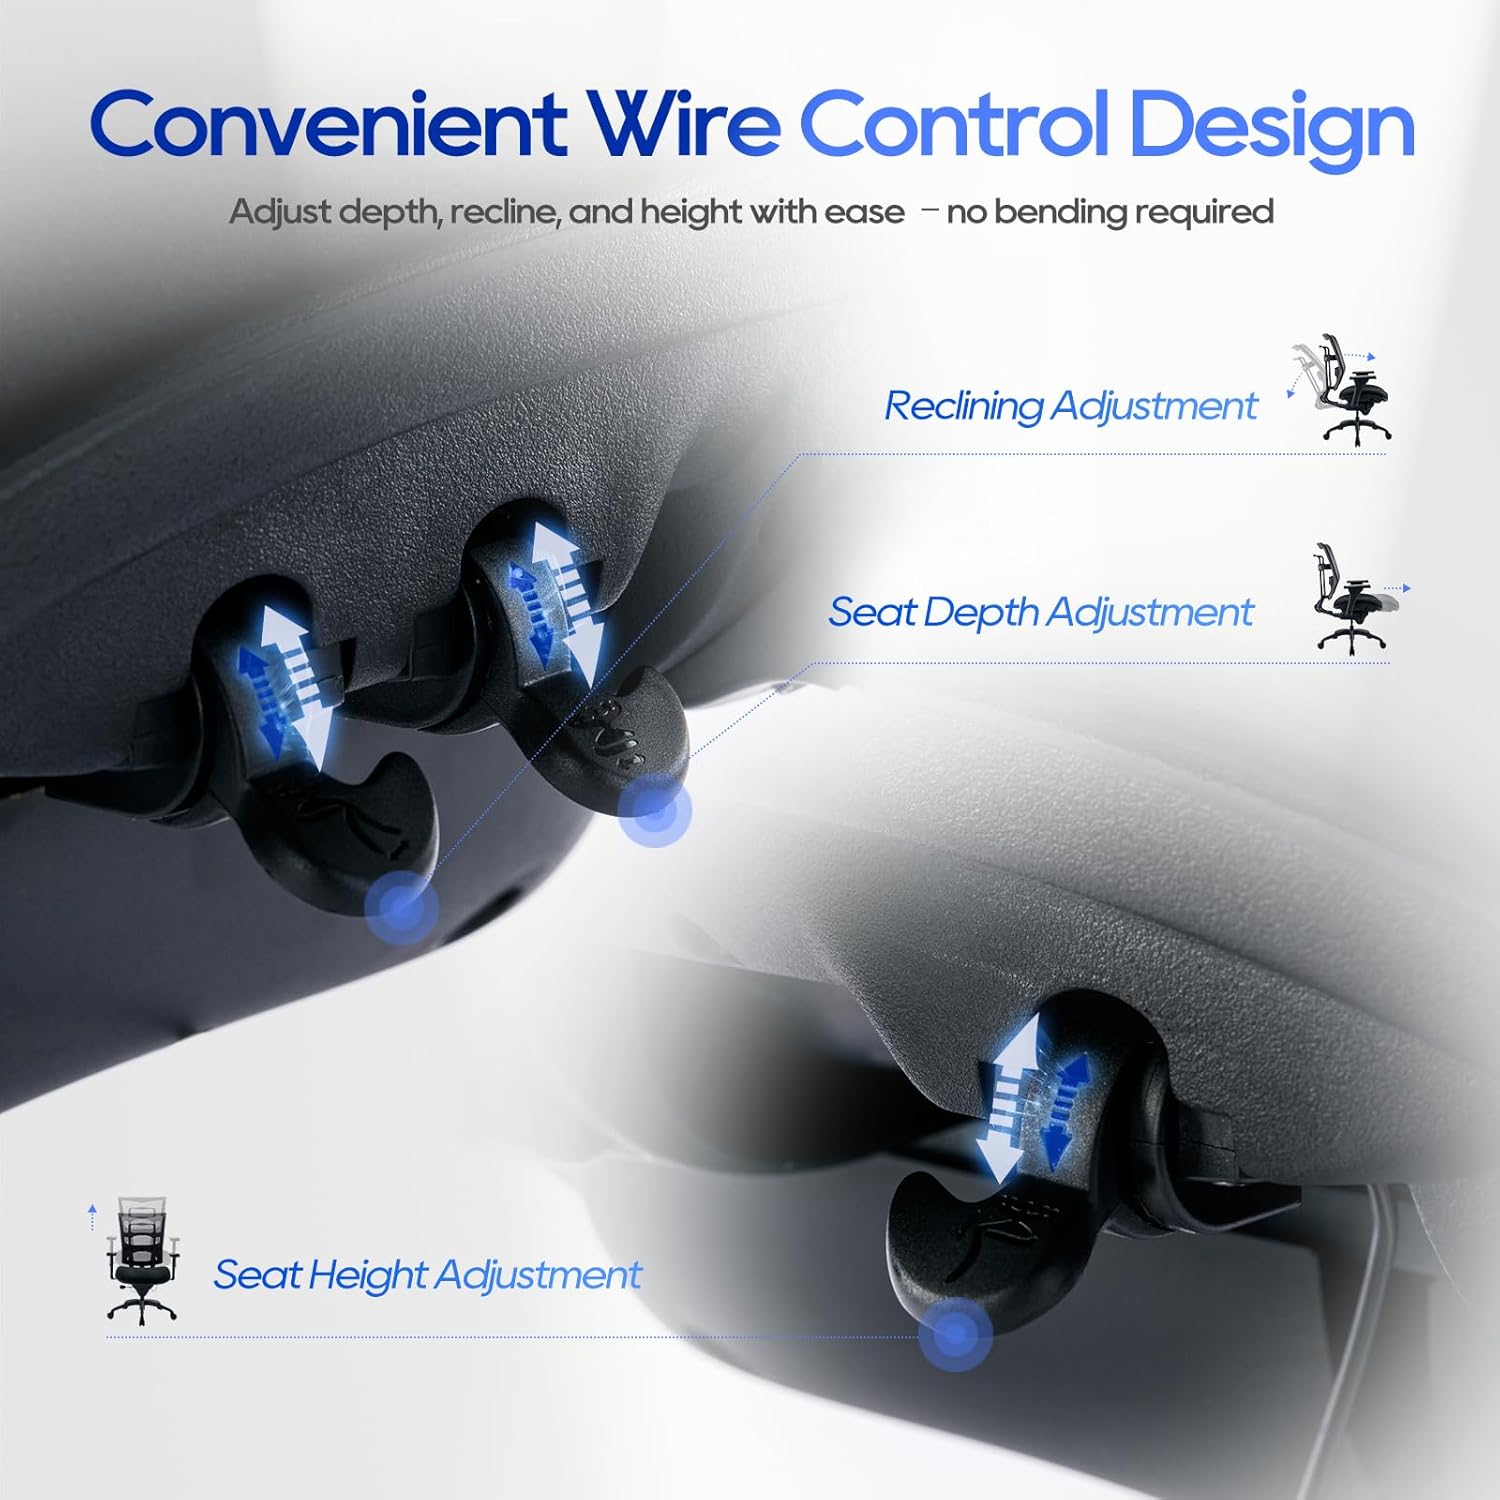
Figure 5.1: Convenient Wire Control Design for Adjustments. This image highlights the levers used for adjusting seat depth, recline, and seat height without bending.
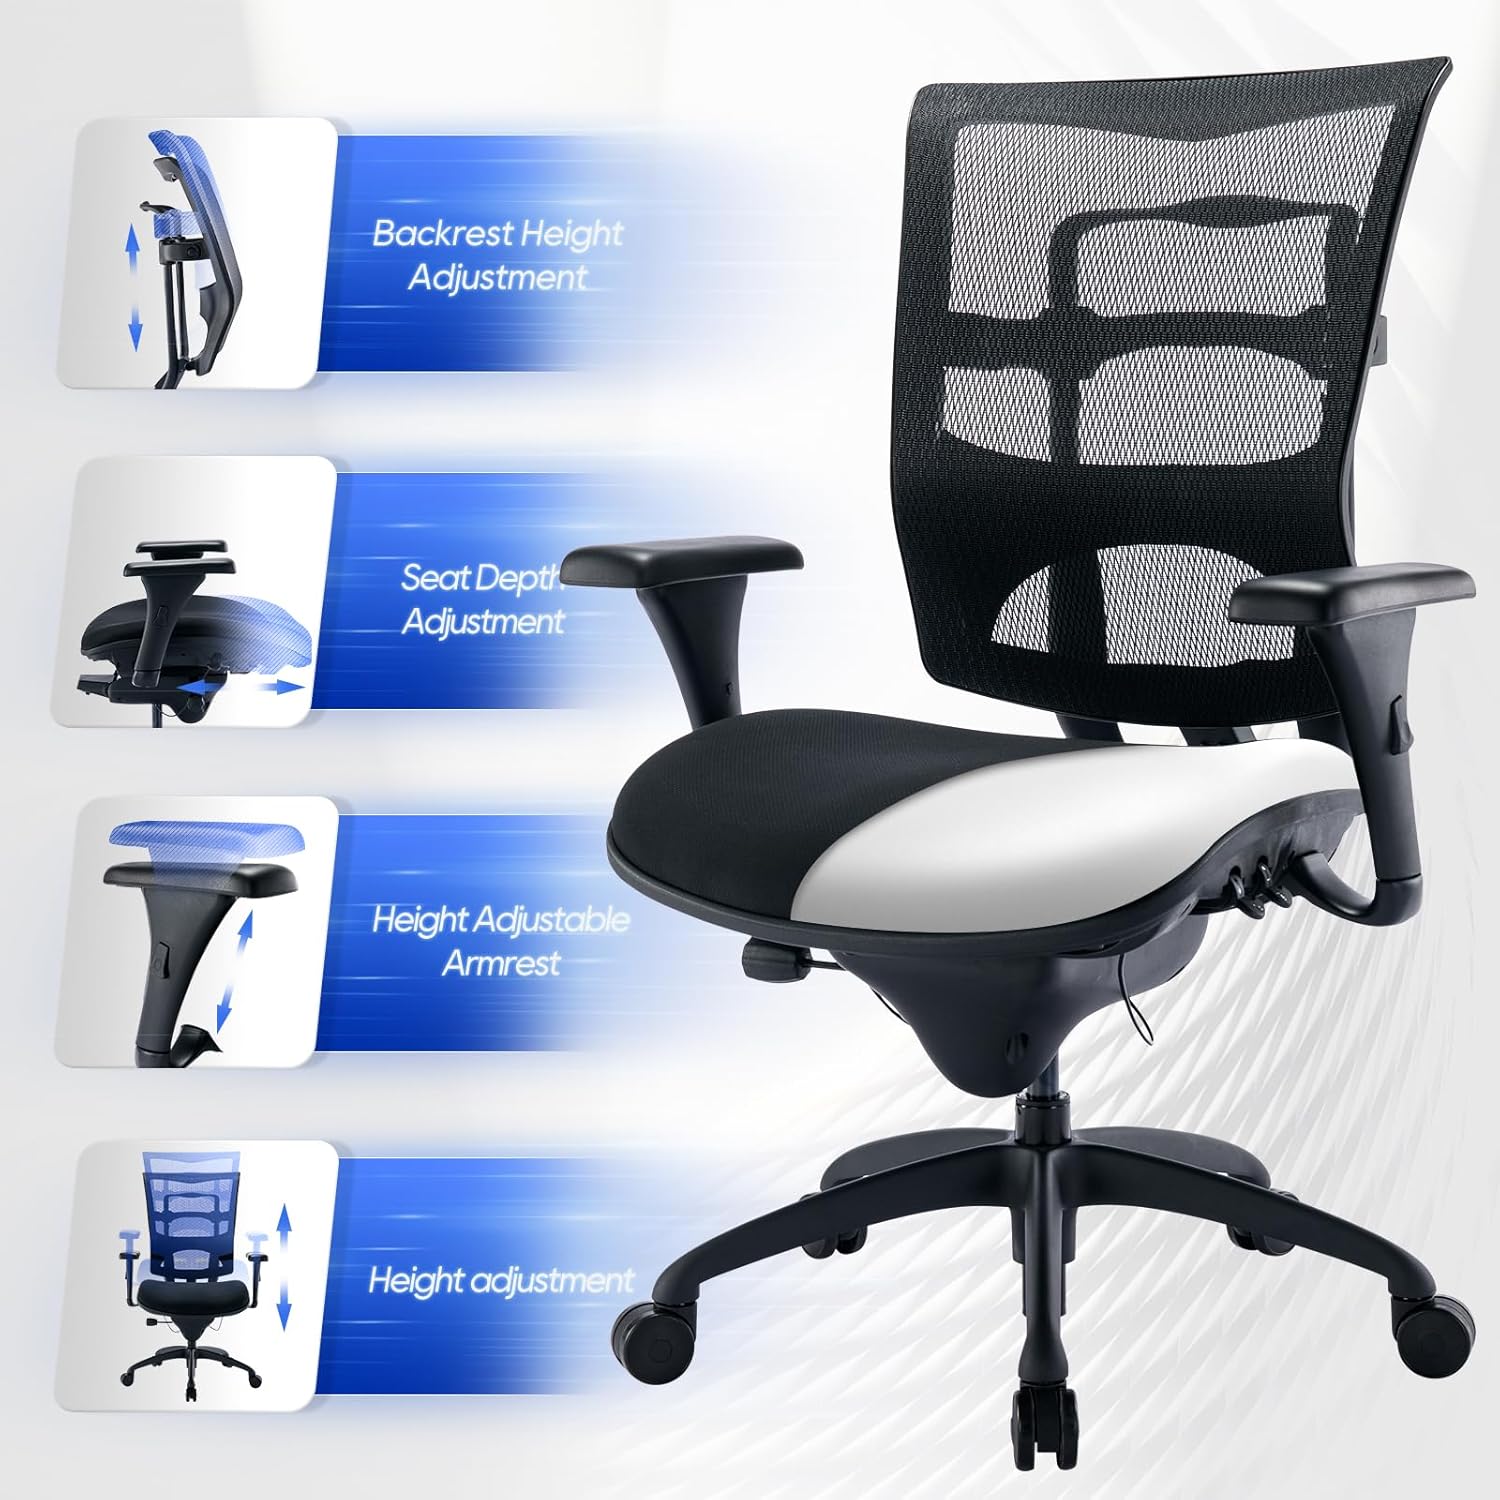
Figura 5.2: Sobreview of Adjustable Features. This image visually explains the different adjustable components of the chair, including backrest, seat, and armrests.

Figure 5.3: Recline and Seat Depth Adjustments. This image illustrates the various recline angles and the 2-inch seat depth adjustment feature.

Figure 5.4: Backrest and Lumbar Support Adjustment. This image details how the backrest height and integrated lumbar support can be customized for optimal comfort.
6. Mantenimiento
- Limpieza: Para una limpieza general, limpie la silla con un paño suave y seco.amp cloth. For spot removal on the mesh or upholstered parts, use a mild fabric cleaner and blot the area gently. Avoid harsh chemicals or abrasive cleaners.
- Controles periódicos: Periodically inspect all screws, bolts, and connections to ensure they are tight. Re-tighten if necessary to maintain stability and safety.
- Cuidado de las ruedas: Mantenga las ruedas libres de pelos y residuos para garantizar un movimiento suave.
7. Solución de problemas
Si tiene algún problema con su silla, consulte los siguientes problemas y soluciones comunes:
| Problema | Posible causa | Solución |
|---|---|---|
| La silla no ajusta la altura | Gas lift not engaged or faulty | Asegúrese de que la palanca de ajuste de altura esté completamente enganchada. Si el problema persiste, es posible que sea necesario reemplazar el pistón de gas. |
| La silla se tambalea o se siente inestable | Tornillos sueltos o montaje desigual | Revise y apriete todos los tornillos y pernos. Asegúrese de que la silla esté montada sobre una superficie plana. |
| Las ruedas no giran con suavidad | Residuos en las ruedas o ruedas dañadas | Retire el pelo o la suciedad de las ruedas. Si están dañadas, es posible que sea necesario reemplazarlas. |
| Recline function is stiff or not locking | Tilt tension too high or mechanism issue | Adjust the tilt tension knob counter-clockwise. Ensure the recline lock lever is fully engaged or disengaged. |
8. Especificaciones
- Número de modelo: H6
- Marca: COLAMIA
- Color: Negro
- Dimensiones del producto (L x An x Al): 75.49 x 76.99 x 116.84 cm (29.72 x 30.31 x 45.99 pulgadas)
- Peso del artículo: 27.22 kg (60 libras)
- Capacidad de peso: 450 libras
- Material principal: Carbon Fiber (Mesh)
- Material del marco: Metal
- Tipo de acabado: Chapado
- Estilo: Moderno
- Estilo de espalda: Espalda sólida
- Cojín cómodo: Upholstered, 3.9 inches thick
- Elevación de gas: Class 4 SGS Certified
- Certificaciones: Certificado por BIFMA
- Asamblea: Requerido
- Usos recomendados: Gaming, Reading, Office
9. Garantía y soporte
COLAMY is committed to full customer satisfaction. All necessary tools and hardware are included for easy assembly. If you have any questions, concerns, or require assistance with your COLAMY H6 office chair, please do not hesitate to contact our customer support team. We are dedicated to providing prompt and helpful service.
For support, please refer to the contact information provided at the point of purchase or on the official COLAMY websitio.


