Introducción
This manual provides detailed instructions for the assembly, operation, maintenance, and storage of your VOUNOT 3x3m Pop-up Gazebo. Please read all instructions carefully before use to ensure safe and correct handling of the product.
Advertencias de seguridad
Atención:
- Ensure the gazebo is properly anchored using the provided sandbags, ropes, and stakes to prevent any risks associated with wind. Failure to do so may result in damage or injury.
- Although designed to be weather-resistant, do not use the gazebo in extreme weather conditions such as heavy rain, strong winds (above 45 km/h), or snow. Disassemble and store the gazebo during such conditions.
- The gazebo's UV protection does not replace the need for personal sun protection like sunscreen.
- Always ensure the setup surface is flat and clear of obstructions.
- Mantenga a los niños y a las mascotas alejados del mirador durante el montaje y desmontaje.
Contenido del paquete
Antes del montaje, verifique que todos los componentes enumerados a continuación estén presentes y no estén dañados.

This image displays the complete list of parts for the gazebo: the foldable tent frame, the blue canopy, a black tent bag for storage, four black sandbags, eight ground nails (stakes), and four ropes for securing the gazebo.
- 1 x Tent Frame (Foldable Steel Structure)
- 1 x Canopy (100% Polyester, Blue, Silver-coated)
- 4 x Detachable Sidewalls (Waterproof, with 6 arched windows and 1 zippered door)
- 1 x Bolsa de transporte
- 4 x Sacos de arena
- 8 x Ground Stakes (Nails)
- 4 x Tension Ropes (3.2m each)
Instrucciones de instalación
The VOUNOT gazebo features a 1-touch pop-up system for quick and easy assembly. While designed for one person, two people may find initial setup easier.

This image illustrates the ease of setup. The 'Before' section shows two people struggling to open a traditional gazebo frame. The 'After' section demonstrates one person easily deploying the VOUNOT gazebo using its patented one-key pop-up central locking mechanism, which simplifies the process.
- Desembalaje y posicionamiento: Remove the folded gazebo frame from its transport bag. Place the frame on a flat, clear surface where you intend to set it up.
- Expandir parcialmente el marco: Gently pull the outer legs of the frame slightly outwards, allowing the frame to partially expand.
- Engage Pop-up Mechanism: Locate the central locking button on the underside of the canopy frame. With one hand, gently push up on the central hub until it clicks into place, fully extending the frame. This activates the 1-touch pop-up system.
- Fijar el dosel: Drape the canopy over the fully extended frame, ensuring it is centered and secured at all corners.
- Ajustar altura: Press the improved buttons on each leg to adjust the gazebo to one of the three available height settings. Ensure all four legs are locked at the same height.
- Fijar paredes laterales (opcional): If desired, attach the four detachable sidewalls using the hook-and-loop fasteners or clips provided. Position the sidewalls with windows and the zippered door as preferred.
- Anclaje seguro: Fill the four sandbags with sand or other heavy material and attach them to the gazebo legs. Use the provided stakes to secure the gazebo legs to the ground. For additional stability, attach the tension ropes to the gazebo frame and stake them into the ground at an angle.

This collage provides close-up views of key functionalities. It shows the central pop-up mechanism for easy setup, the ventilation opening for air circulation, the three-level height adjustment buttons, reinforced frame joints for durability, the design of the arched windows on the sidewalls, and the compact packed gazebo fitting conveniently into a car trunk, demonstrating its portability.
Instrucciones de funcionamiento
Ajuste de altura
The gazebo frame features three adjustable height settings. To adjust, press the improved buttons located on each leg and slide the inner leg up or down to the desired height. Ensure all four legs are securely locked at the same level for stability.
Sidewalls and Ventilation
- The four sidewalls are detachable and waterproof. They can be easily attached or removed as needed for privacy, weather protection, or an open-air feel.
- The gazebo includes 6 arched windows on the sidewalls, designed to allow soft light and light ventilation.
- One sidewall features a zippered door for quick and easy entry and exit.
- A ventilation opening is integrated into the roof to ensure efficient air circulation within the gazebo.
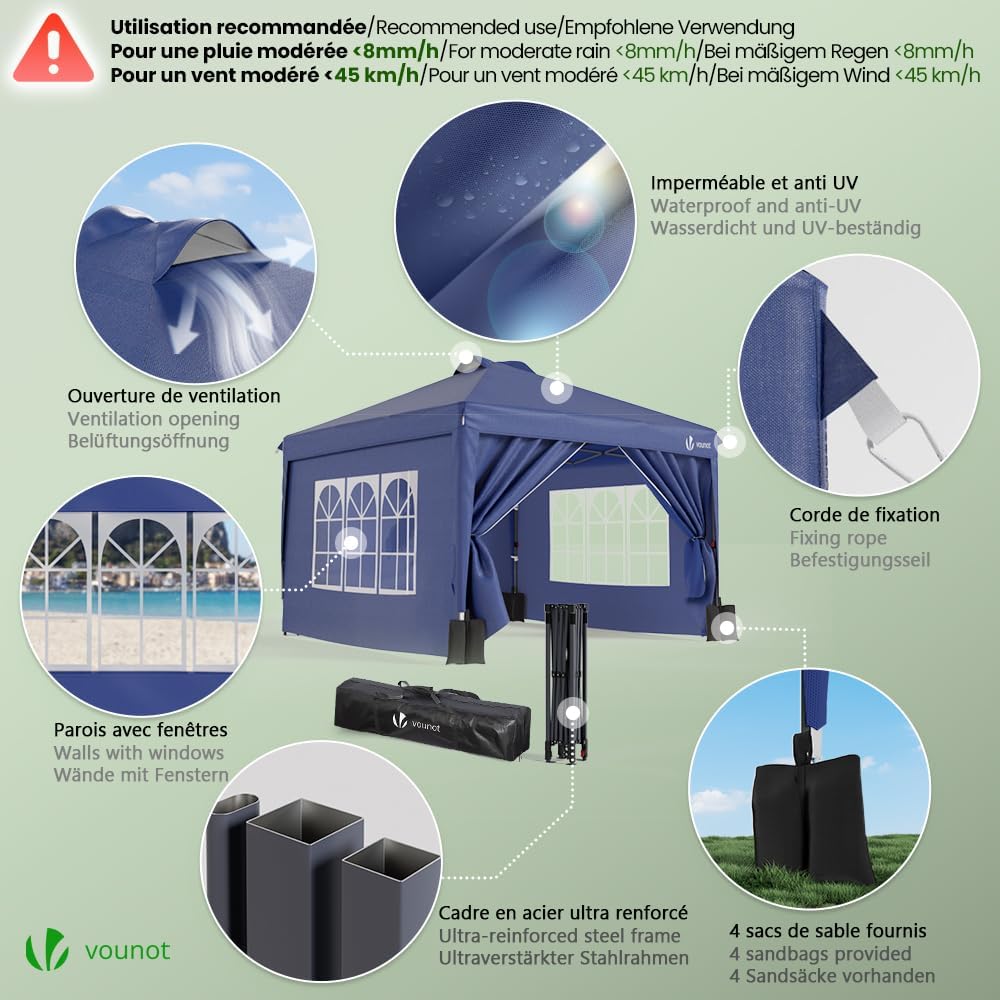
This diagram points out the main features of the gazebo. It shows the waterproof and UV-resistant canopy, a ventilation opening at the top for air circulation, fixing ropes for stability, removable sidewalls with arched windows, the robust ultra-reinforced steel frame, and the four sandbags provided for anchoring.
Mantenimiento
- Limpieza: Clean the canopy and sidewalls with a mild soap solution and a soft cloth or sponge. Rinse thoroughly with clean water and allow to air dry completely before storage. Do not use harsh chemicals or abrasive cleaners.
- Cuidado del marco: Inspeccione periódicamente el marco de acero para detectar cualquier signo de óxido o daño. Limpie la suciedad o los residuos del marco. Si aparece óxido, límpielo y aplique una pintura antioxidante.
- Sujetadores: Check all fasteners, ropes, and stakes regularly for wear and tear. Replace any damaged components to maintain stability and safety.
Almacenamiento
Proper storage extends the life of your gazebo.
- Desmontaje: Reverse the assembly steps. Carefully collapse the frame by disengaging the central locking mechanism and then pushing the outer legs inwards.
- Limpio y seco: Ensure the canopy, sidewalls, and frame are completely clean and dry before packing to prevent mold, mildew, and rust.
- Embalar: Fold the canopy and sidewalls neatly. Place the folded frame, canopy, sidewalls, sandbags, stakes, and ropes into the provided transport bag.
- Almacenar: Store the packed gazebo in a cool, dry place, away from direct sunlight and extreme temperatures.

This image provides the assembled dimensions of the gazebo and its compact packed size in the transport bag, illustrating its portability.
Solución de problemas
- Dificultad de montaje/plegado: Ensure the gazebo is on a flat surface. If the frame is stiff, gently rock it while expanding/collapsing. Applying a silicone spray to moving parts can help. While designed for one person, having two people can make the process smoother, especially during initial uses.
- Inestabilidad del mirador: Always use all provided anchoring accessories (sandbags, stakes, ropes). Ensure stakes are fully driven into the ground and ropes are taut. Do not use in windy conditions exceeding 45 km/h.
- Fuga de agua: Ensure the canopy is properly stretched and secured over the frame. While waterproof up to 1200pa, prolonged exposure to heavy rain may lead to minor seepage. Avoid using in extreme downpours.
- Problemas con la cremallera: If a zipper on the transport bag or sidewalls becomes stiff, apply a zipper lubricant or a small amount of wax to ease movement. Avoid forcing zippers.
Presupuesto
| Característica | Especificación |
|---|---|
| Marca | VOUNOT |
| Número de modelo | 8766363042141 |
| Área base | 3 x 3 meters (9.8 x 9.8 feet) |
| Altura ajustable | 255 cm - 275 cm (100.4 pulgadas - 108.2 pulgadas) |
| Material del marco | Aleación de acero |
| Material de la cubierta | 100% Polyester with Silver Coating |
| Protección UV | 99% |
| Resistencia al agua | Up to 1200pa (Waterproof) |
| Peso del artículo | Aproximadamente 17.8 kg (39.2 libras) |
| Dimensiones empaquetadas | 120 22 x x 21 cm (47.2 8.6 x x 8.3 in) |
| Accesorios incluidos | 4 detachable sidewalls, 4 sandbags, 8 stakes, 4 tension ropes, 1 transport bag |

This image compares the superior design of the VOUNOT gazebo with typical shortcomings found in other gazebos, highlighting improved plastic knobs for secure three-level height adjustment, additional tubes and reinforced connectors for increased stability, extended and reinforced plastic brackets to prevent pole bending, and enlarged sturdy metal legs with drilled holes for added stability.
Garantía y soporte
Specific warranty information is not provided in the product details. For any questions regarding warranty, product defects, or support, please contact the seller or manufacturer directly through your purchase platform. Keep your proof of purchase for any warranty claims.


