1. Introducción
Thank you for choosing the Geek Smart L7 Robot Vacuum and Mop. This device is designed to provide efficient and thorough cleaning for your home, combining powerful vacuuming with intelligent mopping capabilities. Featuring advanced LDS navigation, Wi-Fi connectivity, and smart app control, the L7 ensures a customized cleaning experience for various floor types, including carpets and hard floors.
This manual provides essential information for the safe operation, setup, maintenance, and troubleshooting of your robot vacuum. Please read it carefully before use and retain it for future reference.
2. Instrucciones de seguridad
Para reducir el riesgo de lesiones o daños, lea y siga todas las precauciones de seguridad al configurar, usar y realizar el mantenimiento de su aspiradora robot.
- Este aparato puede ser utilizado por niños mayores de 8 años y personas con capacidades físicas, sensoriales o mentales reducidas o con falta de experiencia y conocimientos, si están bajo supervisión o reciben instrucciones sobre el uso del aparato de forma segura y comprenden los peligros que implica.
- Se debe supervisar a los niños para garantizar que no jueguen con el aparato.
- La limpieza y el mantenimiento por parte del usuario no deberán ser realizados por niños sin supervisión.
- Utilice únicamente el adaptador de corriente original proporcionado por el fabricante.
- No utilice el robot en entornos con llamas abiertas o materiales inflamables.
- Mantenga el cabello, la ropa suelta, los dedos y todas las partes del cuerpo lejos de las aberturas y las partes móviles.
- No opere el robot en habitaciones donde duerma un bebé o un niño.
- No utilice el robot para recoger residuos grandes, líquidos u objetos en llamas.
- Asegúrese de que el robot esté colocado sobre una superficie estable y no pueda caerse de lugares altos.
- Turn off the robot and unplug the charging dock before cleaning or maintenance.
3. Contenido del paquete
Verifique que todos los componentes estén presentes y en buenas condiciones al desembalar.
- Geek Smart L7 Robot Vacuum and Mop
- Base de carga
- Adaptador de corriente
- Cepillos laterales (2 pares)
- Cepillo principal
- Dust Bin (680ML)
- 2-in-1 Water Tank & Dust Bin (350ML water tank & 260ML dust bin)
- Paños de fregona (2)
- High-Efficiency Filter (pre-installed in dust bin)
- Herramienta de limpieza
- Manual de usuario
4. Producto terminadoview
Componentes del robot aspirador

Image: The Geek Smart L7 Robot Vacuum, showcasing su parte superior view with control buttons, LDS sensor, and accompanying accessories like the charging dock and replacement filters.
- LDS Navigation Sensor: Ubicado en la parte superior, para mapeo y navegación precisos.
- Botones de control: Power/Clean, Home/Recharge.
- Parachoques delantero: Detecta obstáculos.
- Cepillos laterales: Barra los escombros hacia el camino principal del cepillo.
- Cepillo principal: Recoge suciedad y residuos.
- Ruedas motrices: Permitir el movimiento a través de diversas superficies.
- Contactos de carga: Conéctese con la base de carga.
- Depósito de basura/tanque de agua: Removable compartments for dust collection and water for mopping.
Base de carga
The charging dock provides power to recharge the robot's battery. It should be placed in an open area with sufficient clearance.
5. Configuración
5.1 Ubicación de la base de carga
- Coloque la base de carga contra una pared en un área abierta.
- Asegúrese de que haya al menos 0.5 metros (1.6 pies) de espacio libre a ambos lados del muelle y 1.5 metros (4.9 pies) al frente.
- Conecte el adaptador de corriente a la base de carga y enchúfelo a una toma de pared.
- Asegúrese de que el indicador de encendido en la base de carga se ilumine.
5.2 Carga inicial
- Coloque el robot en la base de carga, asegurándose de que los contactos de carga estén alineados.
- The robot will automatically begin charging. Allow it to fully charge before its first use (approximately 4-5 hours).
5.3 Conexión y mapeo de aplicaciones

Image: The Geek Smart L7 Robot Vacuum actively scanning its environment using LDS navigation to create a detailed map, with digital map representations floating above it.
- Download the Geek Smart app from your mobile device's app store (available for iOS and Android).
- Registre una cuenta e inicie sesión.
- Follow the in-app instructions to add your L7 robot vacuum. This typically involves connecting to the robot's Wi-Fi hotspot and then connecting the robot to your home Wi-Fi network.
- Once connected, initiate a full cleaning cycle. The robot will use its LDS navigation to create an accurate map of your home. This map will be saved in the app for future use, allowing for features like selective room cleaning and setting no-go zones. The robot can save up to 5 different maps.
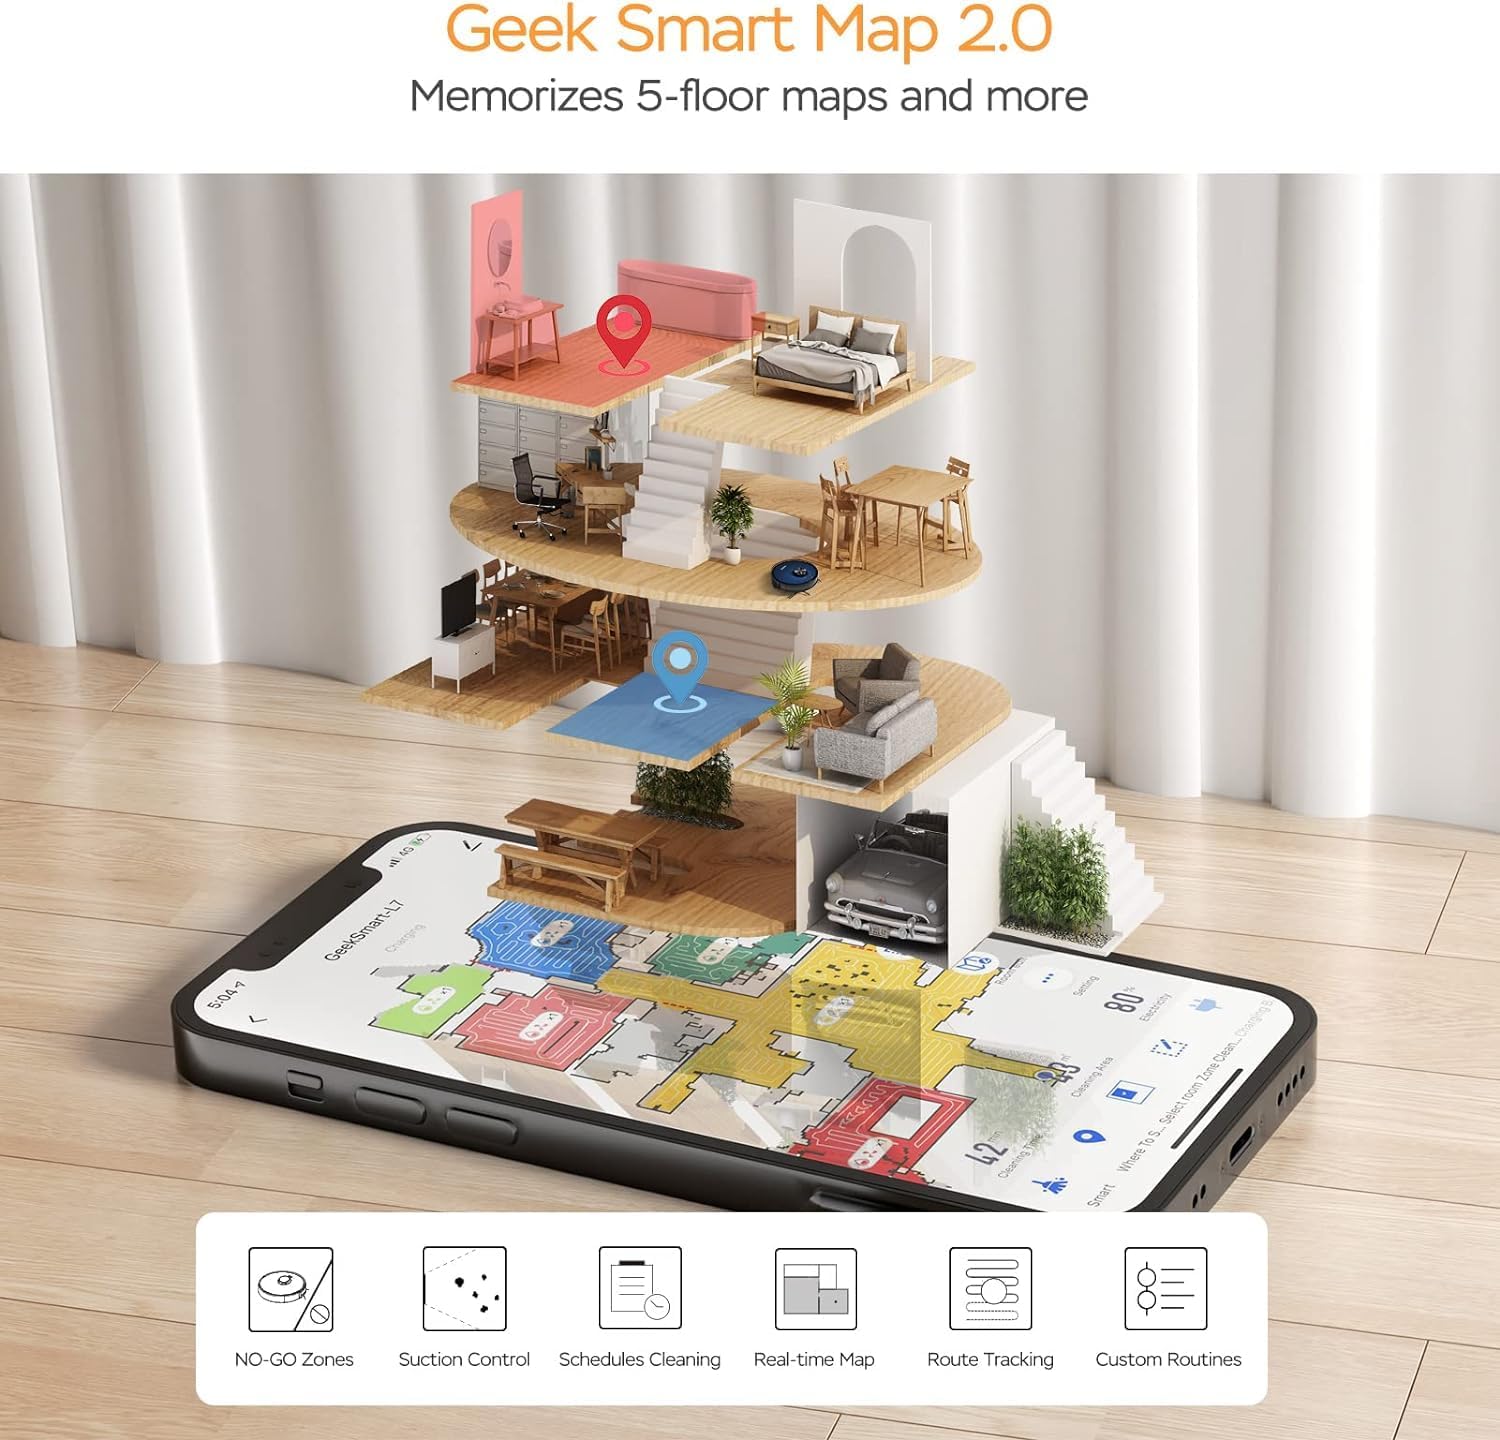
Image: A smartphone screen displaying the Geek Smart app interface, showing a color-coded floor plan map with various cleaning zones and controls.
6. Instrucciones de funcionamiento
6.1 Inicio y parada de la limpieza
- Empezar a limpiar: Press the Power/Clean button on the robot or tap "Start Cleaning" in the app. The robot will begin a full cleaning cycle.
- Pausa la limpieza: Press the Power/Clean button during operation or tap "Pause" in the app.
- Reanudar limpieza: Press the Power/Clean button again or tap "Resume" in the app.
- Regreso al muelle: Press the Home/Recharge button on the robot or tap "Recharge" in the app. The robot will return to its charging dock.
6.2 Modos de limpieza
The L7 offers various cleaning modes to suit different needs.

Image: The Geek Smart L7 Robot Vacuum demonstrating its 2-in-1 sweeping and mopping capabilities on a hard floor, with debris being swept and a damp mop trail visible.
- Limpieza automática: The robot intelligently plans its cleaning path using LDS navigation.
- Aspirar: Utilizes up to 2700Pa suction power to clean dirt and debris from various surfaces.
- trapear: Attach the mop cloth and fill the 2-in-1 water tank. The electronic water tank allows for adjustable water output.
- Aspirar y trapear (simultáneamente): The robot can vacuum and mop simultaneously when the 2-in-1 tank is installed.
- Modo de refuerzo de alfombra: The robot automatically increases suction power when it detects carpeted areas for deeper cleaning.

Image: The Geek Smart L7 Robot Vacuum actively cleaning a hard floor, with a visual representation of its powerful 2700Pa suction lifting debris.

Image: The Geek Smart L7 Robot Vacuum transitioning from a hard floor to a carpet, illustrating its Carpet Boost Mode with enhanced suction indicated by glowing lines.

Image: The Geek Smart L7 Robot Vacuum positioned on a floor split between marble and wood, illustrating its integrated mopping system and adjustable water output for different surfaces.
6.3 Funciones de control de aplicaciones
The Geek Smart app unlocks advanced cleaning customization.
- Limpieza selectiva de habitaciones: Choose specific rooms or areas on the map for cleaning.
- No-Go Zones / No-Mop Zones: Draw virtual boundaries on the map to prevent the robot from entering certain areas or mopping carpets.
- Invisible Walls: Create virtual walls to restrict the robot's movement.
- Programación: Set cleaning schedules for automatic operation at desired times.
- Ajuste de potencia de succión: Manually adjust the suction level.
- Ajuste de salida de agua: Control the water flow for mopping.

Image: The Geek Smart L7 Robot Vacuum operating quietly (65dB) in a living room, demonstrating its low noise level suitable for homes with sleeping individuals or pets.
7. Mantenimiento
El mantenimiento regular garantiza un rendimiento óptimo y prolonga la vida útil de su robot aspirador. Apague siempre el robot y desconecte la base de carga antes de realizar cualquier mantenimiento.
7.1 Vaciado del depósito de polvo
- Presione el botón de liberación del depósito de polvo y extraiga el depósito de polvo.
- Abra la tapa del depósito de polvo y vacíe el contenido en un bote de basura.
- Limpie el filtro y el depósito de polvo con la herramienta de limpieza proporcionada o un cepillo suave.
- Vuelva a instalar el depósito de polvo.
7.2 Cleaning the 2-in-1 Water Tank & Dust Bin
- Retire el tanque 2 en 1 del robot.
- Empty any remaining water from the water tank compartment.
- Vacíe el compartimento para el polvo y limpie el filtro.
- Rinse the water tank compartment with clean water. Do not immerse the entire tank in water, especially the electronic components.
- Allow all parts to air dry completely before reassembling and reinstalling.
7.3 Limpieza del cepillo principal
- Da la vuelta al robot y presiona las pestañas de liberación para quitar la cubierta del cepillo principal.
- Levante el cepillo principal.
- Utilice la herramienta de limpieza para eliminar el cabello y los residuos enredados alrededor del cepillo y sus cojinetes.
- Vuelva a instalar el cepillo principal y la cubierta.
7.4 Limpieza de los cepillos laterales
- Tire suavemente los cepillos laterales hacia arriba para quitarlos.
- Remove any hair or debris. If brushes are bent, soak them in warm water for a few minutes to reshape.
- Press the brushes back into place until they click.
7.5 Limpieza de sensores y contactos de carga
- Use a clean, dry cloth to wipe the cliff sensors (located on the bottom of the robot), wall sensors (on the side), and the charging contacts on both the robot and the charging dock.
- Ensure the LDS sensor on top is also clean and free of obstructions.
8. Solución de problemas
If you encounter issues with your robot vacuum, refer to the following table for common problems and solutions.
| Problema | Posible causa | Solución |
|---|---|---|
| robot no enciende | Batería baja; interruptor de encendido apagado | Coloque el robot en la base de carga; asegúrese de que el interruptor de encendido esté encendido. |
| El robot no puede cargarse | Contactos de carga sucios; la base de carga no recibe alimentación | Limpie los contactos de carga del robot y la base; asegúrese de que la base esté enchufada. |
| El robot se queda atascado con frecuencia | Obstáculos en el suelo; sensores de desnivel sucios | Clear cables and small objects; Clean cliff sensors. |
| Pobre rendimiento de limpieza | Dust bin full; Brushes tangled; Filter clogged | Vaciar el depósito de polvo; limpiar los cepillos principales y laterales; limpiar o reemplazar el filtro. |
| La función de trapeador no funciona | Water tank empty; Mop cloth dry; Water outlet clogged | Fill water tank; Moisten mop cloth; Clean water outlet. |
| Problemas de conexión de la aplicación | Contraseña de Wi-Fi incorrecta; Router demasiado lejos; Robot desconectado | Verify Wi-Fi credentials; Move robot closer to router; Restart robot and router. |
9. Especificaciones
| Característica | Especificación |
|---|---|
| Marca | friki inteligente |
| Nombre del modelo | L7 |
| Tipo de navegación | LiDAR de 360° |
| Potencia máxima de succión | 2700 Pa |
| Capacidad de la batería | 2600 mAh |
| Tiempo de ejecución máximo | 130 minutos |
| Capacidad del depósito de polvo | 680 ml |
| Water Tank Capacity (2-in-1) | 350 ml |
| Nivel de ruido | Sub-65 dB |
| Dimensiones del producto | 12.59" de largo x 12.59" de ancho x 3.74" de alto |
| Peso del artículo | 13.39 libras |
| Dispositivos compatibles | Amazon Echo |
| Código Postal | 764773837187 |
10. Garantía y soporte
Geek Smart products are manufactured to the highest quality standards. For warranty information, technical support, or customer service inquiries, please refer to the contact information provided on the product packaging or visit the official Geek Smart websitio.
Conserve su comprobante de compra para reclamos de garantía.


