Introducción
This manual provides detailed instructions for the assembly, installation, operation, and maintenance of your JUBEST 42" x 84" Glass Sliding Barn Door. This door features a durable aluminum frame and frosted tempered glass, designed for smooth and quiet operation. Please read all instructions carefully before beginning installation to ensure proper setup and safe use.
Información de seguridad
- Utilice siempre el equipo de seguridad adecuado, incluidos guantes y protección para los ojos, durante el montaje y la instalación.
- Ensure the mounting surface (wall) is structurally sound and capable of supporting the weight of the door and hardware. Consult a professional if unsure.
- Mantenga a los niños y las mascotas alejados del área de trabajo durante la instalación.
- Manipule los paneles de vidrio con sumo cuidado para evitar roturas y lesiones.
- Do not modify the product or use non-approved parts, as this may void the warranty and create safety hazards.
- Asegúrese de que todos los sujetadores estén bien apretados antes de usar la puerta.
Contenido del paquete
Verifique que todos los componentes enumerados a continuación estén presentes y sin daños antes de comenzar el ensamblaje.
- 2 paneles de vidrio
- 1 Metal panel
- Rieles 2
- 5 Rail fixings
- 2 Rodillos
- 2 Door stoppers
- 2 Floor guides
- 2 Anti-jump pads
- Necessary screws and wrenches

Image: All components included in the JUBEST Sliding Barn Door package, showing glass panels, metal panel, rails, rollers, and various hardware pieces.
Presupuesto
| Marca | JUBEST |
| Número de modelo | JUBEST Sliding Barn Door-KDA06-42B |
| Tamaño | 42 x 84 pulgadas |
| Dimensiones del producto | 1.36 x 42.03 x 83.97 pulgadas |
| Color | Negro |
| Material | Aluminio, vidrio |
| Estilo | Moderno |
| Peso del artículo | 50 libras |
| Requiere ensamblaje | Sí |
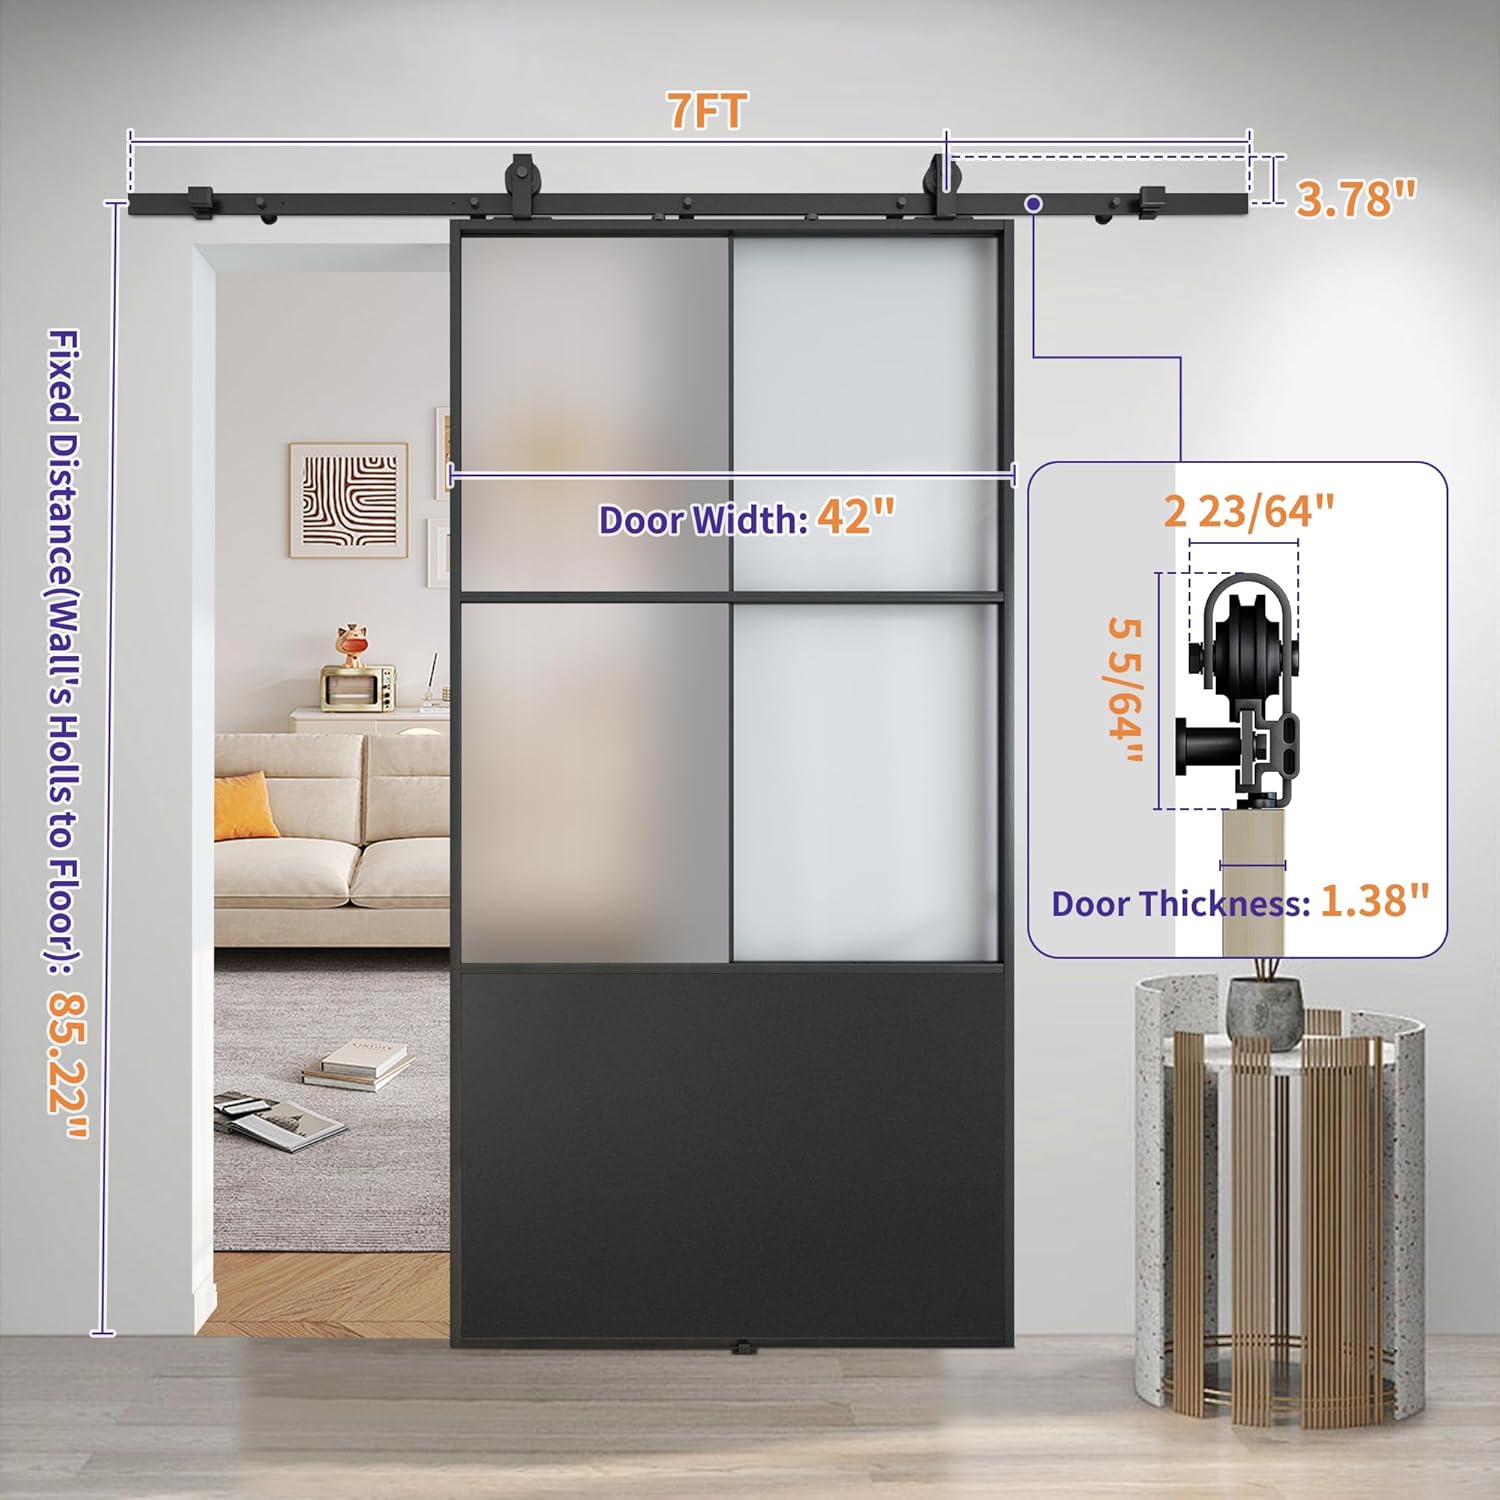
Image: Detailed dimensions of the JUBEST Sliding Barn Door, showing overall width, height, and door thickness.
Configuración e instalación
The JUBEST sliding barn door is designed for straightforward installation. Follow these steps carefully.
Step 1: Assemble the Door Panels
Connect the glass panels and metal panel to form the complete door structure. The panels are pre-drilled for easy alignment. Ensure all connections are secure.
Step 2: Connect the Rail
Join the two rail sections together. Ensure the connection is flush and stable.
Step 3: Install the Hardware
Mount the rail fixings to your wall, ensuring they are aligned with wall studs for maximum support. Attach the rollers to the top of the assembled door. Install the anti-jump pads and door stoppers onto the rail.
Paso 4: Cuelgue la puerta
Carefully lift the assembled door and hang the rollers onto the installed rail. Adjust the door stoppers to define the open and closed positions. Install the floor guides to prevent the door from swinging.

Image: A visual guide illustrating the four main steps of installation: assembling panels, connecting the rail, installing hardware, and hanging the door.
Customization Option: Decorative Stripes
The sliding barn door includes extra stripes, allowing you to customize the door's appearance. You can choose to apply these stripes to create a different aesthetic for your door.

Image: Two versions of the JUBEST Sliding Barn Door, one with decorative horizontal and vertical stripes on the glass panels, and one without, demonstrating style options.
Operación
Your JUBEST sliding barn door is designed for smooth and quiet operation. To open or close the door, gently push or pull it along the top-mounted rail. The rollers facilitate effortless movement.
Características operativas clave:
- Smooth Sliding Pulley: The door utilizes a smooth sliding pulley system for quiet and easy movement.
- Premium Anti-jump Pad: Anti-jump pads are installed to ensure the door remains securely on the track and prevents it from lifting off the rail during operation.
- Adjustable Door Stoppers: The included door stoppers can be adjusted along the rail to control how far the door opens or closes, allowing you to customize its travel path.
- Guía de suelos: A floor guide is installed at the bottom to prevent the door from swinging away from the wall as it slides.

Imagen: Primer plano view of the smooth sliding pulley system, highlighting its design for quiet and durable operation.

Imagen: Primer plano view of the premium anti-jump pad, designed to keep the door securely on the track.

Imagen: Primer plano view of an adjustable door stopper, which can be positioned to limit the door's travel.

Imagen: Primer plano view of the floor guide, installed to prevent the door from swaying.
Mantenimiento
- Limpieza del vidrio: Use a soft, lint-free cloth and a non-abrasive glass cleaner to clean the frosted tempered glass panels. Avoid harsh chemicals that may damage the frosting.
- Limpieza del marco: Limpie el marco de aluminio con un paño suave.amp cloth. For stubborn dirt, a mild soap solution can be used, followed by rinsing and drying.
- Comprobación del hardware: Inspeccione periódicamente todos los tornillos y fijaciones para asegurarse de que estén bien apretados. Vuelva a apretarlos si es necesario.
- Lubricación: If the door's sliding action becomes less smooth over time, a silicone-based lubricant can be applied sparingly to the rail and roller wheels.
Solución de problemas
- La puerta no se desliza suavemente: Check the rail for obstructions or debris. Ensure the rollers are clean and properly aligned on the track. Apply lubricant if needed.
- Door is wobbly or swings: Verify that the floor guide is correctly installed and adjusted. Check all rail fixings and door panel connections for tightness.
- Door stoppers not holding position: Ensure the door stoppers are securely tightened on the rail. Adjust their position as required.
- Ruido durante el funcionamiento: Inspect rollers and rail for any foreign objects or wear. Lubricate the rollers and track if friction is causing noise.
Garantía y soporte
JUBEST is committed to providing quality products. This product comes with a manufacturer's warranty. For specific warranty details, claims, or technical support, please refer to the warranty card included in your package or contact JUBEST customer service directly. Our professional team is available to assist you with any issues or questions.


