1. Instrucciones de seguridad
Please read all safety instructions carefully before installing, operating, or maintaining the VEVOR Commercial Grease Trap. Failure to follow these instructions may result in property damage, injury, or improper operation.
- Personal calificado: Installation and maintenance should only be performed by qualified personnel familiar with local plumbing codes and regulations.
- Equipo de protección individual (EPI): Always wear appropriate PPE, including gloves and eye protection, during installation and maintenance.
- Ventilación adecuada: Asegúrese de que haya una ventilación adecuada en el área de instalación.
- Instalación segura: The grease trap must be installed on a stable, level surface to prevent tipping or movement.
- Control de fugas: After installation, thoroughly check all connections for leaks before regular operation.
- Precaución con el agua caliente: Be cautious when handling hot wastewater, as it can cause burns.
- Productos químicos: Do not use harsh chemicals or solvents inside the grease trap, as they can damage the unit or interfere with its function.
- Desecho: Dispose of collected grease and food scraps according to local environmental regulations.
2. Producto terminadoview
The VEVOR Commercial Grease Trap (Model YSFLQ60*40*40) is a high-efficiency oil-water separator designed for commercial and home kitchen environments. Constructed from durable 18/8 stainless steel, it effectively intercepts and separates fats, oils, and greases (FOGs) from wastewater, preventing pipe clogging and environmental pollution. Its triple-path filtration pipe design ensures efficient separation, while the robust construction guarantees longevity and ease of cleaning.
This unit is ideal for restaurants, canteens, coffee shops, convenience stores, and home kitchens, offering a reliable solution for managing kitchen wastewater.
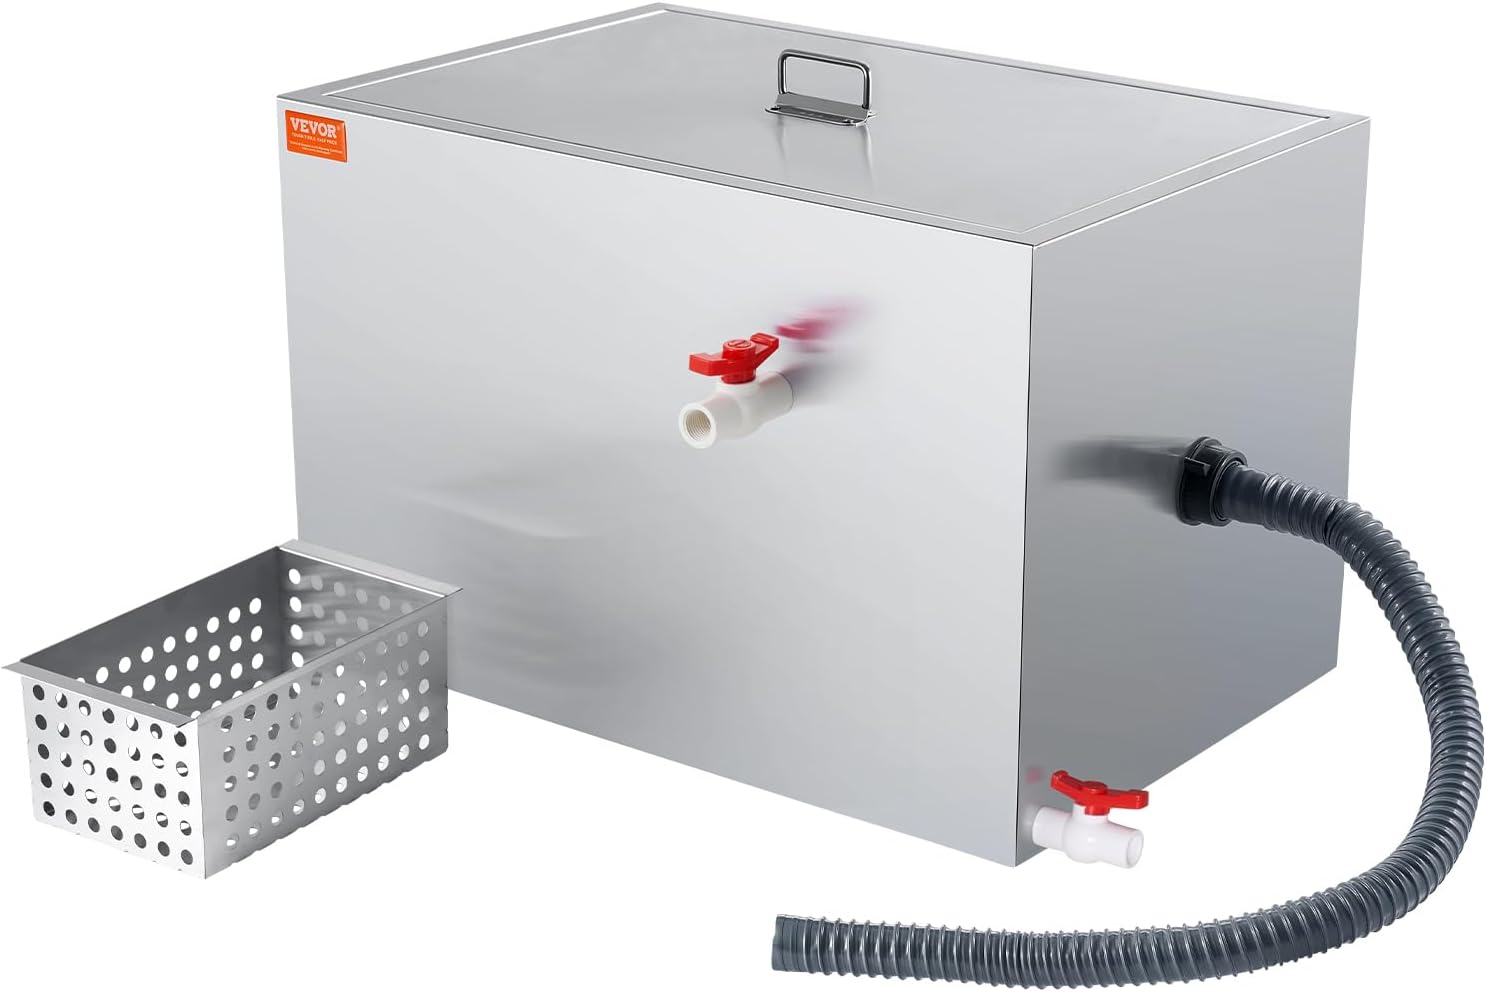
Image 2.1: VEVOR Commercial Grease Trap (Model YSFLQ60*40*40) with included accessories. The unit is made of stainless steel with a side inlet and outlet, and includes a flexible drain hose and a removable filter basket.
3. Componentes
The VEVOR Commercial Grease Trap comes with the following components:
- Grease Trap Unit: The main stainless steel body with internal baffles for oil-water separation.
- Tapa: Removable lid with a handle and buckle locks for secure closure.
- Cesta de filtro: Perforated stainless steel basket for collecting solid food scraps.
- Inlet/Outlet Pipes: Threaded connections for water inlet and outlet.
- Oil Drain Valve: A valve located at the bottom for draining separated oil.
- Water Drainage Outlet: An additional faucet for draining water, connectable to a floor drain.
- Flexible Drain Hose: For connecting the unit to the sink drain or sewer line.
- Sealing Accessories: Rubber rings, gaskets, raw tape, nuts, and thread heads for secure, leak-proof connections.
- Manual de usuario: este manual de instrucciones.

Imagen 3.1: Explosión view of the VEVOR Commercial Grease Trap components, illustrating the main unit, filter basket, drain pipes, oil drain valve, and various sealing accessories for installation.
4. Instalación
The VEVOR Commercial Grease Trap is designed for under-sink or under-counter installation. It comes fully assembled, simplifying the installation process. Ensure the installation area is level and provides sufficient space for maintenance.
4.1. Pasos previos a la instalación
- Deshacer: Carefully unpack all components and verify against the components list.
- Inspeccionar: Check the unit and all accessories for any damage incurred during shipping.
- Preparar ubicación: Choose a suitable location under the sink or counter that is easily accessible for cleaning and maintenance. Ensure the surface is stable and level.
- Ensamblar componentes internos: Place the filter basket inside the grease trap unit.

Image 4.1: The internal structure of the grease trap, illustrating the placement of the filter basket and the oil-water separation baffles.
4.2. Connecting the Oil Drain Valve
- Locate the oil drain port at the bottom of the grease trap.
- Apply PTFE sealing tape (raw tape) to the threads of the oil drain valve.
- Screw the oil drain valve into the port and tighten securely to ensure a leak-proof seal.
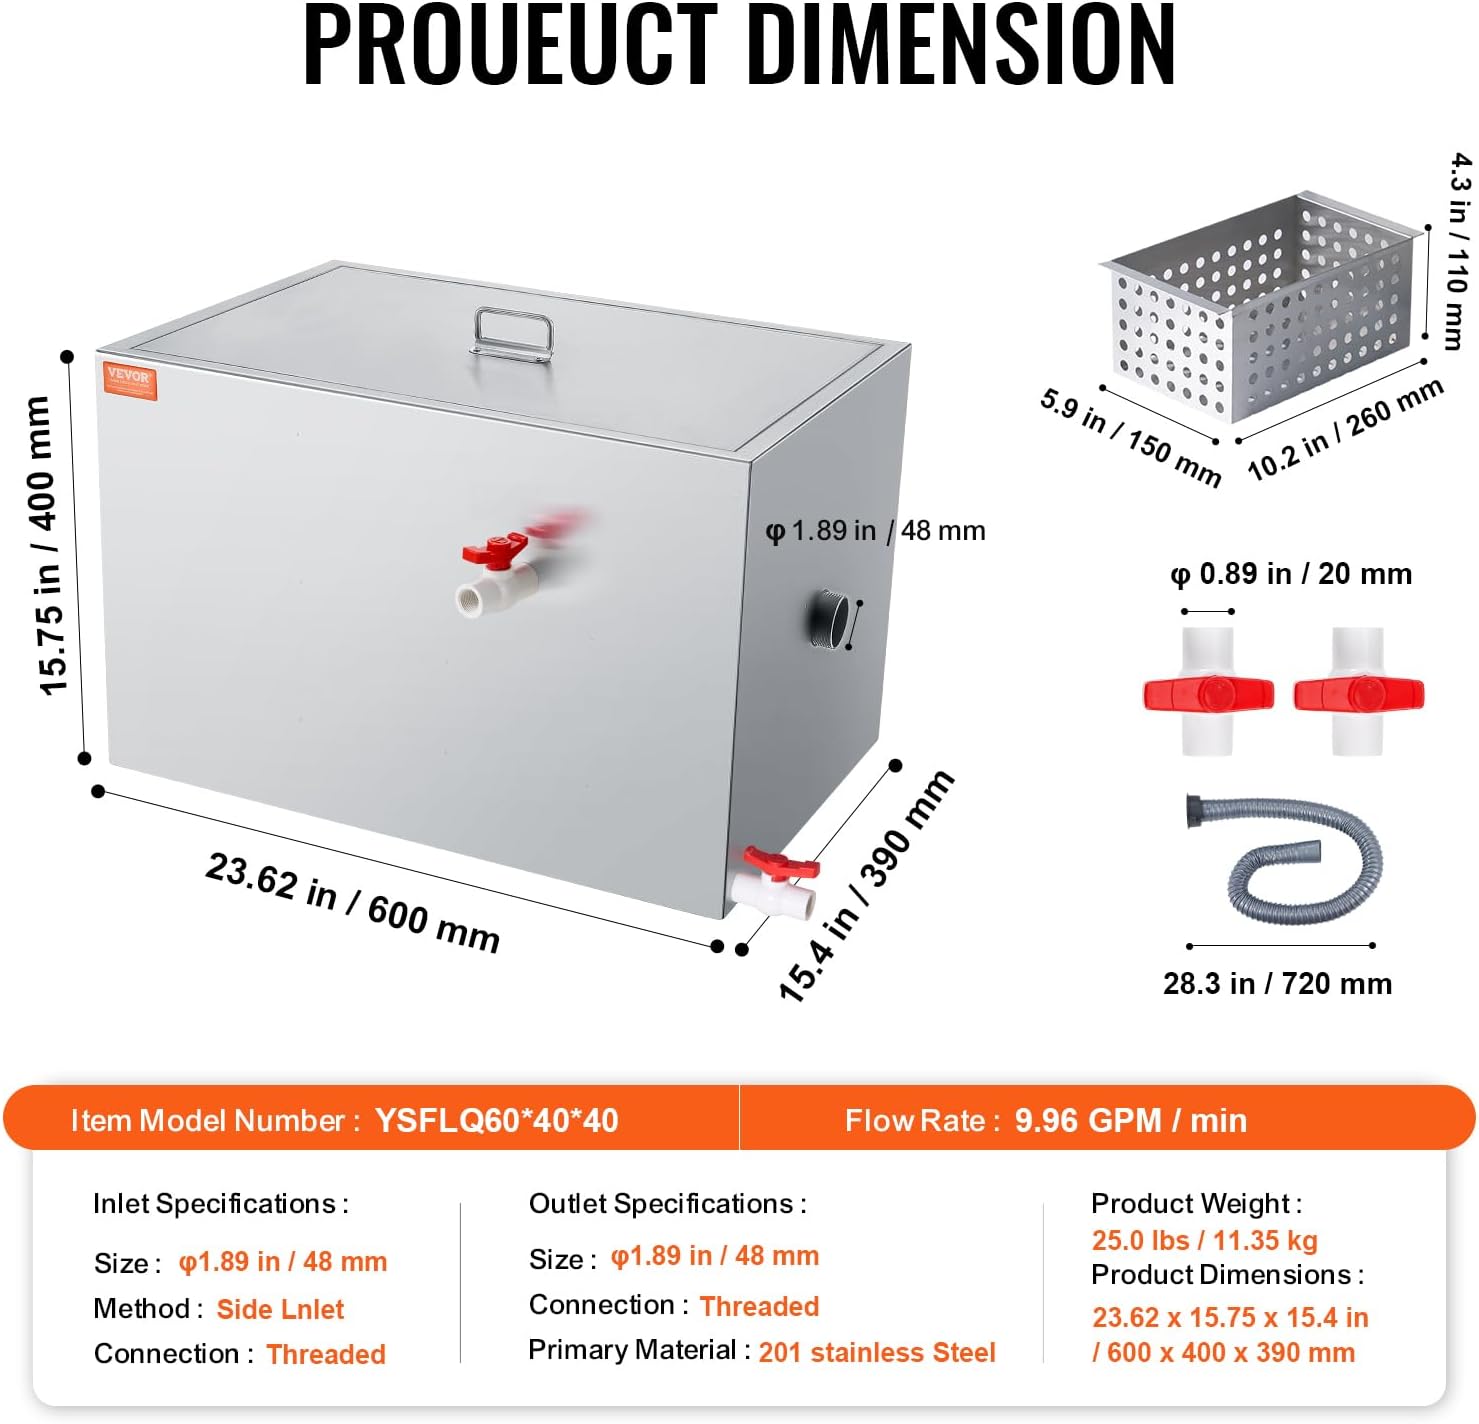
Image 4.2: Installation of the oil drain valve, showing the threaded connection and the valve handle.
4.3. Connecting Inlet and Outlet Pipes
- Conexión de entrada: Connect the flexible drain hose from your sink or dishwasher to the grease trap's inlet port. Ensure a rubber ring and sealing tape are used for a tight, leak-proof connection. The inlet is typically on the side of the unit.
- Conexión de salida: Connect the other end of the flexible drain hose from the grease trap's outlet port to your main sewer line. Again, use a rubber ring and sealing tape for a secure connection.
- Water Drainage Outlet: If desired, connect the additional water drainage outlet (faucet) to a floor drain using an appropriate hose.

Image 4.3: Schematic of the grease trap installed under a sink, showing the inlet from the sink and the outlet connecting to the main drainage system.

Image 4.4: Close-up illustrating the compact structure and the various connection points for water inlet, outlet, oil drainage, and an optional floor drain connection.
4.4. Guía de instalación en vídeo
Para obtener una guía visual sobre el proceso de instalación, consulte el siguiente video:
Video 4.1: This video demonstrates the general installation of a grease trap under a sink, including connecting the sink basket strainer, applying sealing tape, and attaching the P-trap and unions. While the specific model shown may vary, the principles of connection and sealing are applicable.
Vídeo 4.2: Este vídeo proporciona una visión generalview of the BEAMNOVA Commercial Grease Trap, including its components and a demonstration of assembling the filter basket and connecting the drain and outlet valves. It also highlights features like improved welding and rounded corners.
Video 4.3: This video demonstrates the installation of an IRONWALLS 8LBS Side Inlet Commercial Grease Interceptor, focusing on the assembly of the filter basket, the installation of the oil outlet valve, and the connection of the water inlet and outlet pipes.
5. Operación
Once installed, the VEVOR Commercial Grease Trap operates automatically to separate FOGs from wastewater. Wastewater flows into the unit, where solid food particles are caught by the filter basket. The water then passes through internal baffles, allowing fats, oils, and greases, which are lighter than water, to rise to the surface and accumulate. The cleaner water exits through the outlet pipe to the sewer system.

Imagen 5.1: Un interior view of the grease trap, detailing the flow path of wastewater and the separation of water, grease, and food scraps through the triple-path filtration system.
6. Mantenimiento
Regular maintenance is crucial for the efficient operation and longevity of your grease trap. The frequency of cleaning depends on the volume and type of wastewater processed.
6.1. Daily/Weekly Cleaning (Filter Basket)
- Open the lid of the grease trap.
- Retire con cuidado la cesta del filtro.
- Empty any collected food scraps into a waste bin.
- Rinse the filter basket thoroughly with warm water.
- Return the clean filter basket to its position inside the grease trap.
- Cierre bien la tapa.
6.2. Monthly/Bi-Monthly Cleaning (Grease Removal)
- Ensure the water flow to the sink/dishwasher connected to the grease trap is turned off.
- Open the lid and remove the filter basket (if not already done).
- Coloque un recipiente adecuado debajo de la válvula de drenaje de aceite.
- Open the oil drain valve to allow the accumulated grease to drain into the container.
- Once the grease has drained, close the oil drain valve.
- If necessary, use the water drainage outlet to drain any remaining water for a more thorough cleaning of the internal surfaces.
- Scrape any solidified grease from the internal baffles and walls of the trap using a non-abrasive tool. Collect all removed grease for proper disposal.
- Rinse the interior of the trap with warm water.
- Reinstall the filter basket and close the lid securely.
- Dispose of collected grease and food waste according to local regulations.
Importante: Never pour collected grease down the drain. This defeats the purpose of the grease trap and can lead to blockages further down the plumbing system.
7. Solución de problemas
This section addresses common issues you might encounter with your VEVOR Commercial Grease Trap.
| Problema | Posible causa | Solución |
|---|---|---|
| Drenaje lento |
|
|
| Malos olores |
|
|
| Fugas de conexiones |
|
|
| Grease in Outlet Water |
|
|
8. Especificaciones
Below are the technical specifications for the VEVOR Commercial Grease Trap (Model YSFLQ60*40*40):
| Característica | Detalle |
|---|---|
| Nombre del modelo | Trampa de grasa comercial |
| Número de modelo | Tamaño del producto: 60*40*40 |
| Marca | VEVOR |
| Material | Acero inoxidable 18/8 |
| Peso del artículo | 21.5 libras (9.75 kg) |
| Dimensiones del producto (L x An x Al) | 23.62 x 15.75 x 15.3 pulgadas (600 x 400 x 390 mm) |
| Capacity (Grease) | 40 libras |
| Caudal de agua | 9.96 galones por minuto (GPM) |
| Tipo de instalación | Bajo el mostrador |
| Inlet/Outlet Pipe Diameter | 1.89 pulgadas (48 mm) |
| Características especiales | Triple Path Filtration, Adjustable Basket, Threaded Drainage Outlet, Rubber Ring Seal |
| Código Postal | 197988814450 |

Image 8.1: Dimensional drawing and key specifications of the VEVOR Commercial Grease Trap, including inlet/outlet sizes and flow rate.
9. Garantía y soporte
Para obtener información sobre la garantía, asistencia técnica o comprar piezas de repuesto, consulte el sitio web oficial de VEVOR. website or contact VEVOR customer service directly. Keep your purchase receipt as proof of purchase for warranty claims.
Recursos en línea:
- Visita el Tienda VEVOR en Amazon Para obtener información y soporte sobre el producto.


