1. Introducción
Gracias por la compraasing the Coolfire Vibrating Alarm Clock Wristband, Model 1685B. This device is designed to provide a discreet and effective silent alarm experience through gentle vibrations on your wrist. This manual provides detailed instructions for setup, operation, and maintenance to ensure optimal performance and longevity of your device.
2. Producto terminadoview
The Coolfire Vibrating Alarm Clock is a wristband-style watch featuring a digital display and a silent vibration alarm. It is suitable for individuals who need to wake up without disturbing others, or for those with hearing or visual impairments. The device includes a rechargeable battery and a washable sweatband for comfort and hygiene.
Características principales:
- Silent vibration alarm on the wrist.
- Large, bright LCD digital display.
- Up to 6 daily alarms.
- Three adjustable vibration strengths (Low, Medium, High).
- Integrated 24-hour precision 1/100 seconds digital stopwatch.
- Rechargeable lithium battery via USB.
- Soft, washable sweatband.

Figura 1: Frente view of the Coolfire Vibrating Alarm Clock Wristband, showing the digital display and control buttons.
3. Configuración
3.1 Carga del dispositivo
Before initial use, fully charge the device. A full charge takes approximately 4 hours and provides 4-6 weeks of operation.
- Locate the USB charging cable provided with your device.
- Connect the USB cable to any standard USB adapter (not included).
- Release the locking ring from the back of the watch unit and gently push out the watch module from the sweatband.
- Plug the small end of the USB cable into the charging socket located on the back of the watch module.
- Deje que el dispositivo se cargue durante 4 horas.
- Once charged, disconnect the cable and reinsert the watch module into the sweatband, securing it with the locking ring.
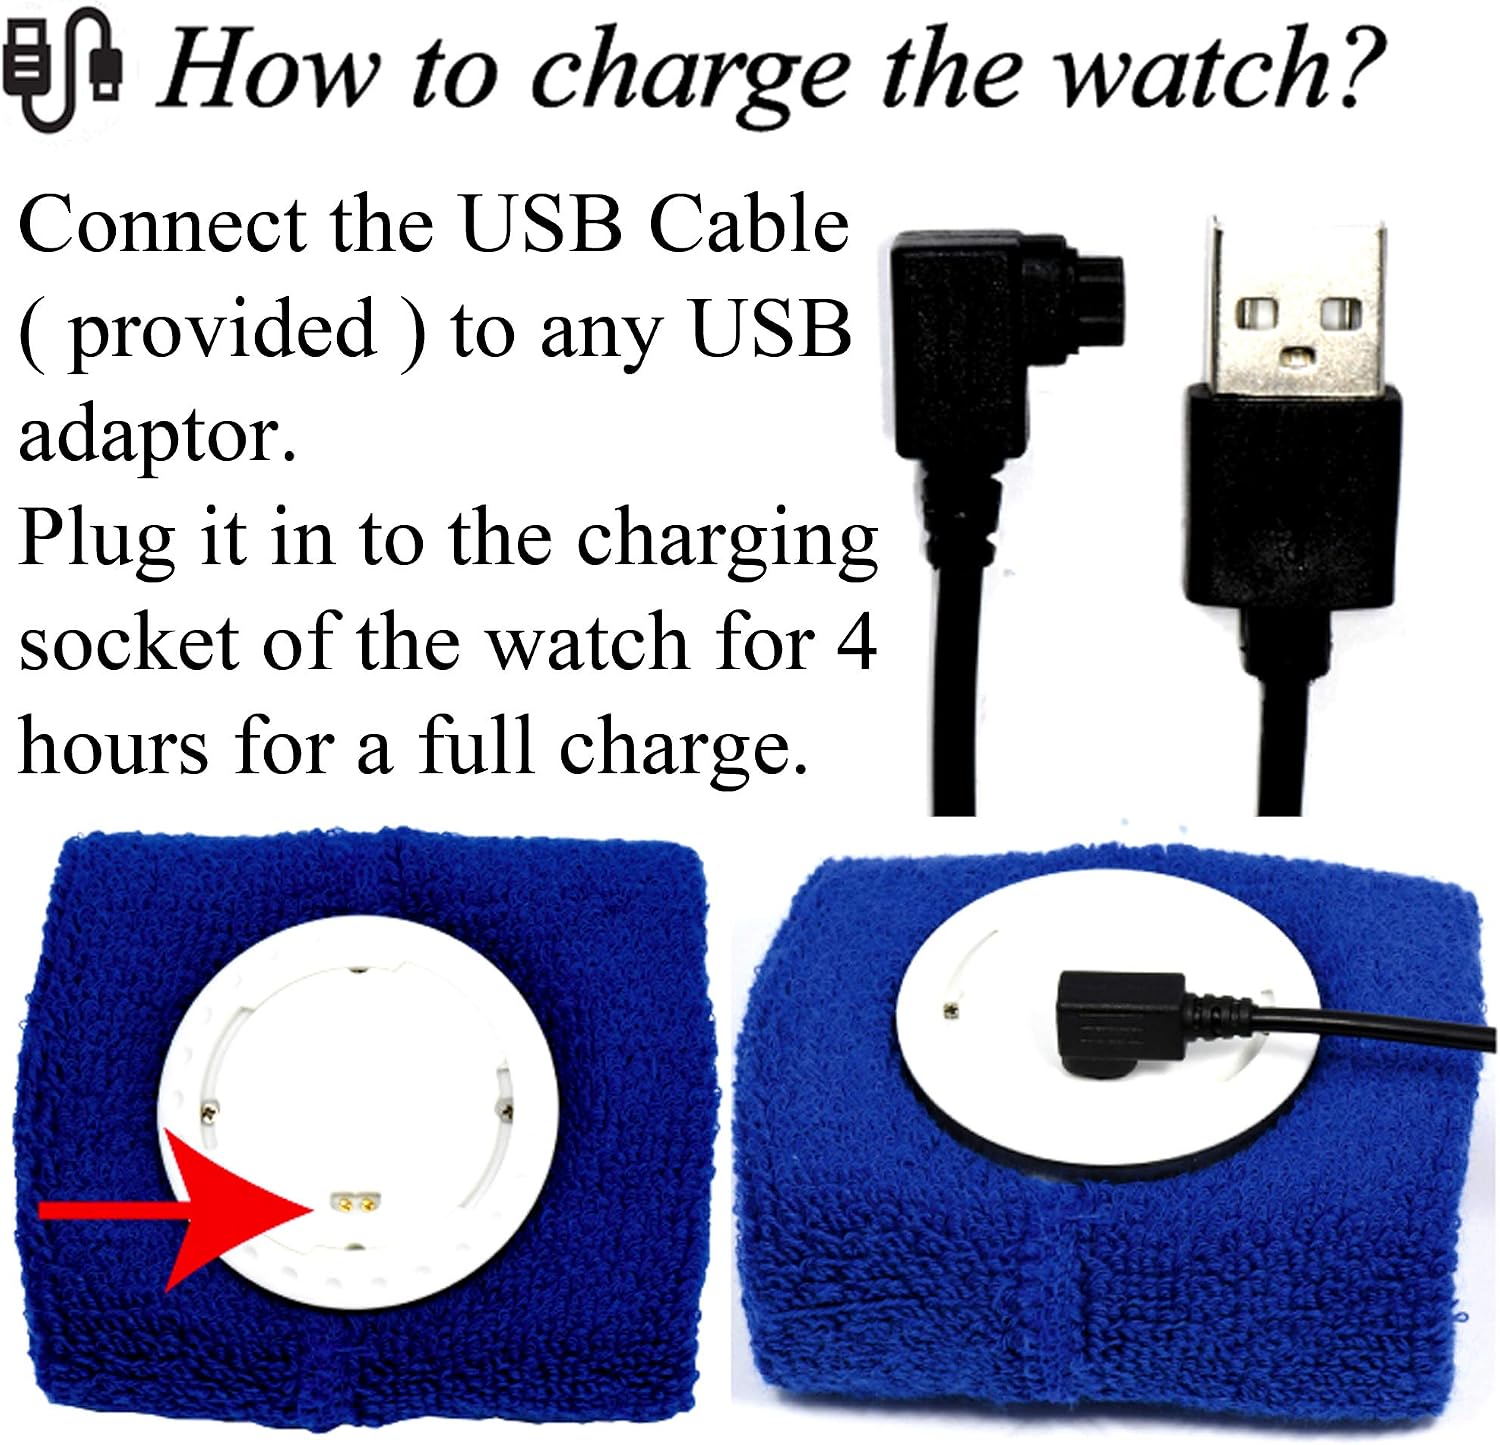
Figure 2: Illustration of connecting the USB cable to the watch module for charging.
3.2 Wearing the Wristband
The wristband is designed for comfortable wear. Ensure the watch module is securely placed within the sweatband.
- The sweatband is adjustable and fits wrist sizes from 6.7 inches (170mm) to 8.5 inches (215mm).
- Wear the wristband snugly enough to ensure good contact for vibration, but not so tight as to be uncomfortable.

Figura 3: Example of the Coolfire Vibrating Alarm Clock Wristband worn on a wrist, indicating suitable wrist sizes.
4. Instrucciones de funcionamiento
The Coolfire alarm clock features a simple digital display and user-friendly buttons for setting time, alarms, and other functions.
4.1 Funciones de los botones
The watch module has three primary buttons:
- LIGHT/STW: Activates backlight; in stopwatch mode, starts/stops the stopwatch.
- CONJUNTO: Ingresa al modo de configuración de hora y alarmas.
- TIME/ALARM: Toggles between time display and alarm display; in setting mode, adjusts values.
4.2 Configuración de hora y fecha
- From the main time display, press and hold the COLOCAR Botón hasta que los dígitos de la hora comiencen a parpadear.
- Presione el HORA/ALARMA Botón para ajustar el valor intermitente (por ejemplo, horas, minutos).
- Presione el COLOCAR button again to move to the next setting (e.g., minutes, year, month, day).
- Repita los pasos 2 y 3 hasta que todas las configuraciones de fecha y hora sean correctas.
- Presione el COLOCAR button one last time to exit setting mode.
4.3 Configuración de alarmas
The device supports up to 6 daily alarms.
- Desde la pantalla principal de la hora, presione el botón HORA/ALARMA button repeatedly until "ALARM" is displayed and you see an alarm number (e.g., AL1).
- Mantenga pulsado el COLOCAR Botón hasta que los dígitos de la hora de la alarma comiencen a parpadear.
- Presione el HORA/ALARMA Botón para ajustar la hora intermitente.
- Presione el COLOCAR button to move to the minutes.
- Presione el HORA/ALARMA Botón para ajustar los minutos que parpadean.
- Presione el COLOCAR button to enable/disable the alarm (an alarm icon will appear when enabled).
- Presione el COLOCAR button again to save the alarm setting and exit.
- To set additional alarms, repeat steps 1-7, cycling through AL2, AL3, etc., using the HORA/ALARMA botón.
4.4 Ajuste de la intensidad de la vibración
The device offers three vibration strengths: Low, Medium, and High. The method for adjusting this setting is typically found within the alarm settings or a dedicated mode. Refer to the on-screen prompts or experiment with the COLOCAR y HORA/ALARMA buttons while in alarm setting mode to locate this option.
4.5 Uso del cronómetro
- Desde la pantalla principal de la hora, presione el botón HORA/ALARMA button repeatedly until "STW" (Stopwatch) is displayed.
- Presione el LIGHT/STW Botón para iniciar el cronómetro.
- Presione el LIGHT/STW Presione nuevamente el botón para pausar el cronómetro.
- To reset the stopwatch, while paused, press and hold the COLOCAR botón.
- Presione el HORA/ALARMA button to return to the main time display.
5. Mantenimiento
5.1 Washing the Sweatband
The sweatband is washable, but the watch module is No resistente al agua. Always remove the watch module before washing the sweatband.
- To detach the watch module, release the locking ring from the back of the watch.
- Gently push the watch module out from the sweatband.
- Machine wash the sweatband as needed, following standard fabric care instructions.
- Ensure the sweatband is completely dry before reinserting the watch module.
- Reinsert the watch module and secure it with the locking ring.
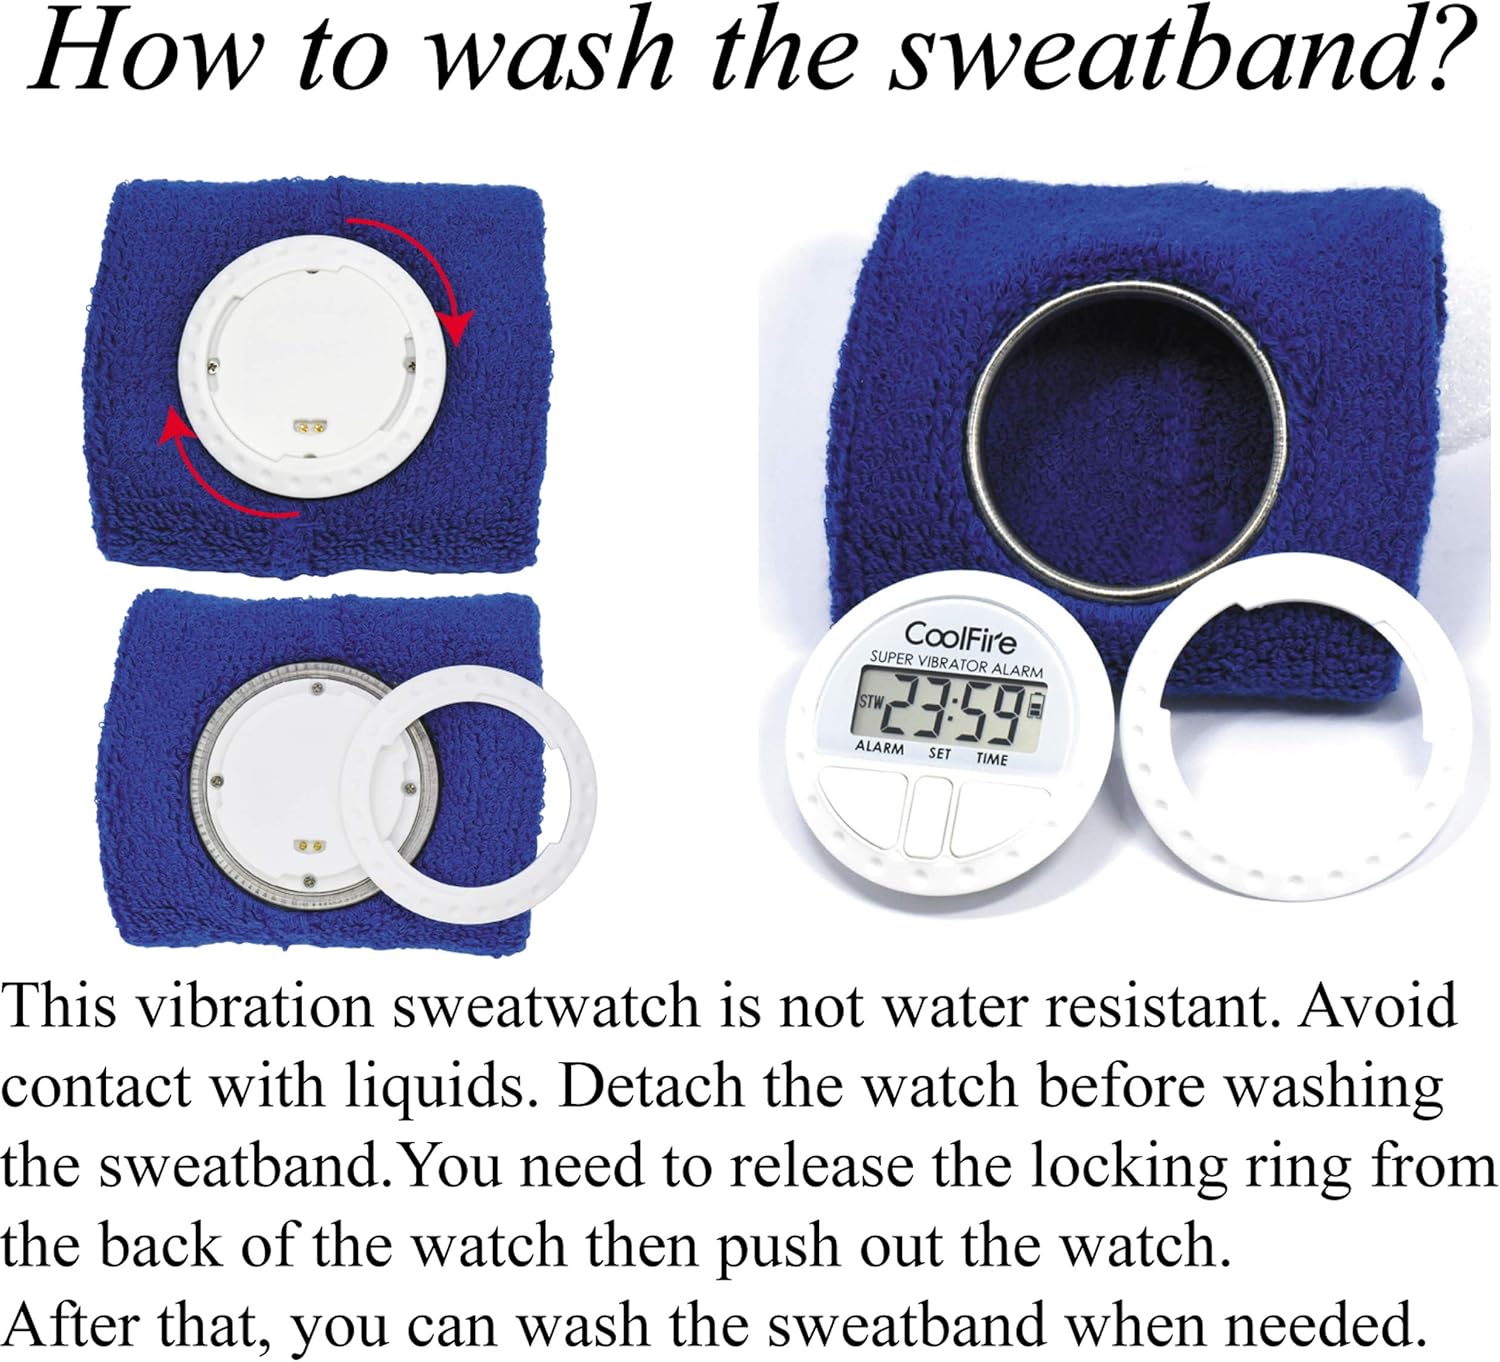
Figure 4: Steps for removing the watch module from the sweatband for cleaning.
6. Solución de problemas
| Problema | Posible causa | Solución |
|---|---|---|
| El dispositivo no se enciende o la pantalla está en blanco. | La batería está agotada. | Cargue el dispositivo durante 4 horas utilizando el cable USB proporcionado. |
| Vibration alarm is too weak or not felt. | Vibration strength set to Low; wristband is too loose. | Adjust vibration strength to Medium or High. Ensure the wristband is worn snugly. |
| Alarm does not activate. | Alarm is not enabled or set incorrectly. | Verify alarm settings and ensure the alarm icon is displayed, indicating it is active. |
| La pantalla es difícil de leer. | No backlight activated. | Presione el LIGHT/STW botón para activar la retroiluminación. |
7. Especificaciones
- Marca: Fuego a baja temperatura
- Número de modelo: 1685B
- Color: Negro (puede haber otros colores disponibles)
- Dimensiones del producto: 8.89 x 3.81 x 8.89 cm (watch module)
- Peso del artículo: 10 g (watch module)
- Material: Plastic (watch module), Fabric (sweatband)
- Tipo de pantalla: LCD digital
- Fuente de energía: Batería de litio recargable
- Tiempo de carga: Aproximadamente 4 horas
- Duración de la batería: 4-6 semanas con una carga completa
- Características especiales: Silent Clock, Vibrating Alarm, Stopwatch
- Wristband Fit: 6.7" (170 mm) a 8.5" (215 mm)
8. Garantía y soporte
For warranty information and customer support, please refer to the documentation included with your purchase or contact your retailer. Keep your purchase receipt as proof of purchase.
For further assistance, you may visit the official Coolfire webSitio web o contacte con su departamento de atención al cliente. Los datos de contacto suelen encontrarse en el empaque del producto o en la página web oficial de la marca.


