1. Introducción
Thank you for choosing the GRACEALL Portable Electric Infrared Hot Plate. This appliance is designed to provide efficient and versatile cooking solutions for your home, apartment, RV, or outdoor activities. With its powerful 3500W heating element and user-friendly controls, you can enjoy a wide range of cooking possibilities. Please read this manual carefully before operation to ensure safe and optimal performance.

Image: The GRACEALL Portable Electric Infrared Hot Plate, showcasing its sleek design and intuitive control layout.
2. Instrucciones de seguridad importantes
Al utilizar aparatos eléctricos, siempre se deben seguir precauciones básicas de seguridad para reducir el riesgo de incendio, descarga eléctrica y lesiones a las personas, incluidas las siguientes:
- Lea todas las instrucciones antes de utilizar el aparato.
- No toque superficies calientes. Utilice asas o perillas.
- Para protegerse contra descargas eléctricas, no sumerja el cable, los enchufes ni el aparato en agua ni en ningún otro líquido.
- Es necesaria una estrecha supervisión cuando cualquier aparato sea utilizado por niños o cerca de ellos.
- Desenchufe el aparato del tomacorriente cuando no lo utilice y antes de limpiarlo. Deje que se enfríe antes de colocar o quitar piezas.
- No opere ningún aparato con un cable o enchufe dañado o después de que el aparato funcione mal o haya sufrido algún daño.
- El uso de accesorios no recomendados por el fabricante del aparato puede provocar lesiones.
- No utilizar en exteriores.
- No deje que el cable cuelgue del borde de la mesa o mostrador, ni que toque superficies calientes.
- No lo coloque sobre o cerca de un quemador de gas o eléctrico caliente, ni dentro de un horno caliente.
- Se debe tener mucho cuidado al mover un aparato que contenga aceite caliente u otros líquidos calientes.
- Siempre conecte primero el enchufe al electrodoméstico, luego enchufe el cable al tomacorriente de la pared. Para desconectar, gire cualquier control a la posición "apagado", luego retire el enchufe del tomacorriente de la pared.
- No utilice el aparato para ningún fin distinto del previsto.
- The 220V hot plates for cooking are equipped with overheat protection and automatic shut-off, ensuring kitchen safety.

Image: Universal warning symbols for electrical appliances, highlighting potential hazards.
3. Características del producto
- Salida de alta potencia: 3500W para un calentamiento rápido y una cocción eficiente.
- Control versátil: Features both sensitive touch controls and a precise rotary knob for easy power and temperature adjustments.
- Niveles de potencia ajustables: Offers 12 wattage levels ranging from 200W to 3500W for diverse cooking needs.
- Temporizador integrado: A 3-hour timer (1 to 180 minutes) for precise cooking duration.
- Preset Cooking Modes: Includes 4 convenient modes: Fry, BBQ, Soup, and Power, each with adjustable default wattages.
- Large Heating Zone: An 18 cm heating zone ensures even heat distribution for consistent cooking results.
- Superficie duradera: Made with microcrystalline ceramic glass, designed to withstand high temperatures, resist cracking, and be explosion-proof.
- Amplia compatibilidad con utensilios de cocina: Works with all flat-bottom cookware, including stainless steel, glass, enamel, aluminum, cast iron, copper, ceramic, and moka pots.
- Sistema de enfriamiento eficiente: Equipped with a robust cooling fan to dissipate heat effectively and prolong appliance life.
- Diseño portátil: Compact and lightweight with a carrying handle, making it ideal for various locations.
- Fácil de limpiar: The smooth glass panel and brushed stainless steel body simplify cleaning.
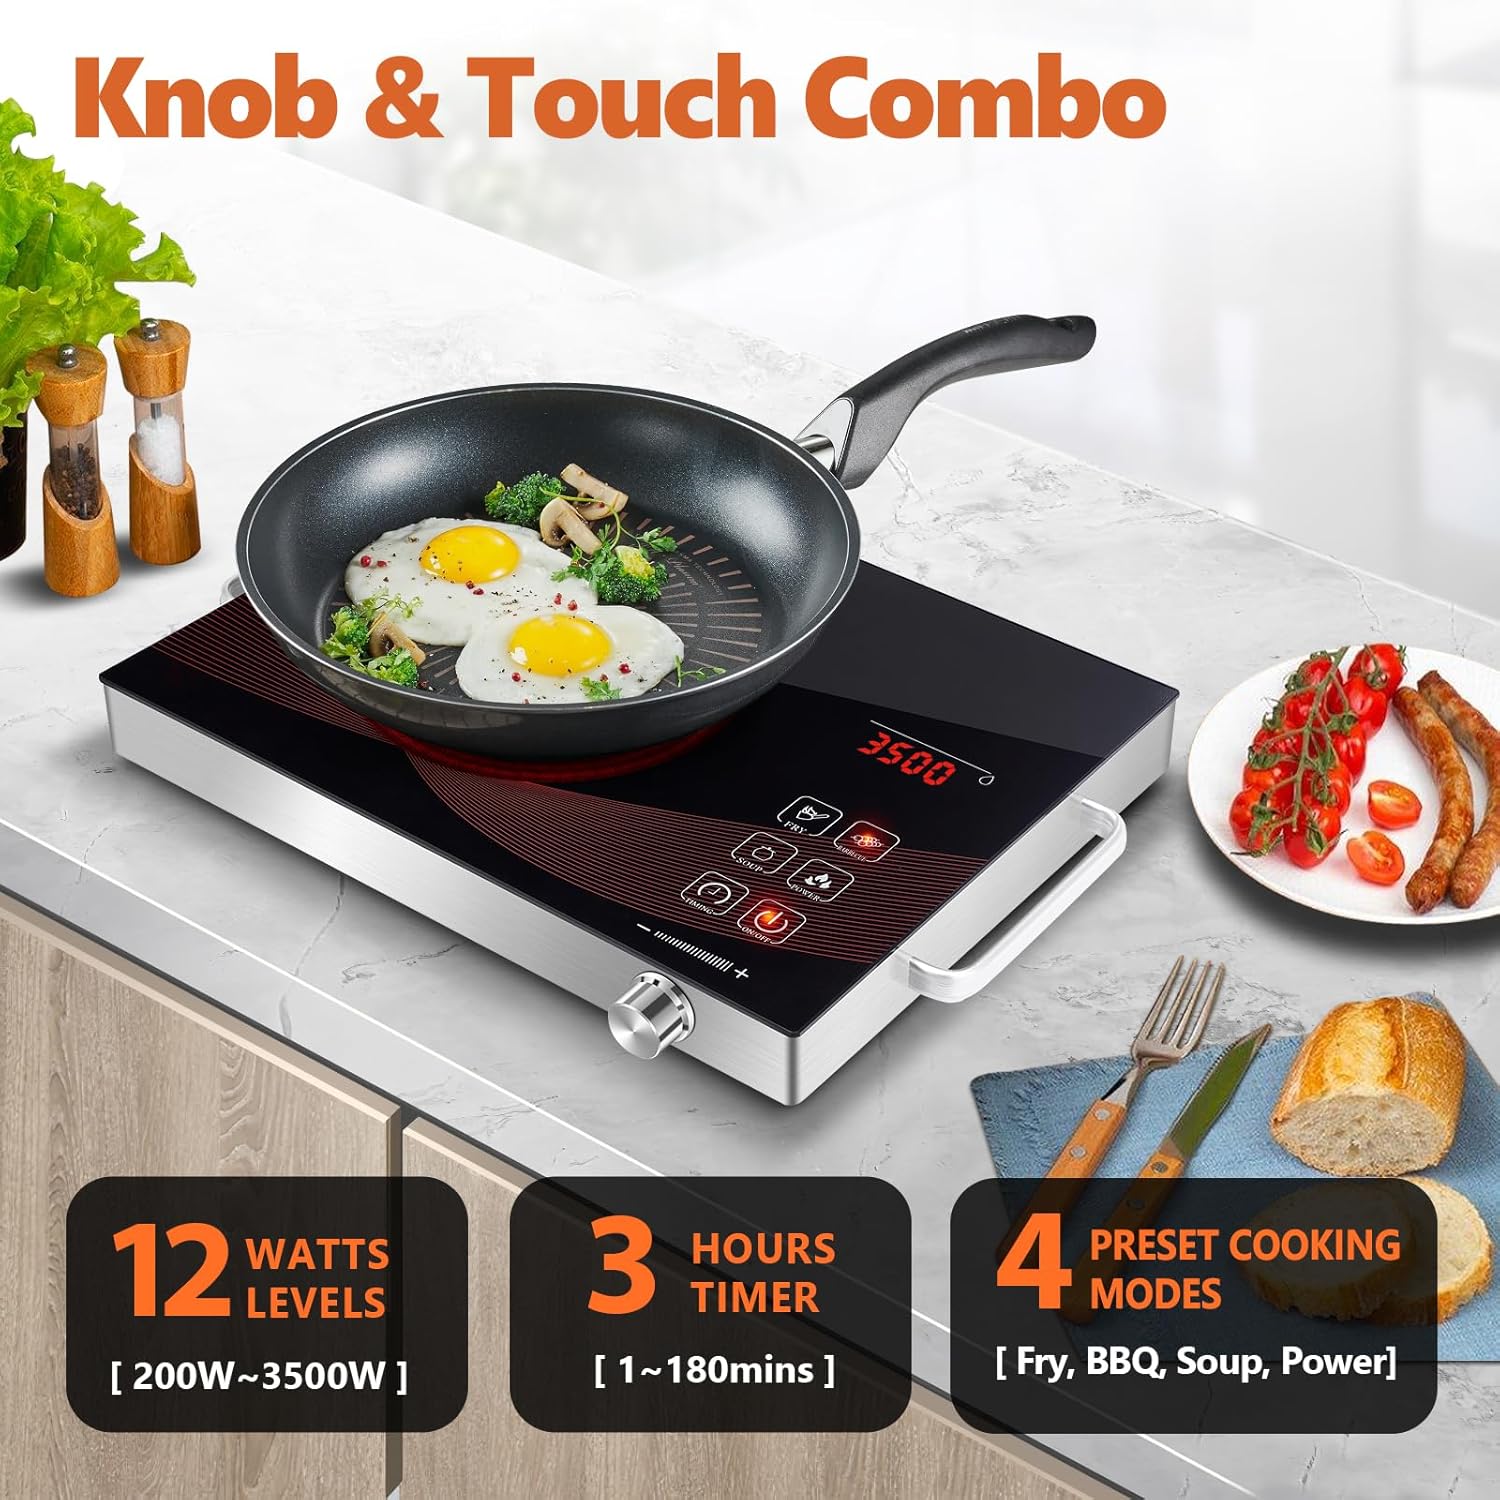
Imagen: Más alláview of the control panel, highlighting the knob and touch interface, power levels, timer, and cooking modes.

Image: Close-up of key features including rapid heating, cooling system, and control responsiveness.
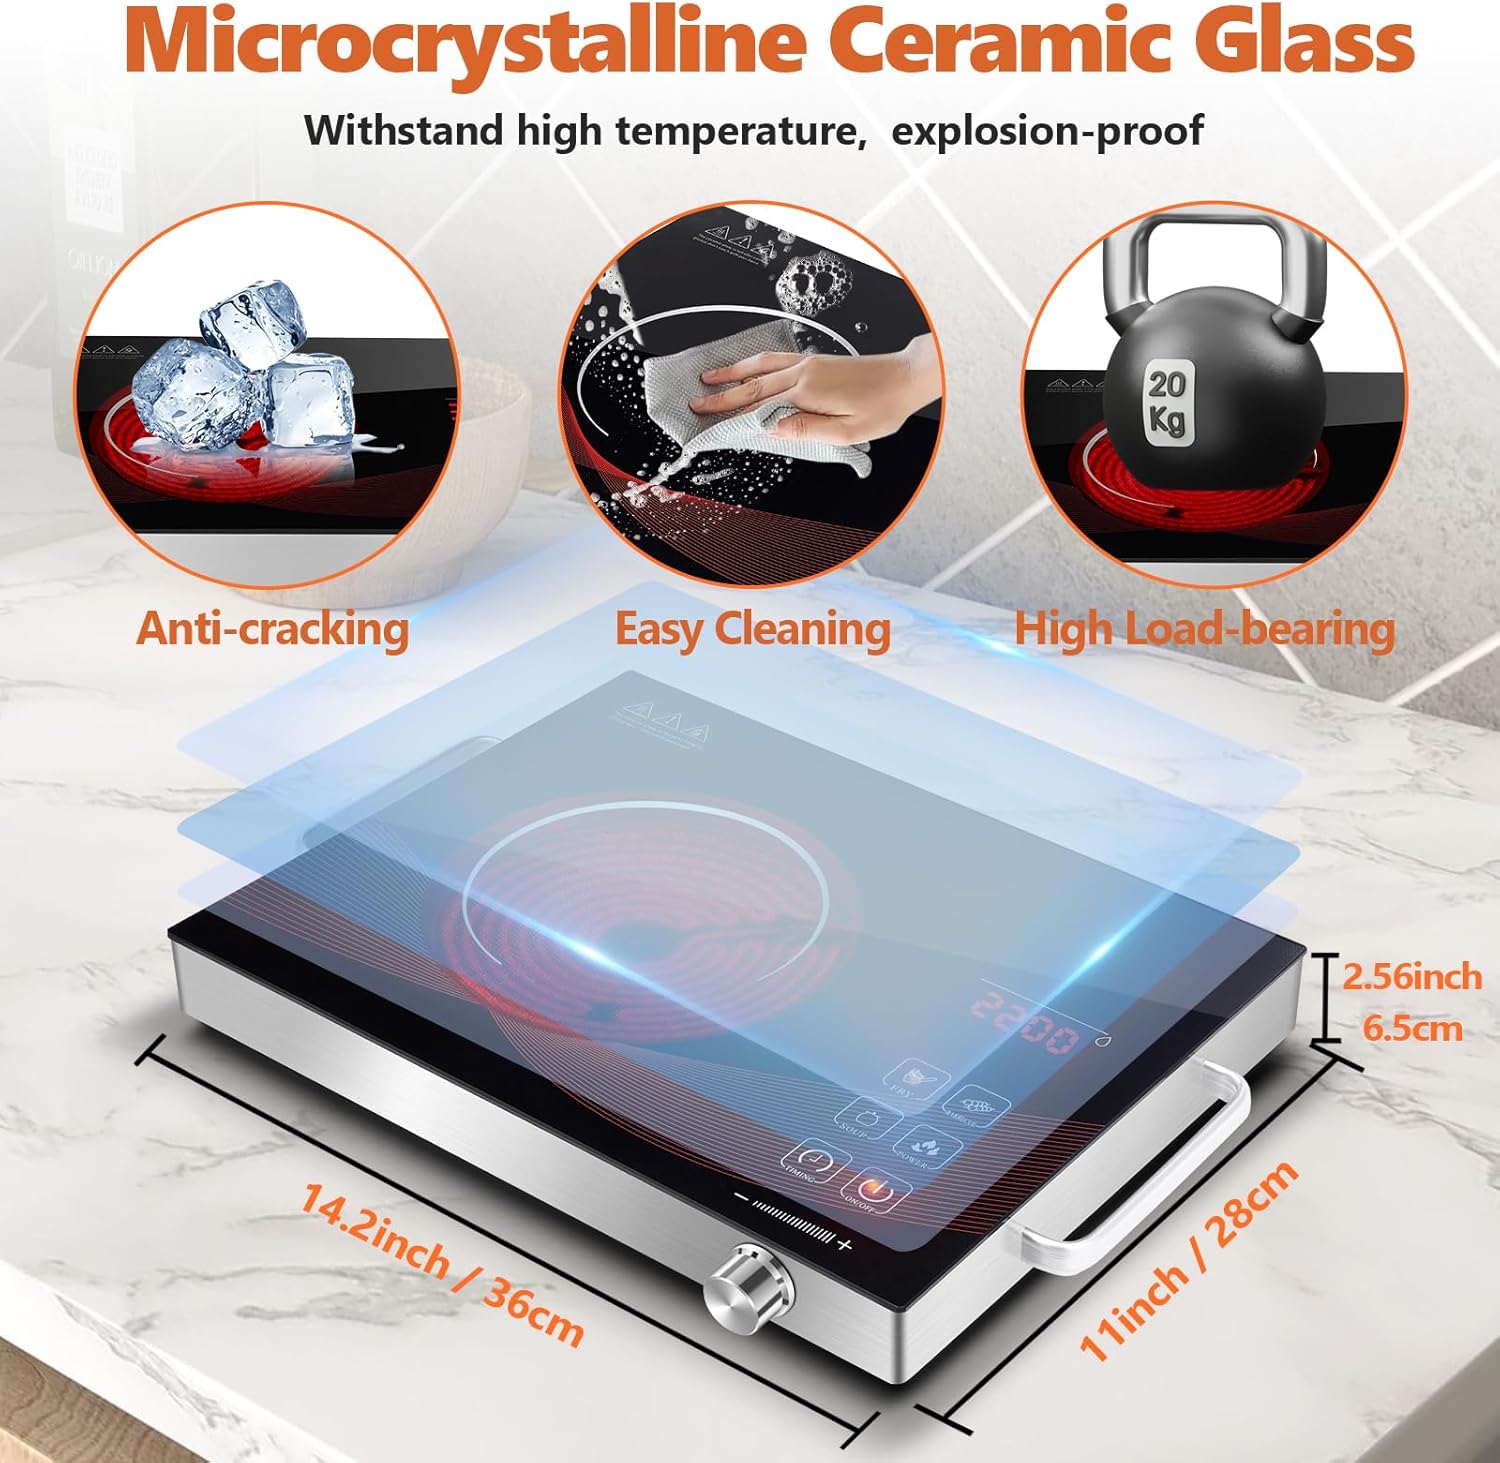
Image: Illustration of the durable ceramic glass surface and the compact dimensions of the hot plate.

Image: Visual guide to the wide range of cookware types compatible with the infrared hot plate.
4. Configuración
- Desembalaje: Carefully remove the hot plate and all packaging materials from the box. Retain packaging for future storage or transport if needed.
- Inspección: Inspect the appliance for any signs of damage. Do not use if the unit or power cord is damaged.
- Colocación: Place the hot plate on a stable, flat, heat-resistant surface. Ensure there is adequate ventilation around the unit (at least 10 cm clearance from walls or other objects). Do not place on tablecloths or other flammable materials.
- Conexión de energía: Asegúrese de que su toma de corriente coincida con el volumentage requirements of the appliance (220V AC). Plug the power cord firmly into a grounded electrical outlet.

Image: The hot plate being carried, emphasizing its portable design and ease of placement.
5. Instrucciones de funcionamiento
Operación básica
- Encendido: Place your cookware (with contents) on the center of the heating zone. Press the ENCENDIDO/APAGADO button to turn on the hot plate. The LED display will illuminate.
- Ajuste de potencia/temperatura:
- Use the rotary MANDO: Turn clockwise to increase power/temperature, counter-clockwise to decrease. The display will show the current wattage.
- Usar Controles táctiles: Some models may have dedicated '+' and '-' touch buttons for fine adjustments.
- Uso de modos preestablecidos: Press the desired preset mode button (e.g., FREÍR, PARILLA, SOPA, FUERZA). The hot plate will automatically set to the default wattage for that mode. You can then adjust the wattage using the knob if needed.
- Configuración del temporizador: Presione el MINUTERO button. Use the knob to set the desired cooking time (from 1 to 180 minutes). The hot plate will automatically shut off once the timer expires.
- Apagado: Presione el ENCENDIDO/APAGADO button to turn off the hot plate. The heating element will cool down, and the display will turn off.

Image: A clear diagram of the control panel, indicating the function of each button and the rotary knob.

Imagen: Examples of the hot plate in action, showcasing its versatility for different cooking styles and environments.
6. Mantenimiento y limpieza
Proper maintenance ensures the longevity and optimal performance of your hot plate.
- Antes de limpiar: Always unplug the hot plate from the power outlet and allow it to cool completely before cleaning.
- Limpieza de la superficie: Limpie la superficie de vidrio cerámico con un paño suave.amp cloth and a mild detergent. For stubborn stains, use a non-abrasive cleaner specifically designed for ceramic cooktops. Do not use abrasive pads, harsh chemicals, or steel wool, as these can scratch the surface.
- Limpieza del cuerpo: Wipe the brushed stainless steel body with a soft, damp Paño. Seque completamente.
- Ventilador de enfriamiento: Periodically check the air vents for dust or debris. Use a soft brush or a vacuum cleaner with a brush attachment to gently clean the vents. Do not insert any objects into the fan opening.
- Almacenamiento: Store the hot plate in a cool, dry place when not in use. Ensure the power cord is neatly wrapped and not kinked.
- No sumergir: Nunca sumerja la placa calefactora, el cable o el enchufe en agua ni en ningún otro líquido.

Image: The hot plate being cleaned, illustrating the ease of maintenance for its smooth surface.
7. Solución de problemas
If you encounter issues with your hot plate, please refer to the table below for common problems and their solutions.
| Problema | Posible causa | Solución |
|---|---|---|
| La placa calefactora no se enciende. | No enchufado; sin energíatage; toma de corriente defectuosa; mal funcionamiento de la unidad. | Ensure the power cord is securely plugged into a working outlet. Check your circuit breaker. Try a different outlet. If the issue persists, contact customer support. |
| Hot plate heats slowly or not at all. | Incorrect power setting; cookware not flat-bottomed; cookware too small/large; overheat protection activated. | Increase the power setting. Ensure cookware has a flat bottom and is within the recommended size for the heating zone. Allow the unit to cool if it has been running for a long time. |
| La pantalla muestra un código de error. | Mal funcionamiento interno; error del sensor. | Unplug the unit for 5 minutes, then plug it back in. If the error persists, note the error code and contact customer support. |
| El ventilador continúa funcionando después de apagarlo. | Proceso de enfriamiento normal. | This is normal. The fan will continue to run for a short period to cool down internal components before automatically shutting off. |
8. Especificaciones
| Especificación | Detalle |
|---|---|
| Marca | GRACEALL |
| Número de modelo | RR-912 |
| Color | Rr-912-black |
| Dimensiones del producto (L x An x Al) | 36 x 28 x 6.5 cm (14.2 x 11 x 2.56 pulgadas) |
| Peso del artículo | 2.59 kilogramos |
| Fuerza | 3500 vatios |
| Volumentage | 220 voltios (CA) |
| Material | Vidrio cerámico |
| Elementos calefactores | 1 |
| Tipo de control | Knob and Touch |
| Tipo de quemador | Radiante |
| Función de apagado automático | Sí |
9. Garantía y soporte
GRACEALL products are manufactured to high-quality standards. While specific warranty details may vary by region or retailer, generally, this product is covered by a standard manufacturer's warranty against defects in materials and workmanship from the date of purchase. Please retain your proof of purchase for warranty claims.
For technical support, troubleshooting assistance, or warranty inquiries, please contact GRACEALL customer service through the retailer where you purchased the product or visit the official GRACEALL websitio para información de contacto.
Tenga en cuenta que en este momento no se proporciona información sobre la disponibilidad de repuestos.


