1. Introducción
Thank you for choosing the KOSUMOSU Digital LED Mirror Alarm Clock, Model ACD-330. This stylish and functional clock features a large 6.7-inch mirror display, dual alarm settings, 12/24-hour time format, date, day of the week, and temperature display. It also offers adjustable brightness for optimal viewing comfort. Please read this manual carefully to ensure proper setup and operation.
2. Contenido del paquete
- KOSUMOSU Digital LED Mirror Alarm Clock (Gold)
- Cable de alimentación USB (1.5 metros)
- Manual de usuario
- Base del soporte

3. Producto terminadoview
Familiarize yourself with the clock's display and control buttons.
3.1. Pantalla frontal

The 6.7-inch mirror display clearly shows:
- Tiempo: Large digital numbers (12H/24H format).
- Indicador AM/PM: Para formato de 12 horas.
- Fecha: Month and Day.
- Día de la semana: Indicated by highlighted text (Sun, Mon, Tue, Wed, Thu, Fri, Sat).
- Temperatura: In Celsius (°C) or Fahrenheit (°F).
- Iconos de alarma: To indicate active alarms.
3.2. Back Panel and Buttons
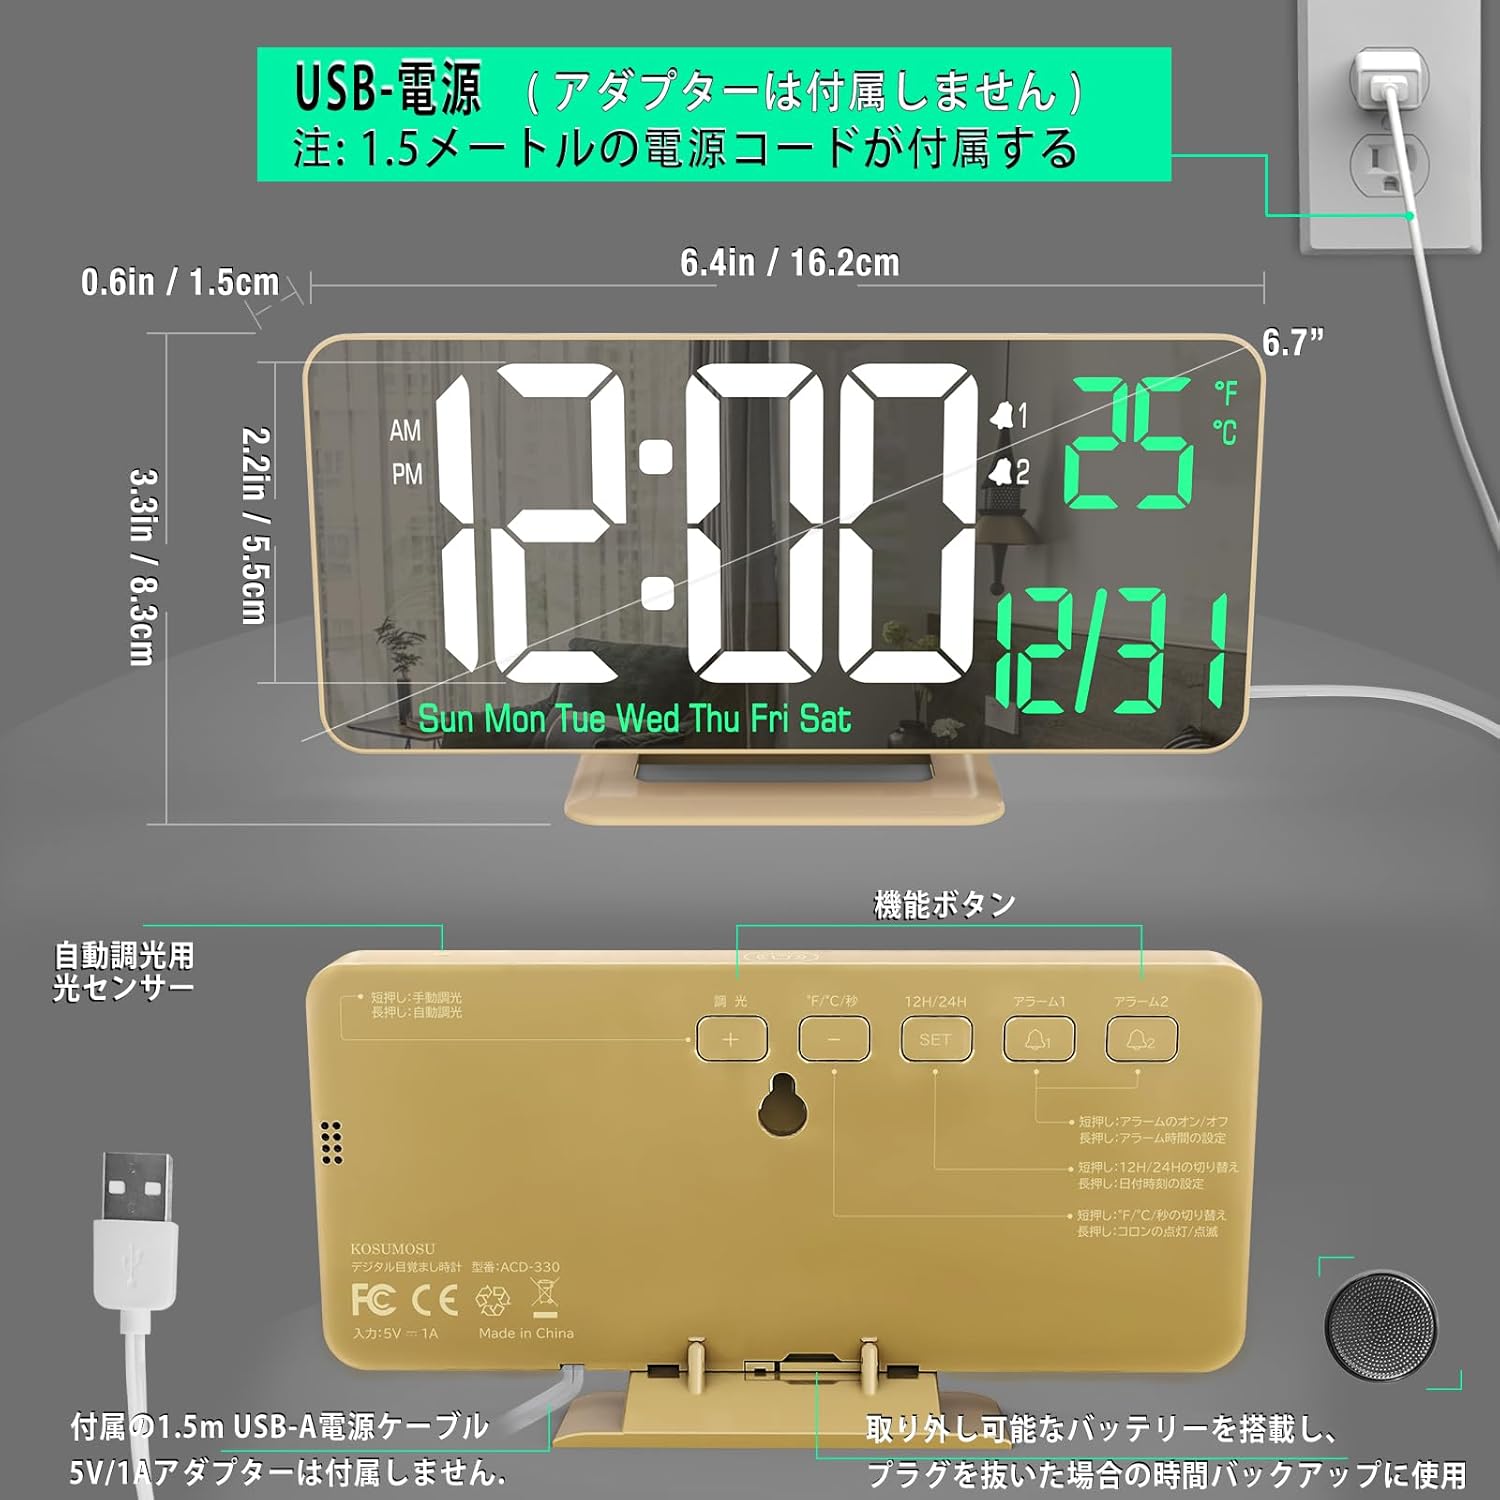
The back of the clock features the following controls:
- Botón de ajuste: Se utiliza para ingresar y confirmar configuraciones.
- Botón de arriba: Adjusts values upwards or cycles through options.
- Botón ABAJO: Adjusts values downwards or cycles through options.
- Botón de alarma: Se utiliza para configurar y activar alarmas.
- Botón SNOOZE/LIGHT: Activa la función de repetición durante una alarma o ajusta el brillo de la pantalla.
- Entrada de alimentación USB: Para conectar el cable de alimentación.
- Compartimento de la batería: For the button battery (memory backup).
4. Configuración
4.1. Conexión de alimentación
- Connect the provided USB power cable to the USB Power Input port on the back of the clock.
- Plug the other end of the USB cable into a 5V/1A AC adapter (not included).
- The clock will power on and the display will light up.

Nota: A button battery (included) is installed in the battery compartment. This battery serves as a memory backup to retain time settings during a power outage. It is not intended for continuous operation of the clock.
4.2. Configuración inicial de hora y fecha
- Mantenga pulsado el COLOCAR Mantenga pulsado el botón durante 3 segundos para acceder al modo de ajuste de la hora. Los dígitos de la hora parpadearán.
- Utilice el UP or ABAJO Botones para ajustar la hora.
- Prensa COLOCAR De nuevo para confirmar la hora y pasar al ajuste de los minutos. Los dígitos de los minutos parpadearán.
- Utilice el UP or ABAJO Botones para ajustar los minutos.
- Prensa COLOCAR again to confirm the minutes and move to year setting.
- Continuar usando ARRIBA/ABAJO to adjust the year, then COLOCAR to move to month, then COLOCAR to move to day.
- Después de configurar el día, presione COLOCAR para salir del modo de configuración de hora/fecha.
5. Instrucciones de funcionamiento
5.1. Formato de 12/24 horas
En el modo de visualización de hora normal, presione el UP Botón para alternar entre formatos de 12 horas (AM/PM) y 24 horas.
5.2. Temperature Unit (°C/°F)
En el modo de visualización de hora normal, presione el ABAJO Botón para cambiar la visualización de la temperatura entre Celsius (°C) y Fahrenheit (°F).
5.3. Configuración de alarma (alarmas duales)
El reloj admite dos alarmas independientes (AL1 y AL2).

- Presione el ALARMA button once to select Alarm 1 (AL1). The AL1 icon will appear.
- Mantenga pulsado el ALARMA button for 3 seconds. The hour digits for AL1 will flash.
- Utilice el UP or ABAJO Botones para ajustar la hora de la alarma. Presione ALARMA Para confirmar.
- Los dígitos de los minutos parpadearán. Utilice UP or ABAJO to adjust the alarm minutes. Press ALARMA Para confirmar.
- Next, select the alarm cycle: 1-5 (Monday-Friday), 1-7 (Every day), or 6-7 (Saturday-Sunday). Use UP or ABAJO para elegir, luego presione ALARMA para confirmar y salir.
- Repeat steps 1-5 for Alarm 2 (AL2) by pressing ALARMA twice to select AL2.
Para activar/desactivar una alarma, presione el botón ALARMA button repeatedly until the desired alarm icon (AL1 or AL2) appears or disappears from the display.
5.4. Función de repetición
Cuando suene una alarma, presione el DORMITOR / LUZ button to activate the snooze function. The alarm will pause for 5 minutes and then sound again. To turn off the alarm completely, press any other button.
5.5. Ajuste de brillo
The clock offers both manual and automatic brightness adjustment.
- Ajuste manual: En el modo de visualización de hora normal, presione brevemente el botón DORMITOR / LUZ button to cycle through brightness levels: Weak, Medium, High, and Off.
- Ajuste automático: Mantenga pulsado el DORMITOR / LUZ button to activate automatic brightness adjustment. The clock will automatically adjust its display brightness based on the ambient light conditions.
5.6. Función de espejo
The clock's 6.7-inch display surface also functions as a mirror, making it a versatile addition to any room.

6. Recursos de medios
6.1. Vídeo del producto
7. Mantenimiento
- Limpieza: Utilice un paño suave y seco para limpiar la superficie del reloj. Evite limpiadores abrasivos o disolventes.
- Reemplazo de batería: Si el reloj pierde tiempo durante un corte de energíatage, the button battery may need replacement. Open the battery compartment on the back of the clock and replace the battery with a new one of the same type.
8. Solución de problemas
- La pantalla está en blanco: Ensure the USB power cable is securely connected to both the clock and a working 5V/1A AC adapter.
- La alarma no suena: Check if the alarm is activated (AL1 or AL2 icon visible on display). Ensure the volume is not set to zero (if applicable, though this model does not specify volume control).
- La hora es incorrecta después de un corte de energíatage: The button battery for memory backup might be depleted. Replace the battery and reset the time.
9. Especificaciones
| Característica | Detalle |
|---|---|
| Marca | KOSUMOSU technology |
| Número de modelo | ACD-330 |
| Tipo de pantalla | Digital LED Mirror |
| Tamaño de la pantalla | 6.7 pulgadas |
| Color | Oro |
| Material | Plastic (ABS Frame) |
| Fuente de poder | Eléctrico con cable (USB 5 V/1 A) |
| Tipo de batería (de respaldo) | Manganese Dioxide Lithium (Internal) |
| Dimensiones del producto | 16.2 cm (ancho) x 8.3 cm (alto) |
| Peso del artículo | 170 gramos |
| Características especiales | Dual Alarm, Snooze, 12/24H, Date, Day, Temperature, Auto/Manual Brightness |
10. Garantía y soporte
This KOSUMOSU product comes with a 2 año de garantía. If you encounter any quality issues or have questions regarding the use or setup of your alarm clock, please contact our customer service immediately. We are committed to providing assistance, including product exchange or guidance on usage and settings.


