Introducción
Gracias por la compraasing the KOSUMOSU Digital Alarm Clock. This sleek and modern clock features a 6.7-inch LED display, dual alarms, temperature display, date, day of the week, and automatic/manual dimming. This manual will guide you through the setup, operation, and maintenance of your new digital alarm clock to ensure optimal performance and longevity.
Lea este manual detenidamente antes de utilizar el producto y consérvelo para futuras consultas.
Información de seguridad
- No exponga el dispositivo a temperaturas extremas, luz solar directa o humedad alta.
- Evite dejar caer o someter el dispositivo a impactos fuertes.
- Use only the specified 5V/1A AC adapter (not included) for power.
- Mantener fuera del alcance de los niños.
- No intente desmontar ni reparar el dispositivo usted mismo. Póngase en contacto con el servicio de atención al cliente para obtener ayuda.
Contenido del paquete
Por favor revise el paquete para ver los siguientes artículos:
- KOSUMOSU Digital Alarm Clock (Model: ACD-330BL)
- Cable de alimentación USB (1.5 metros)
- Manual de usuario
- Base del soporte
- Button Battery (for time retention during power loss)

Image: Contents of the KOSUMOSU Digital Alarm Clock package.
Producto terminadoview
The KOSUMOSU Digital Alarm Clock features a minimalist design with intuitive controls located on the back panel.
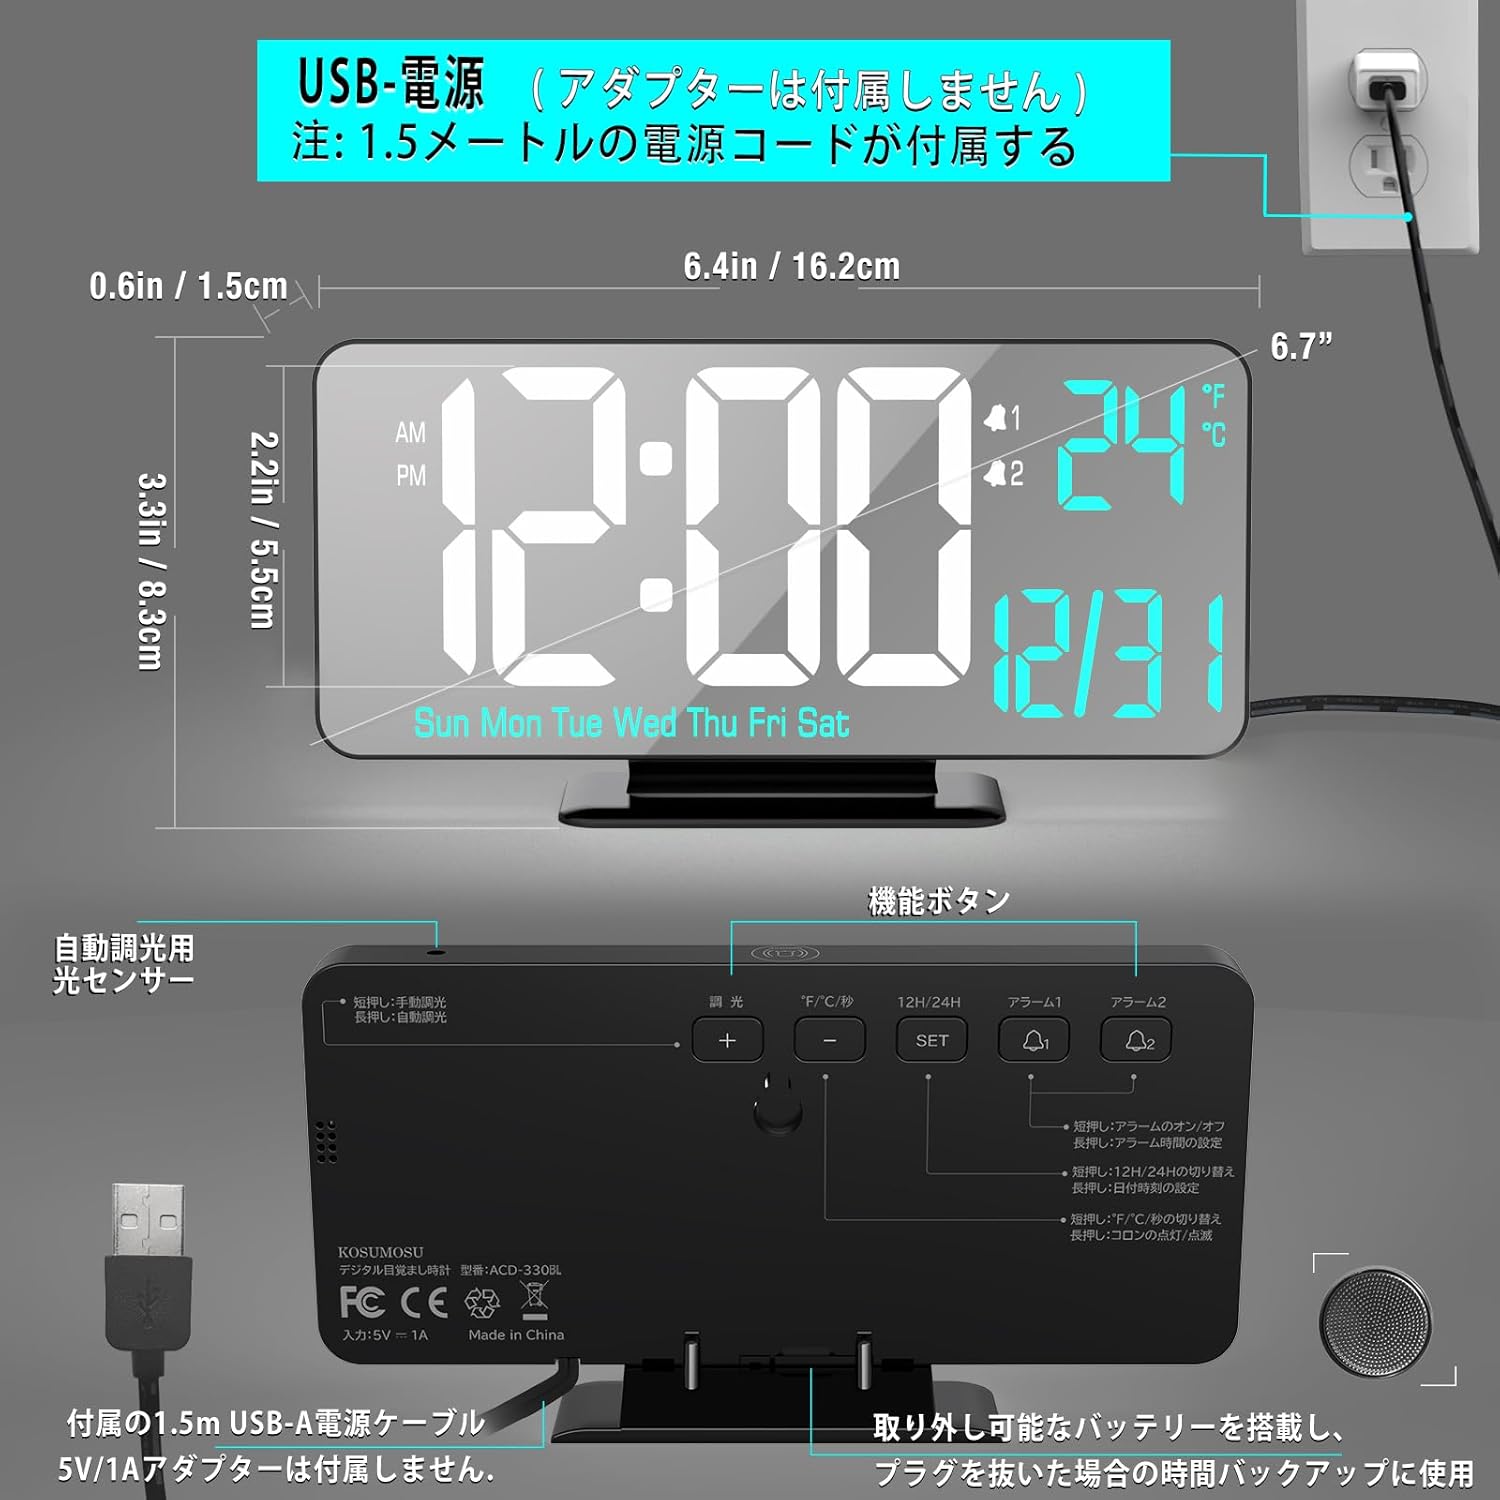
Imagen: Anverso y reverso view of the clock with dimensions and button labels.
Pantalla frontal
- Visualización de la hora: Large LED digits for hours and minutes.
- Indicador AM/PM: Para formato de 12 horas.
- Indicadores de alarma: Iconos para Alarma 1 y Alarma 2.
- Pantalla de temperatura: Shows indoor temperature in °F or °C.
- Visualización de la fecha: Month and Day.
- Visualización del día de la semana: Sun, Mon, Tue, Wed, Thu, Fri, Sat.
Controles del panel posterior
- DIMMING Button: Ajusta el brillo de la pantalla.
- °F/°C/SEC Button: Toggles between temperature units and seconds display.
- 12H/24H Button: Cambia entre formatos de hora de 12 y 24 horas.
- Botón ALARMA 1: Establece la alarma 1.
- Botón ALARMA 2: Establece la alarma 2.
- Botón de ajuste: Ingresa al modo de configuración y confirma las selecciones.
- + Botón: Aumenta los valores durante la configuración.
- - Botón: Disminuye los valores durante la configuración.
- Botón SNOOZE (arriba): Activa la función de repetición durante una alarma.
Configuración
Conexión de energía
- Connect the provided USB power cable to the clock's USB port.
- Plug the other end of the USB cable into a 5V/1A AC adapter (not included).
- Plug the AC adapter into a wall outlet. The display will light up.
Note: A button battery is included to retain time settings during power outages. It is not intended for continuous power supply.

Image: USB power connection setup.
Instrucciones de funcionamiento
Configuración de hora, fecha y día
- Mantenga pulsado el COLOCAR Mantenga pulsado el botón durante 3 segundos para acceder al modo de ajuste de la hora. Los dígitos de la hora parpadearán.
- Utilice el + or - Botones para ajustar la hora.
- Prensa COLOCAR to confirm and move to minute setting. Adjust minutes with + or -.
- Prensa COLOCAR to confirm and move to year setting. Adjust year with + or -.
- Prensa COLOCAR to confirm and move to month setting. Adjust month with + or -.
- Prensa COLOCAR to confirm and move to day setting. Adjust day with + or -.
- Prensa COLOCAR para confirmar y salir del modo de configuración.
Formato 12/24 horas
Presione el 12 horas/24 horas Botón para alternar entre formatos de 12 horas (con indicador AM/PM) y 24 horas.
Visualización de temperatura (°F/°C)
Presione el °F/°C/SEC button to switch the temperature display between Fahrenheit (°F) and Celsius (°C). A short press will also toggle the display of seconds.
Configuración de alarmas (Alarma 1 y Alarma 2)
El reloj admite dos alarmas independientes (Alarma 1 y Alarma 2).
- Mantenga pulsado el ALARMA 1 (o ALARMA 2) button for 3 seconds. The alarm hour digits will flash.
- Utilice el + or - Botones para ajustar la hora de la alarma.
- Prensa ALARMA 1 (o ALARMA 2) to confirm and move to alarm minute setting. Adjust minutes with + or -.
- Prensa ALARMA 1 (o ALARMA 2) to confirm and move to alarm cycle setting. Use + or - para seleccionar:
- DÍA LABORABLE: La alarma suena de lunes a viernes.
- WEEKEND: La alarma suena el sábado y el domingo.
- A DIARIO: La alarma suena todos los días.
- Prensa ALARMA 1 (o ALARMA 2) to confirm and exit alarm setting mode.
Activación/desactivación de alarmas
Una breve pulsación del ALARMA 1 (o ALARMA 2) button will toggle the respective alarm ON or OFF. An alarm icon will appear on the display when activated.
Función de repetición
Cuando suene una alarma, presione el botón grande DORMITAR button on the top of the clock to activate the snooze function. The alarm will pause for 5 minutes and then sound again. The alarm duration is 5 minutes before it automatically turns off if not snoozed or deactivated.

Image: Snooze function illustration.
Brightness Adjustment (Dimming)
The clock offers both automatic and manual dimming options.
- Atenuación automática: Mantenga pulsado el ATORNILLANDO button to activate automatic dimming via the light sensor. The clock will adjust its brightness based on ambient light.
- Atenuación manual: Presione brevemente el ATORNILLANDO button to cycle through manual brightness levels: Low, Medium, High, or LED display Off.
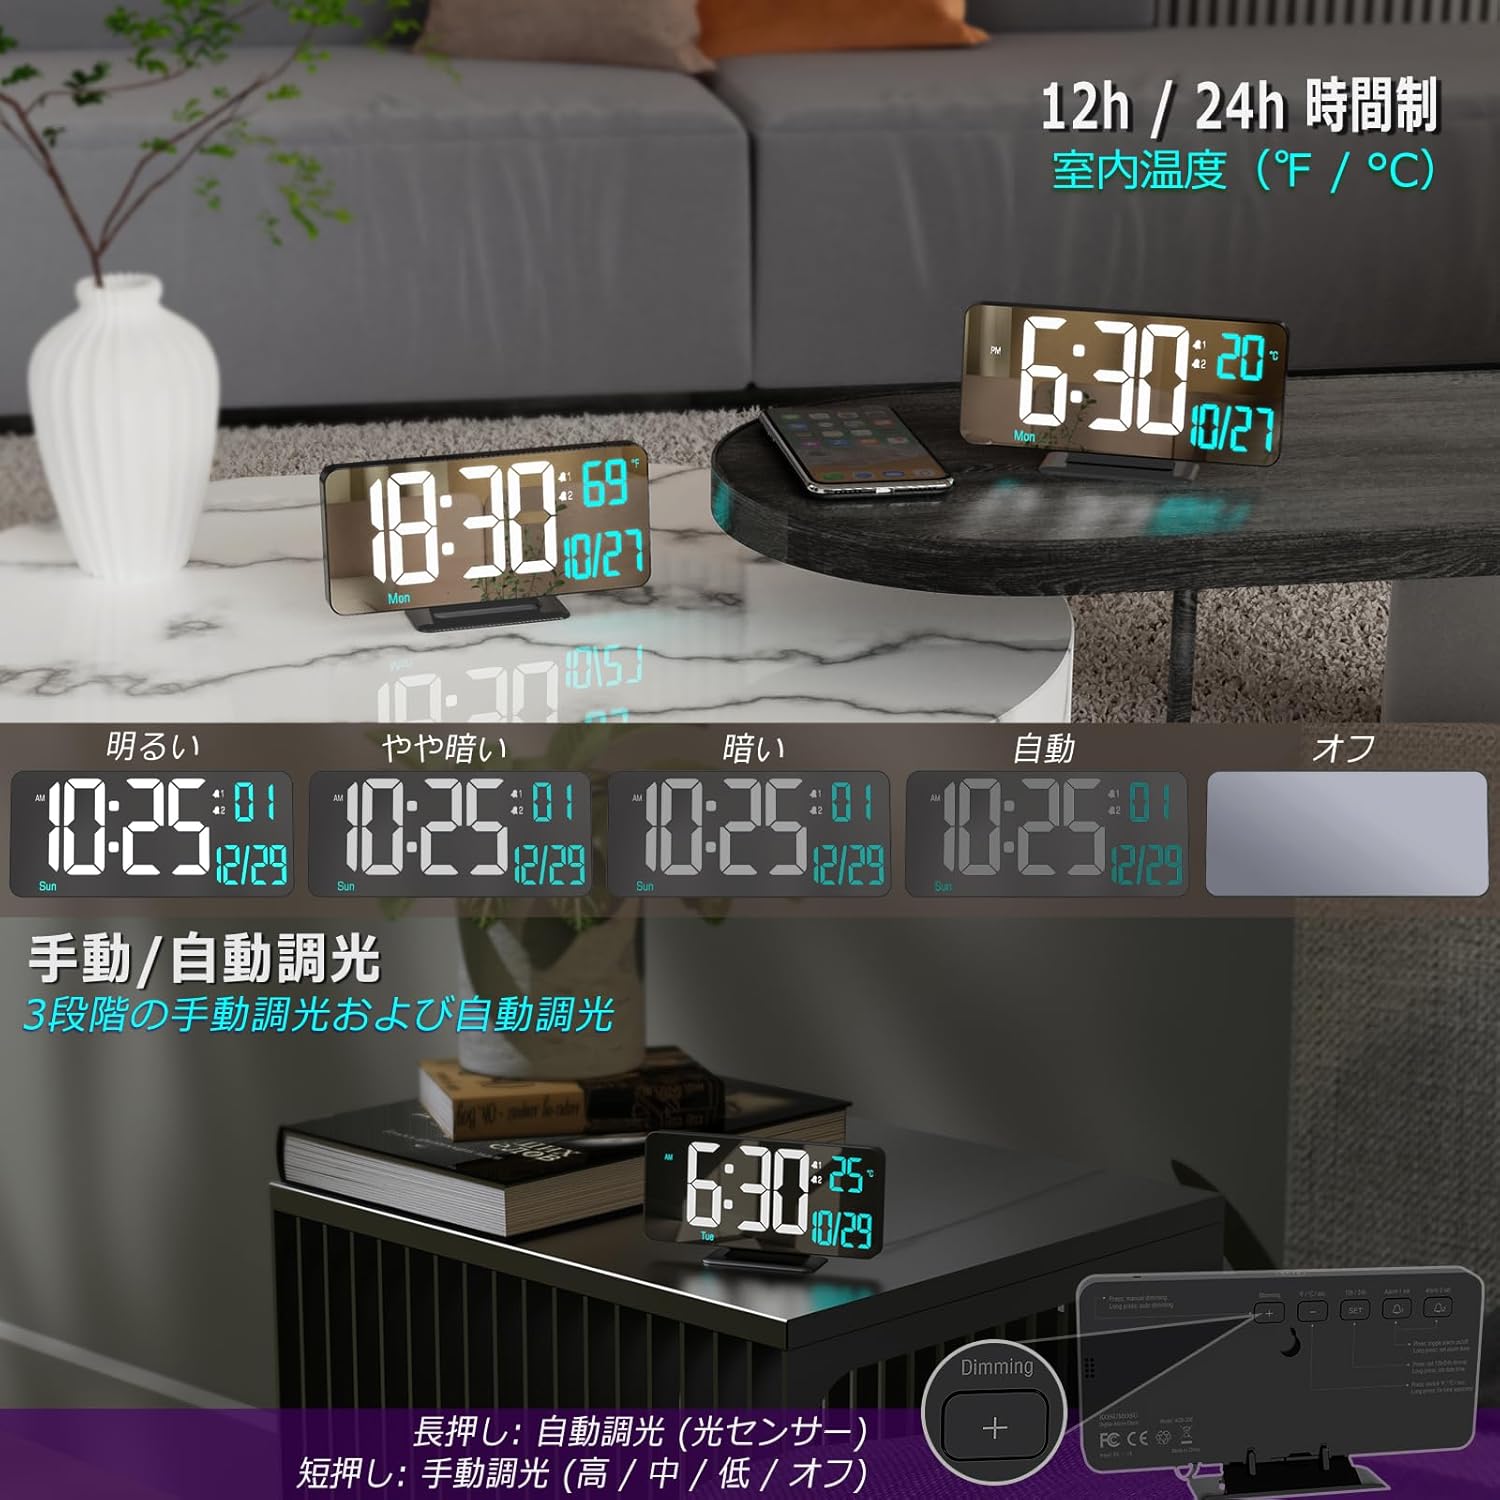
Image: Brightness adjustment options.
Mantenimiento
- Para limpiar el reloj, limpie suavemente la superficie con un paño suave y seco.
- No utilice limpiadores abrasivos ni disolventes, ya que pueden dañar el acabado.
- Asegúrese de que el reloj esté desenchufado antes de limpiarlo.
Solución de problemas
| Problema | Posible causa | Solución |
|---|---|---|
| La pantalla está apagada o tenue. | No power, power adapter issue, or display is set to off. | Ensure power cable is securely connected and AC adapter is working. Check brightness setting (short press DIMMING button). |
| La alarma no suena. | Alarm not activated, volume too low, or incorrect alarm time/cycle. | Ensure alarm is ON (icon visible). Re-check alarm time and cycle settings. The alarm volume is fixed and cannot be adjusted. |
| Time is incorrect after power loss. | Button battery depleted or not installed. | Ensure the button battery is correctly installed and has sufficient charge. Replace if necessary. |
| La lectura de la temperatura parece inexacta. | Reloj colocado cerca de una fuente de calor/respiradero o bajo la luz solar directa. | Reubica el reloj en un área con temperatura ambiente estable. |
Presupuesto
| Característica | Detalle |
|---|---|
| Número de modelo | ACD-330BL |
| Tipo de pantalla | LED digitales |
| Tamaño de la pantalla | 6.7 pulgadas |
| Dimensiones (An x Al) | 16.2 cm x 8.3 cm (6.4 pulgadas x 3.3 pulgadas) |
| Fuente de poder | USB Powered (Requires 5V/1A AC adapter, not included) |
| Batería de respaldo | Button Battery (included, for time retention only) |
| Material | Plástico |
| Características | Dual Alarm, Snooze, 12/24H Format, Date, Day, Seconds, Temperature (°F/°C), Auto/Manual Dimming |
| Peso | 170 gramos (0.17 kg) |
Garantía y soporte
KOSUMOSU products come with a 2 año de garantía. If you encounter any quality or usage issues with your digital alarm clock, please do not hesitate to contact our customer service team via email. We are committed to resolving any problems promptly to ensure your satisfaction.
For support, please refer to the contact information provided on the product packaging or our official websitio.


