1. Introducción
This manual provides essential instructions for the safe and efficient operation, assembly, and maintenance of your Aokia Cordless Weed Wacker. Please read this manual thoroughly before first use and retain it for future reference.
2. Instrucciones de seguridad importantes
El incumplimiento de estas instrucciones de seguridad puede provocar lesiones graves o daños materiales.
- Always engage the double-switch safety lock function to prevent accidental activation and ensure safe use.
- Lea todo el manual antes de utilizar el dispositivo.
- Use only original Aokia batteries and chargers. Using non-original parts may void your warranty and cause hazards.
- Cargue las baterías en un área bien ventilada, lejos de materiales inflamables.
- Wear appropriate protective gear during operation, including safety glasses, gloves, and sturdy footwear.
- Clear the work area of debris, rocks, and other objects that could be thrown by the cutting blade.
- Do not use the weed wacker in wet conditions or rain.
- Always power off the device and remove the battery before performing any adjustments, cleaning, or maintenance.
- Store the device properly in a dry, secure location, out of reach of children.
- The manufacturer is not liable for damage caused by non-original parts or misuse.
3. Contenido del paquete
Verifique que todos los artículos enumerados a continuación estén incluidos en su paquete. Si falta alguna pieza o está dañada, comuníquese con atención al cliente.

Imagen 3.1: Contents of the Aokia Cordless Weed Wacker package. This image displays the main weed wacker unit, various cutting blades (metal and circular saw blade), two wrenches for assembly, safety glasses, a pair of protective gloves, the battery charger, and a 12V lithium-ion battery.
- Aokia Cordless Weed Wacker Main Unit
- Batería de iones de litio de 12 V y 2000 mAh
- Cargador de batería
- Metal Blades (multiple, including 5 additional)
- Hoja de sierra circular
- Gafas de seguridad
- Guantes protectores
- Assembly Wrenches
- Manual de usuario (este documento)
4. Montaje y configuración
Follow these steps to assemble your Aokia Cordless Weed Wacker.
4.1 Attaching the Protection Cover and Anti-Collision Bar

Imagen 4.1.1: The grass protection cover, designed to prevent clippings from scattering during operation.

Imagen 4.1.2: The anti-collision bar, which protects plants and the weed wacker from damage during use.
Securely attach the grass protection cover and the anti-collision bar to the trimmer head. These components are crucial for user safety and protecting the device and surrounding plants.
4.2 Instalación de la hoja
The Aokia Cordless Weed Wacker supports various blade types for different cutting needs. We strongly recommend using metal blades for most applications due to their durability and effectiveness. Plastic blades are prone to breakage and should be used for very light trimming only.

Imagen 4.2.1: Examples of metal blades (top) and circular saw blades (bottom) for the weed wacker. Metal blades are suitable for general weeding, while circular blades are for tougher branches.
Refer to the following steps for blade installation:

Imagen 4.2.2: Step-by-step visual guide for installing the cutting blade on the weed wacker. It shows removing the metal base, installing the grass protection cover, attaching the anti-collision bar, reinstalling the metal base, placing the blade and iron piece, and finally tightening the nut with the L-type socket wrench.
- Step 1: Remove the Metal Base. Use the provided wrench to remove the nut and blade counter-clockwise.
- Step 2: Install the Grass Protection Cover. Slide the grass protection cover into position.
- Step 3: Install the Anti-Collision Bar. Attach the anti-collision bar to the trimmer head.
- Step 4: Install the Metal Base. Place the metal base back onto the shaft.
- Step 5: Install the Blade and Iron Piece. Position your chosen blade (metal or circular) and the iron piece onto the shaft.
- Step 6: Tighten the Nut. Use the wrench to tighten the nut clockwise until secure. Ensure the blade is firmly attached and does not wobble.
4.3 Adjusting the Length and Handle
The weed wacker features a detachable extension pole, allowing for three different lengths: 32 inches, 48 inches, and 65 inches, to suit various gardening tasks and user heights.

Imagen 4.3.1: Illustration of the weed wacker's adjustable length settings (32", 48", 64") and key features including the safety lock, comfortable handle, grass guard, and anti-collision bar.

Imagen 4.3.2: Close-up of the ergonomically designed adjustable handle, showing its range of motion for maximum comfort and control during operation.
To adjust the length, loosen the locking mechanism on the extension pole, extend or retract to the desired length, and then securely tighten the lock. The auxiliary handle can also be adjusted for optimal comfort and control by loosening its clamp, positioning it, and re-tightening.
5. Carga e instalación de la batería
The Aokia Cordless Weed Wacker is powered by a 12V 2000mAh high-capacity rechargeable lithium-ion battery.
5.1 Carga de la batería
- Conecte el cargador a una toma de corriente estándar.
- Inserte la batería en el cargador. Asegúrese de que esté correctamente alineada.
- La luz indicadora del cargador mostrará el estado de carga (consulte el manual del cargador para conocer los patrones de luz específicos).
- Cargue la batería en un área bien ventilada, lejos de materiales inflamables.
- No sobrecargue la batería. Desconéctela una vez que esté completamente cargada.
5.2 Instalación de la batería

Imagen 5.2.1: Illustration showing the insertion point for the 12V battery into the weed wacker handle. The upgraded design ensures improved battery-machine contact for maximum performance.
Align the battery with the battery slot at the base of the handle and slide it in until it clicks securely into place. Ensure the battery is fully seated before operation. To remove, press the release button (if present) and slide the battery out.
6. Instrucciones de funcionamiento
Before operating, ensure you have read and understood all safety instructions and that the device is properly assembled with a fully charged battery.
6.1 Starting and Stopping the Weed Wacker
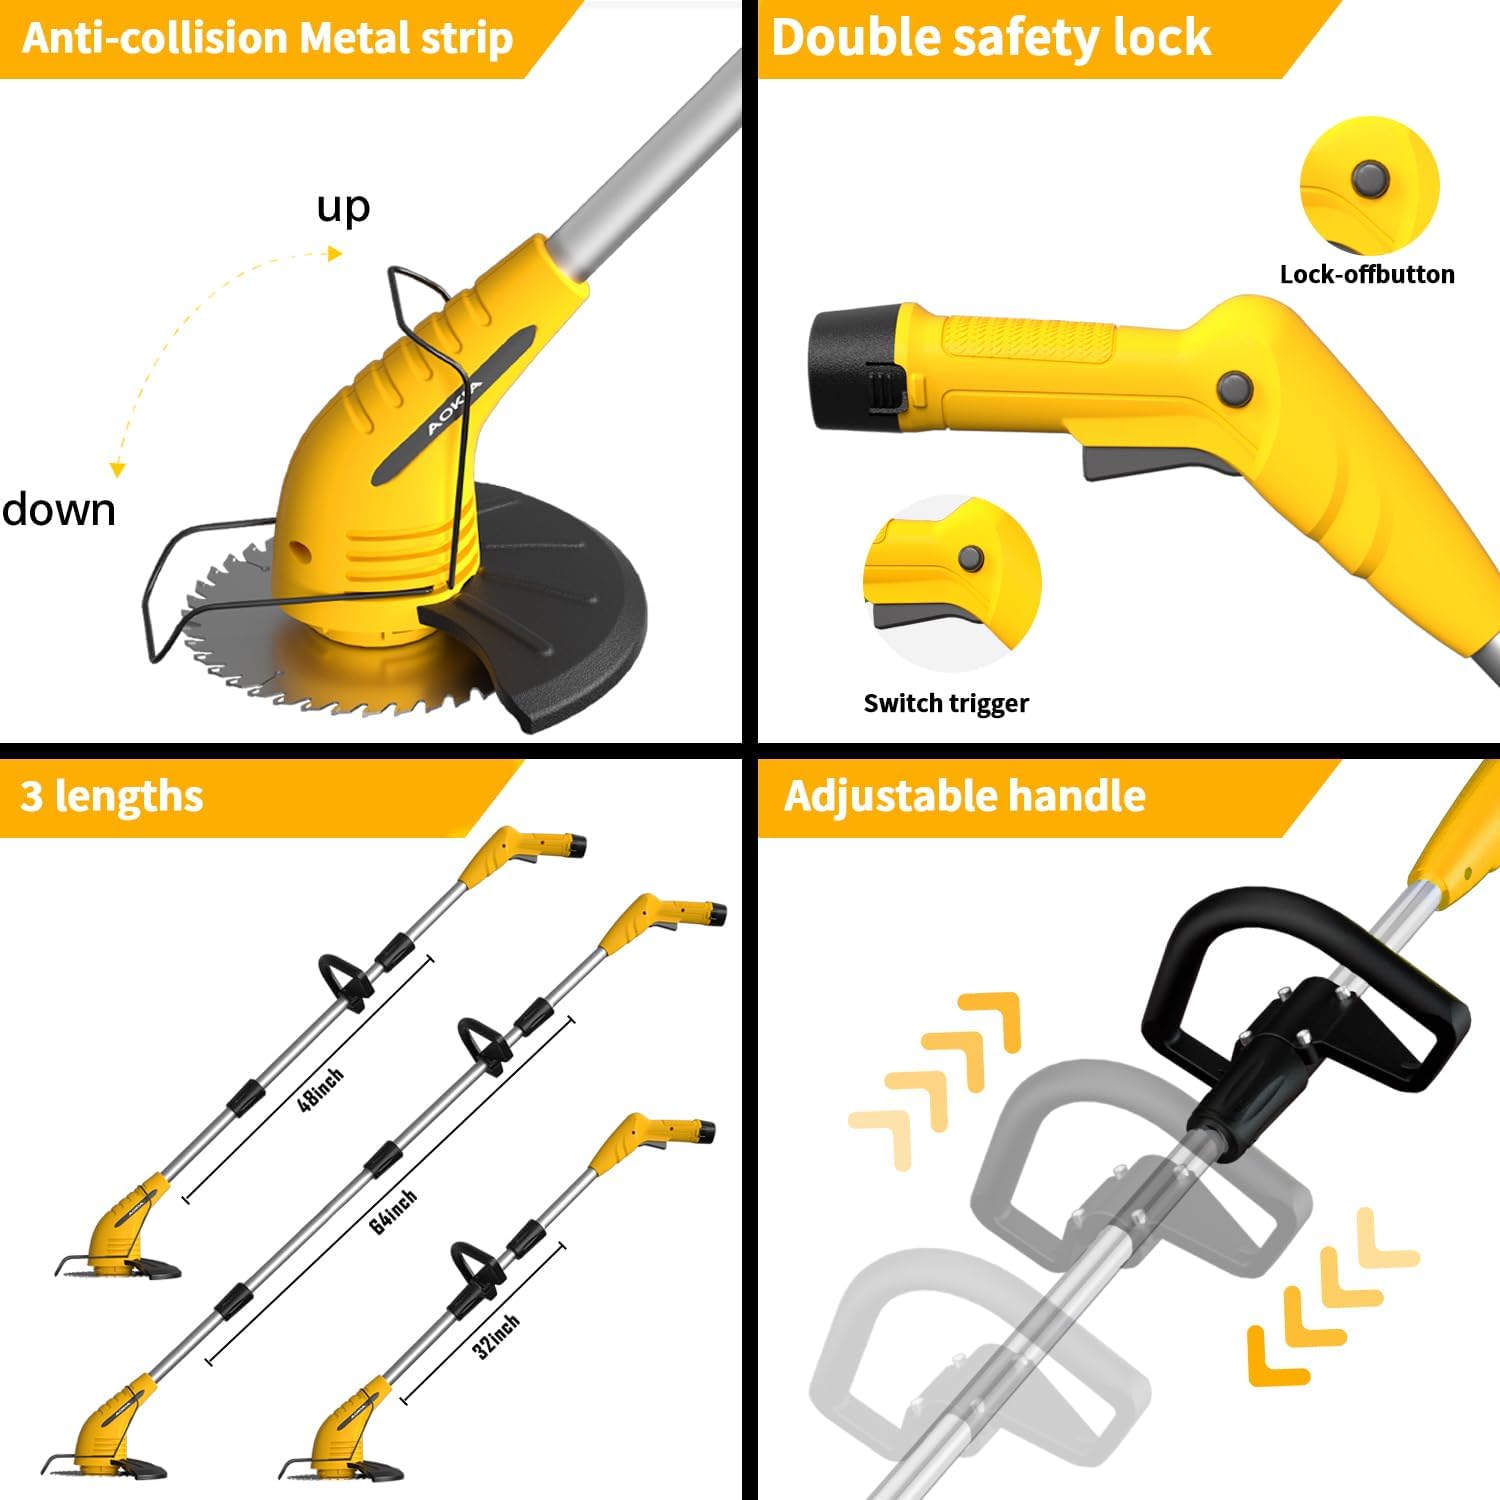
Imagen 6.1.1: Close-up of the weed wacker handle showing the double safety lock button (top) and the switch trigger (bottom). Both must be engaged to start the tool.

Imagen 6.1.2: Demonstrates how the safety lock button must be pressed simultaneously with the trigger to activate the weed wacker, preventing accidental starts.
- To start the weed wacker, first hold down the botón de bloqueo de seguridad (located on the top of the handle).
- While holding the safety lock button, press the interruptor de gatillo. The motor will start, and the blade will begin to rotate.
- To stop the weed wacker, release the switch trigger. The safety lock button will automatically reset.
6.2 Consejos generales de funcionamiento
- Mantenga un agarre firme en ambos mangos durante la operación.
- Mantenga el cabezal de corte paralelo al suelo para lograr un corte uniforme.
- Move the weed wacker in a sweeping motion, cutting small amounts of material at a time.
- Avoid hitting hard objects like rocks, fences, or concrete, as this can damage the blade and motor.
- Utilize the anti-collision bar to protect delicate plants and avoid contact with hard surfaces.
- For optimal performance, especially with thicker weeds or small branches, use the metal or circular saw blades.
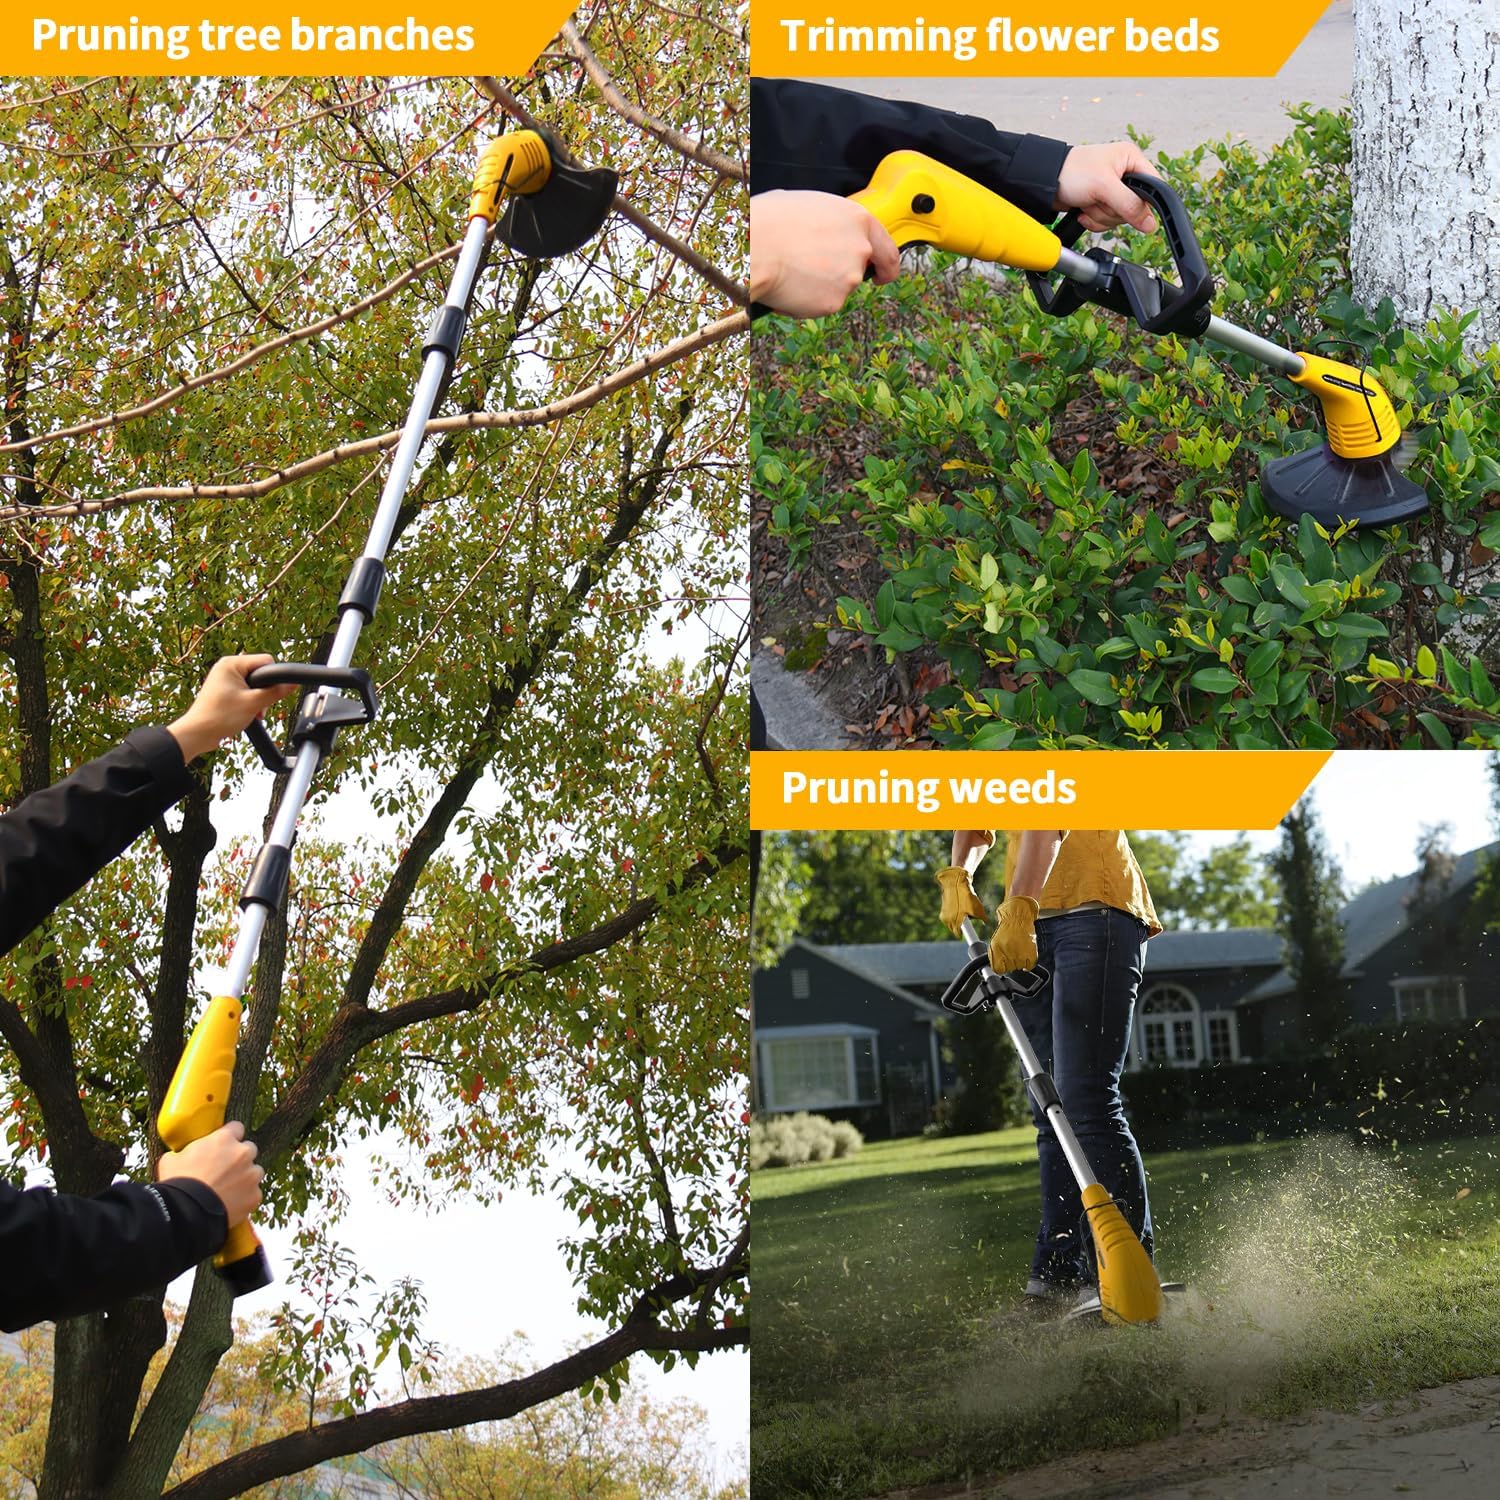
Imagen 6.2.1: Examples of the weed wacker in use: pruning tree branches (top left), trimming flower beds (top right), and pruning weeds (bottom right). This illustrates its versatility for various garden tasks.

Imagen 6.2.2: Highlights the key operational benefits: lightweight design for easy handling, low noise output for quieter operation, and cordless functionality for unrestricted movement.
7. Mantenimiento
Regular maintenance ensures the longevity and optimal performance of your Aokia Cordless Weed Wacker.
- Limpieza: After each use, power off the device and remove the battery. Use a dry cloth or soft brush to clean grass clippings and debris from the cutting head, guard, and motor housing. Do not use water or harsh chemicals.
- Inspección de la hoja: Regularly inspect blades for sharpness, damage, or wear. Replace dull or damaged blades immediately to maintain cutting efficiency and safety. Refer to Section 4.2 for blade installation.
- Cuidado de la batería: Guarde las baterías en un lugar fresco y seco. No las guarde completamente descargadas durante períodos prolongados. Recárguelas periódicamente si no las usa.
- Almacenamiento: Store the weed wacker in a dry, secure location, away from direct sunlight, moisture, and extreme temperatures. Ensure it is out of reach of children and pets.
8. Solución de problemas
This section addresses common issues you might encounter with your Aokia Cordless Weed Wacker.
| Problema | Posible causa | Solución |
|---|---|---|
| Weed wacker does not start. | Batería no cargada o instalada incorrectamente. El seguro no está activado. | Ensure battery is fully charged and correctly inserted. Press the safety lock button before pressing the trigger. |
| Bajo rendimiento de corte. | Dull, damaged, or incorrect blade type. Excessive material being cut. | Replace blades if dull or damaged. Ensure you are using the appropriate blade for the task (metal for general, circular for tougher). Cut smaller sections. |
| La duración de la batería es corta. | Battery not fully charged. Old or worn-out battery. Heavy-duty use. | Asegúrese de que la batería esté completamente cargada antes de usarla. Considere comprarasing a spare battery for extended operation. If battery is old, it may need replacement. |
| Black shield/guard loosens during use. | Instalación incorrecta o sujetadores sueltos. | Power off and remove battery. Re-tighten all fasteners securing the shield/guard. Ensure it is installed according to assembly instructions. |
9. Especificaciones
| Característica | Detalle |
|---|---|
| Marca | Aokia |
| Modelo | B0D54635LP |
| Fuente de poder | Funciona con pilas |
| Tipo de batería | Iones de litio de 12 V (2000 mAh) |
| Peso del artículo | 4.3 libras (aprox. 1.95 kg) |
| Ancho de corte | 5.9 pulgadas (aprox. 15 cm) |
| Dimensiones del producto | 70"L x 5.8"W (adjustable length) |
| Velocidad | Hasta 10,000 RPM |
| Requiere ensamblaje | Sí |
10. Garantía y atención al cliente
Your Aokia Cordless Weed Wacker comes with a garantía de un año a partir de la fecha de compra.
If you encounter any issues with the battery, machine, blades, or other accessories, please contact Aokia customer support. We are committed to resolving issues promptly and providing free replacements for covered defects.
For support, please refer to the contact information provided with your purchase or visit the official Aokia websitio.